Introduction
Snickerdoodle cookies have long been a cherished treat, celebrated for their soft, chewy texture and delightful dusting of cinnamon sugar. These classic cookies are a staple in many households, often evoking warm memories of baking with loved ones or enjoying a sweet snack after school. Their simple yet delectable flavor profile makes them a favorite among cookie enthusiasts of all ages.
In a delightful twist on this beloved classic, we introduce the Snickerdoodle Dream Ice Cream Sandwiches, a decadent dessert that elevates the traditional cookie to new heights. Imagine soft, warm Snickerdoodle cookies cradling a generous scoop of creamy ice cream, creating a blissful contrast between the comforting warmth of freshly baked cookies and the refreshing chill of ice cream. This combination is not only a treat for the taste buds but also an experience to savor, making it a perfect dessert for summer gatherings, birthday parties, or simply as a sweet indulgence on a cozy evening.
What makes these ice cream sandwiches truly special is the ability to customize them to suit your personal taste. Whether you prefer classic vanilla ice cream, rich chocolate, or a fruity sorbet, the options are endless. With a few simple ingredients and some creative flair, you can craft the ultimate Snickerdoodle Dream Ice Cream Sandwich that will impress your family and friends.
Understanding Snickerdoodle Cookies
Before diving into the delicious world of Snickerdoodle Dream Ice Cream Sandwiches, it’s essential to appreciate the history and unique characteristics of the Snickerdoodle cookie itself. The origins of Snickerdoodles are somewhat mysterious, but they are believed to have roots in the New England region of the United States, dating back to the late 19th century. Some theories suggest that the name is derived from a German term for a cookie, while others attribute it to a whimsical combination of words.
What sets Snickerdoodles apart from other cookies is their signature flavor and texture. These cookies are typically made with a base of all-purpose flour, sugar, and butter, combined with a distinctive ingredient: cream of tartar. This key ingredient not only provides the cookies with their characteristic tangy flavor but also contributes to their soft and chewy texture. The addition of cinnamon sugar on the outside creates a delightful sweetness and a warm, cozy aroma that is instantly recognizable.
In the dessert culture, Snickerdoodles hold a special place. They evoke feelings of nostalgia and comfort, reminding many of family gatherings and holiday celebrations. Whether enjoyed on their own or as part of a creative dessert like the Snickerdoodle Dream Ice Cream Sandwiches, these cookies continue to be a beloved choice for dessert lovers everywhere.
Ingredients Breakdown
As we embark on creating Snickerdoodle Dream Ice Cream Sandwiches, it’s important to understand the role each ingredient plays in achieving the perfect cookie. Here’s a detailed look at what you’ll need for the Snickerdoodle cookies:
All-Purpose Flour
All-purpose flour is the foundation of the Snickerdoodle cookie dough. It provides structure and stability, ensuring that the cookies hold their shape while baking. The protein content in all-purpose flour strikes a perfect balance, allowing the cookies to be soft and chewy without becoming too dense.
Cream of Tartar
Cream of tartar is a crucial ingredient in Snickerdoodles, giving these cookies their unique flavor and texture. This acidic compound interacts with baking soda to create a leavening effect, resulting in a light and fluffy cookie. Additionally, it contributes a slight tanginess that enhances the overall taste. For those wondering if cream of tartar is essential, the answer is a resounding yes; omitting it will alter the cookies’ characteristic flavor and texture.
Sugars: Granulated vs. Brown Sugar
The combination of granulated sugar and brown sugar in the cookie dough creates a perfect balance of sweetness and moisture. Granulated sugar provides the necessary sweetness, while brown sugar, which contains molasses, adds moisture and a rich depth of flavor. This combination results in cookies that are not only sweet but also have a hint of caramel undertones, making them irresistible.
Eggs and Vanilla Extract
Eggs play a vital role in binding the ingredients together and providing moisture. They also contribute to the cookies’ texture, ensuring they remain soft and chewy. Vanilla extract adds a warm, aromatic flavor that complements the cinnamon and sugar, elevating the overall taste of the Snickerdoodle cookies.
Ice Cream Filling Options
Once the cookies are baked to perfection, it’s time to think about the ice cream filling. The beauty of Snickerdoodle Dream Ice Cream Sandwiches lies in the versatility of the ice cream you can choose. Classic options like vanilla or chocolate are always a hit, but why not get creative? Consider flavors like salted caramel, cinnamon, or even a fruity sorbet for a refreshing twist.
Optional Add-Ins
For those looking to take their Snickerdoodle Dream Ice Cream Sandwiches to the next level, consider adding mix-ins like chopped pecans or chocolate chips to the cookie dough. These add-ins not only enhance the flavor but also provide a delightful crunch that contrasts beautifully with the smoothness of the ice cream.
Step-by-Step Instructions
Now that we have a solid understanding of the ingredients, let’s prepare to create these delightful Snickerdoodle Dream Ice Cream Sandwiches.
Prepping the Kitchen
Before diving into the baking process, it’s important to prepare your kitchen for success. Start by gathering all the necessary ingredients and kitchen equipment. You’ll need mixing bowls, measuring cups and spoons, a baking sheet, parchment paper, and an oven preheated to 350°F (175°C). Having everything organized and ready to go will make the process smoother and more enjoyable.
Detailed Walkthrough of Each Step
1. Mix the Dry Ingredients: In a medium bowl, whisk together the all-purpose flour, cream of tartar, baking soda, and salt. This ensures that the leavening agents are evenly distributed throughout the flour.
2. Cream the Butter and Sugars: In a large mixing bowl, use an electric mixer to cream together the softened butter, granulated sugar, and brown sugar until the mixture is light and fluffy. This step is critical, as it incorporates air into the dough, resulting in a lighter cookie.
3. Add the Eggs and Vanilla: Beat in the eggs, one at a time, ensuring that each egg is fully incorporated before adding the next. Then mix in the vanilla extract. The batter should be smooth and creamy at this point.
4. Combine Wet and Dry Ingredients: Gradually add the dry ingredient mixture to the wet ingredients, mixing until just combined. Be careful not to overmix, as this can lead to tough cookies.
5. Prepare the Cinnamon Sugar: In a small bowl, combine granulated sugar and ground cinnamon. This will be used to coat the cookie dough before baking, adding that signature Snickerdoodle flavor and texture.
6. Form the Cookies: Using a cookie scoop or tablespoon, portion out the dough and roll it into balls. Then, roll each ball in the cinnamon sugar mixture until fully coated.
7. Bake the Cookies: Place the coated dough balls on a parchment-lined baking sheet, spacing them about 2 inches apart. Bake in the preheated oven for 8-10 minutes, or until the edges are set but the centers are still soft.
8. Cool the Cookies: Allow the cookies to cool on the baking sheet for a few minutes before transferring them to a wire rack to cool completely. This step is crucial, as it allows the cookies to firm up and develop their chewy texture.
After your Snickerdoodle cookies have cooled completely, they are ready to be transformed into irresistible ice cream sandwiches. The combination of flavors and textures will undoubtedly delight anyone fortunate enough to indulge in this delicious treat. Keep an eye out for the next part of this article, where we will dive deeper into assembling your Snickerdoodle Dream Ice Cream Sandwiches and explore more tips for perfecting this delightful dessert.
Preheating the Oven and Preparing Baking Sheets
Before diving into the magic of Snickerdoodle Dream Ice Cream Sandwiches, it’s essential to set the stage right by preheating your oven. Start by preheating your oven to 350°F (175°C). This temperature is ideal for baking the perfect snickerdoodle cookies, ensuring they turn out soft and chewy with a slightly crisp edge.
While the oven is warming up, prepare your baking sheets. Line two baking sheets with parchment paper or silicone baking mats. This not only prevents the cookies from sticking but also aids in achieving an even bake. If you don’t have parchment paper, lightly greasing the baking sheets with butter or non-stick spray is another excellent option. Remember, the preparation of your baking sheets is a crucial step that contributes to the overall success of your cookies.
Mixing Dry vs. Wet Ingredients: Why This Matters
Understanding the separation of dry and wet ingredients is key to achieving the perfect texture in your Snickerdoodles. Begin by combining your dry ingredients—flour, cream of tartar, baking soda, and salt—in a medium bowl. Whisk them together to ensure they are evenly distributed. This step is vital because it helps prevent clumping and ensures that the leavening agents are uniformly mixed throughout the flour.
In a separate bowl, cream together your softened butter, granulated sugar, and brown sugar. Creaming these ingredients together helps to incorporate air into the mixture, creating a light and fluffy texture which is essential for soft cookies. By separating the mixing of dry and wet ingredients, you ensure a consistent dough that bakes evenly.
Creaming Butter and Sugars: Best Practices for Achieving the Right Texture
The creaming process is crucial in cookie-making, and it’s where the magic begins. Use an electric mixer on medium speed to beat the butter and sugars together until the mixture is light and fluffy—this usually takes about 2-3 minutes. The sugars should dissolve into the butter, and the mixture should appear pale in color.
If you’re using cold butter, it’s advisable to let it sit at room temperature for about 30 minutes before creaming. This will make it easier to blend and prevent lumps in your batter. Additionally, scraping down the sides of the bowl halfway through the mixing process ensures that all ingredients are evenly combined.
Rolling Dough and Dusting with Cinnamon Sugar: Tips for Even Coverage
Once your dough is ready, it’s time to shape the cookies. Start by using a small cookie scoop or tablespoon to portion out the dough. Roll each piece into a ball between your palms. For the signature snickerdoodle flavor, prepare a mixture of granulated sugar and cinnamon in a small bowl.
Roll each dough ball in the cinnamon-sugar mixture until fully coated. This not only enhances the flavor but also creates a beautiful crust on the cookies as they bake. For even coverage, take care to roll the dough gently to avoid flattening it. Make sure each cookie is adequately coated, as this will contribute to the delightful spiced flavor that defines snickerdoodles.
Baking Tips: Recognizing When the Cookies Are Done
When baking your cookies, space them about 2 inches apart on the prepared baking sheets to allow for spreading. Bake the cookies in your preheated oven for 10-12 minutes, or until the edges are set while the centers appear slightly underbaked. They will continue to firm up as they cool, resulting in a soft and chewy texture.
Keep an eye on the cookies, as oven temperatures can vary. The key to perfect cookies is to remove them from the oven when they are just beginning to turn golden around the edges. Allow them to cool on the baking sheet for about 5 minutes before transferring them to a wire rack to cool completely.
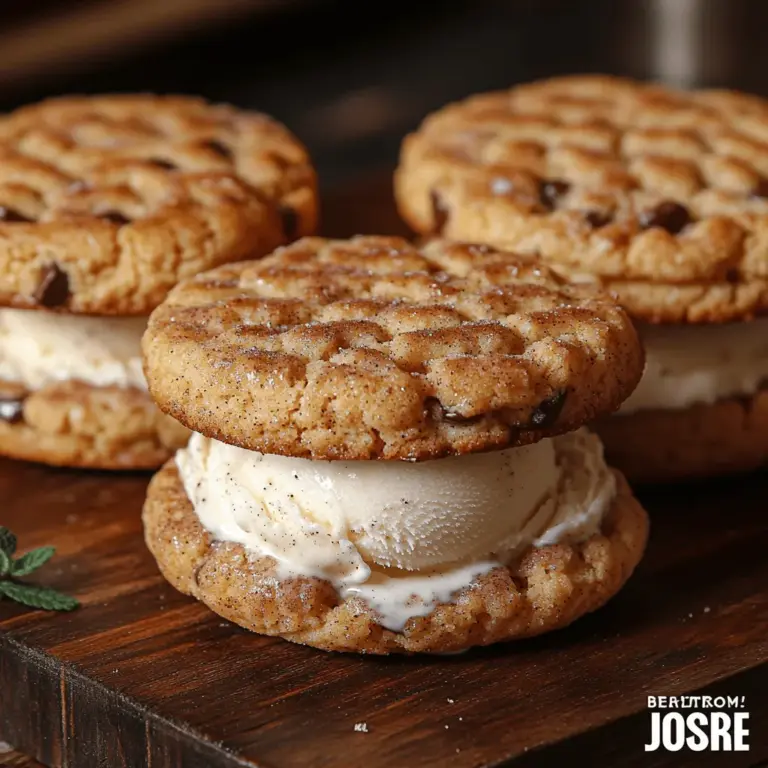
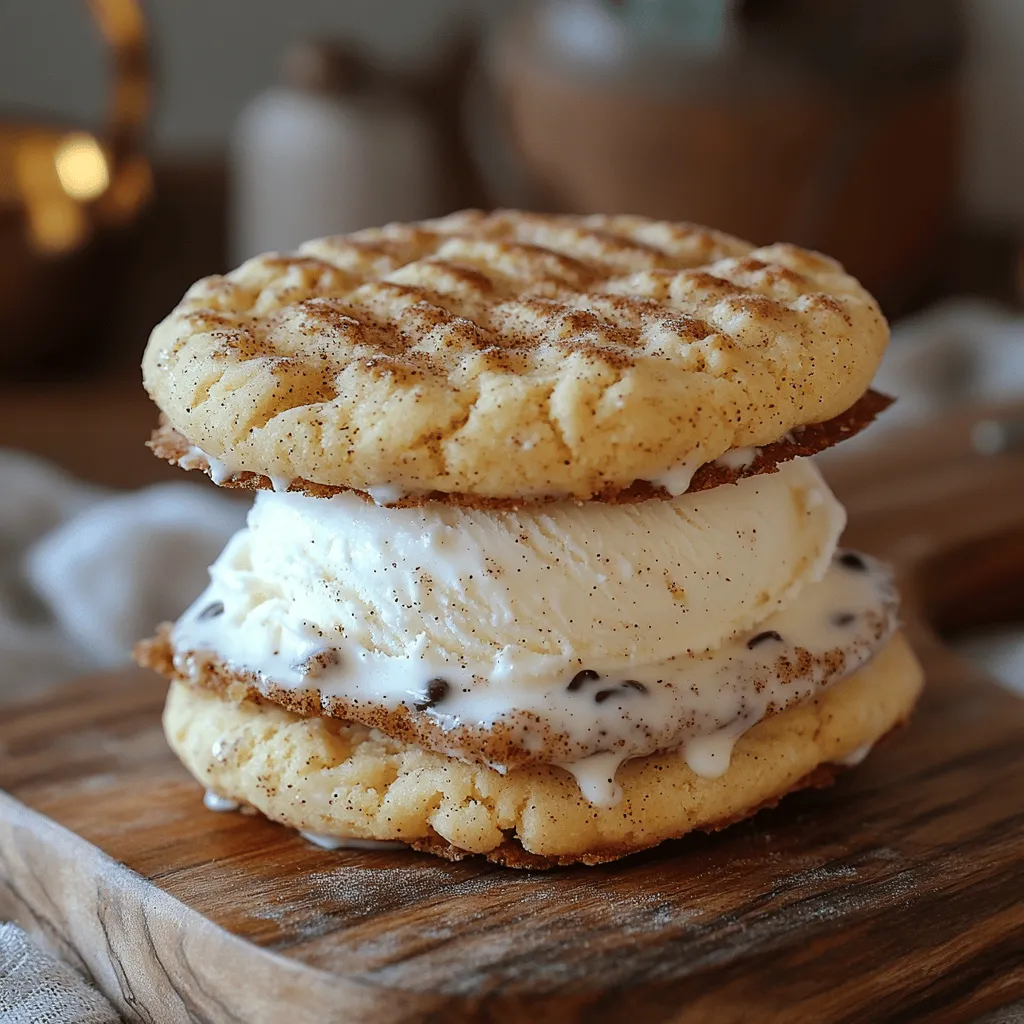
Assembling the Ice Cream Sandwiches
Once your cookies have cooled completely, it’s time to assemble your Snickerdoodle Dream Ice Cream Sandwiches. Allowing the cookies to cool adequately is crucial for preventing the ice cream from melting too quickly upon assembly. Ideally, wait about 30-60 minutes after baking for them to reach room temperature.
When it comes to the ice cream, choose your favorite flavor—vanilla, cinnamon, or even a rich chocolate will work beautifully. To scoop the ice cream, use a large ice cream scoop or a sturdy spoon, making sure to create generous portions. Place a scoop of ice cream on the flat side of one cookie, and gently press another cookie on top to form a sandwich.
Techniques for Scooping and Spreading Ice Cream
For a more uniform ice cream layer, you can also soften the ice cream slightly before scooping. Leave it out at room temperature for about 5-10 minutes to make it easier to spread. This technique not only makes it easier to work with but also allows you to achieve a smooth, even layer of ice cream in each sandwich.
Aim for about 1/2 inch of ice cream between the cookies for a perfect balance of cookie and ice cream. This thickness provides the perfect bite without overwhelming the taste of the snickerdoodles.
Suggestions for Presentation and Serving
Presentation is key when serving these delicious treats. For a festive touch, consider rolling the edges of the ice cream sandwich in sprinkles or crushed nuts. This adds a colorful pop and an extra layer of texture to each bite.
Serve your Snickerdoodle Dream Ice Cream Sandwiches on a platter, perhaps garnished with a sprinkle of cinnamon or a drizzle of warm caramel sauce for an indulgent touch. For a fun, interactive experience, set up a DIY ice cream sandwich bar where guests can assemble their own sandwiches with various toppings and ice cream flavors.
Freezing and Storing Your Sandwiches
After assembling your ice cream sandwiches, it’s essential to freeze them to maintain their structure and ensure the best texture. Place the sandwiches on a baking sheet and freeze them for at least 1-2 hours. This time allows the ice cream to firm up, making them easier to handle when serving.
For longer storage, wrap each sandwich individually in plastic wrap or place them in an airtight container with parchment paper in between layers to prevent sticking. Proper storage keeps your Snickerdoodle Dream Ice Cream Sandwiches fresh and delicious for up to two weeks in the freezer.
Tips for Keeping Them Fresh and Delicious
To retain the best texture and flavor, make sure your ice cream is tightly sealed in its container when not in use. If you notice any frost or ice crystals, it may be time to replace the ice cream for optimal taste. Also, avoid leaving the sandwiches out at room temperature for too long to prevent the cookies from becoming soggy.
The Experience of Enjoying Snickerdoodle Ice Cream Sandwiches
There’s something magical about the first bite of a Snickerdoodle Ice Cream Sandwich. The soft, chewy cookies combined with the creamy ice cream create a delightful contrast of textures and flavors. As you sink your teeth into the sandwich, the cinnamon-sugar coating on the cookies brings a nostalgic warmth that perfectly complements the coolness of the ice cream.
These sandwiches are versatile desserts that are perfect for numerous occasions. Whether you’re hosting a family gathering, throwing a summer barbecue, or simply looking to satisfy your sweet tooth, Snickerdoodle Dream Ice Cream Sandwiches are sure to impress. They can also be a hit at birthday parties, where guests can customize their sandwiches with different ice cream flavors and toppings.
Encouragement to Personalize the Recipe
The beauty of this recipe lies in its versatility. Feel free to experiment with different ice cream flavors, such as salted caramel, cookies and cream, or even fruity options like strawberry or mango for a twist. You can also add mix-ins to the ice cream, like chocolate chips or crushed candy bars, to create unique flavor combinations that cater to your taste.
Conclusion
Creating Snickerdoodle Dream Ice Cream Sandwiches is not just about dessert; it’s about crafting an experience filled with joy and nostalgia. The combination of soft, cinnamon-spiced cookies with creamy ice cream offers a delightful treat that brings a sense of comfort and happiness.
As you embark on this culinary adventure, remember that the joy of making these sandwiches lies in the love and creativity you pour into them. Whether you’re enjoying them alone or sharing them with loved ones, these ice cream sandwiches are a perfect blend of nostalgia and innovation. So gather your ingredients, roll up your sleeves, and prepare to indulge in a delightful treat that will surely become a favorite in your home.
