Introduction
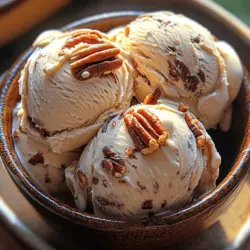
There’s something undeniably magical about homemade ice cream. The creamy texture, the rich flavors, and the satisfaction of crafting a treat from scratch all contribute to its allure. Among the myriad of flavors available, Buttered Pecan Bliss Ice Cream stands out as a rich and indulgent choice. This delightful dessert marries the warmth of buttery pecans with a luxurious cream base, creating a symphony of taste that dances on the palate.
What sets Buttered Pecan Bliss Ice Cream apart is its unique combination of flavors. The nuttiness of toasted pecans beautifully complements the sweet creaminess of the base, while the buttery notes provide a comforting depth. Whether you serve it in a cone, a bowl, or as a topping for your favorite dessert, this ice cream offers a luscious experience that elevates any occasion.
The Appeal of Homemade Ice Cream
Making ice cream at home comes with a plethora of benefits that may not be evident at first glance. For one, there’s a sense of pride and accomplishment that comes with creating something from scratch. The process can be therapeutic, allowing you to unwind as you mix, churn, and freeze your ingredients into a delightful treat. Unlike store-bought options that often contain preservatives and artificial flavors, homemade ice cream allows you to control every aspect of the recipe, ensuring that each scoop is made with love and care.
Additionally, the customization available in homemade ice cream is unparalleled. You have the freedom to experiment with flavors, mix-ins, and sweetness levels according to your preferences. Want a richer buttery flavor? You can add more butter. Prefer a sweeter finish? Adjust the sugar content to your liking. This flexibility means that every batch can be tailored to suit your taste buds, making every scoop a personalized delight.
When comparing homemade ice cream to its store-bought counterparts, the differences become stark. Homemade ice cream typically boasts a fresher taste and a creamier texture, as it often contains fewer air bubbles and no stabilizers. The result is a dessert that melts beautifully in your mouth, allowing the flavors to shine through in a way that mass-produced varieties simply cannot match.
Understanding the Ingredients
Creating the perfect Buttered Pecan Bliss Ice Cream starts with understanding the key ingredients that contribute to its delightful flavor and texture. Each component plays a vital role in the overall experience of the ice cream, and knowing their functions can elevate your homemade creation to new heights.
Pecans
Pecans are the star of our Buttered Pecan Bliss Ice Cream, providing both texture and flavor. These nuts are rich in healthy fats, protein, and fiber, making them not only delicious but also nutritious. Their unique, buttery flavor enhances the overall richness of the ice cream. When toasted, pecans develop a deeper, more complex flavor profile, contributing to the dessert’s luxurious taste. Toasting also helps to release the natural oils in the nuts, giving them a crunch that perfectly contrasts the creamy base.
Unsalted Butter
The use of unsalted butter is essential in this recipe, as it enhances the flavor without adding extra saltiness. Butter contributes a rich, creamy quality to the ice cream, making it indulgent and satisfying. The fat content in butter also helps to create a velvety texture, which is crucial for achieving that perfect scoopable ice cream consistency. When melted and mixed with the pecans, it forms a delectable caramel-like sauce that coats the nuts, infusing the ice cream with its rich flavor.
Brown Sugar vs. Granulated Sugar
In this recipe, we’ll be using both brown sugar and granulated sugar to achieve a balanced sweetness. Brown sugar contains molasses, which adds a hint of moisture and a deeper flavor, enhancing the overall richness of the ice cream. On the other hand, granulated sugar provides a clean sweetness that helps to balance the flavors. The combination of these sugars results in a nuanced sweetness that complements the nuttiness of the pecans and the creaminess of the custard base.
Heavy Cream and Whole Milk
To achieve a luxuriously creamy texture, heavy cream and whole milk are essential components of this ice cream. Heavy cream, with its higher fat content, contributes to the smooth, rich mouthfeel that makes ice cream so indulgent. Whole milk adds a slight lightness while still providing creaminess. The combination of these two dairy products ensures that the ice cream is not only rich but also has a lovely, soft texture that melts beautifully in your mouth.
Vanilla Extract
Vanilla extract is often referred to as the backbone of ice cream flavors, and for good reason. It adds depth and complexity, rounding out the sweetness and enhancing the overall taste of the Buttered Pecan Bliss Ice Cream. Using high-quality vanilla extract will elevate your ice cream, infusing it with a warm, aromatic quality that pairs perfectly with the nuttiness of the pecans.
Sea Salt
While it may seem counterintuitive to add salt to a dessert, a pinch of sea salt plays a crucial role in balancing the sweetness of the ice cream. Salt enhances flavors and can make the sweetness taste more pronounced without overwhelming the palate. In our recipe, the sea salt helps to highlight the buttery notes and the richness of the pecans, creating a more well-rounded flavor profile.
Egg Yolks
Egg yolks are integral to creating the rich custard base that forms the foundation of our ice cream. They contain emulsifiers that help to create a smooth, creamy texture while also contributing to the flavor. The custard-making process involves carefully whisking the egg yolks with sugar, then gradually introducing heat to cook the mixture without curdling. This creates a velvety base that is essential for achieving the luxurious mouthfeel characteristic of high-quality ice cream.
Step-by-Step Preparation Process
Now that we’ve covered the key ingredients, let’s dive into the step-by-step preparation process for creating your Buttered Pecan Bliss Ice Cream. This method involves a few essential steps, each crucial for achieving the best flavor and texture.
Toasting the Pecans
Toasting the pecans is a vital first step that enhances their flavor and adds a delightful crunch to the ice cream. Begin by preheating your oven to 350°F (175°C). Spread the pecans evenly on a baking sheet and toast them in the oven for about 8-10 minutes, or until they are golden and fragrant. Keep a close eye on them, as nuts can go from perfectly toasted to burnt in a matter of moments.
Once toasted, remove the pecans from the oven and allow them to cool slightly. For an added layer of flavor, consider drizzling the warm nuts with a bit of melted unsalted butter and a sprinkle of sea salt. This will give them an extra buttery flavor and ensure that they are perfectly seasoned, enhancing the overall taste of your ice cream.
Crafting the Custard Base
The custard base is where the magic happens, transforming your ingredients into a creamy, rich mixture that will become the foundation of your ice cream. Begin by in a medium saucepan over low heat, combine the heavy cream, whole milk, and half of the sugar. Heat the mixture gently, stirring occasionally, until it’s warm but not boiling.
In a separate bowl, whisk the egg yolks with the remaining sugar until the mixture is pale and slightly thickened. This step is crucial, as it helps to aerate the yolks and prepare them for the cooking process. Once the cream mixture is warm, it’s time to temper the egg yolks. This process involves gradually introducing the warm cream into the egg yolks to prevent them from curdling.
Using a ladle, slowly pour a small amount of the warm cream mixture into the egg yolks while whisking constantly. This will raise the temperature of the yolks without cooking them. Once you’ve added about half of the cream, you can pour the yolk mixture back into the saucepan with the remaining cream, continuing to whisk constantly.
Return the saucepan to low heat, and cook the custard mixture, stirring constantly until it thickens enough to coat the back of a spoon. This step requires patience and attention, as overheating can cause the mixture to curdle. Use a thermometer if you have one; you want the custard to reach about 170°F (77°C).
Once thickened, remove the saucepan from the heat and stir in the vanilla extract and a pinch of sea salt. Allow the mixture to cool to room temperature, then refrigerate it until chilled. This cooling step is essential for achieving the right texture when you churn the ice cream.
As you prepare your Buttered Pecan Bliss Ice Cream, remember that the careful combination of high-quality ingredients and precise techniques will lead to a truly indulgent treat. With the right approach, you can create a delicious ice cream that rivals any premium shop-bought option. Stay tuned for the next part of the recipe, where we will explore the final steps of churning and freezing your delightful creation!
Tempering Technique: Achieving a Silky Custard
Tempering is a crucial technique in making custard-based ice creams, including our Buttered Pecan Bliss Ice Cream. This method involves gradually raising the temperature of the egg mixture without cooking the eggs too quickly, which could lead to scrambling. To temper, start by whisking the egg yolks in a bowl. While whisking, slowly pour in a small amount of the heated milk mixture. This gradual addition warms the egg yolks gently. Once combined, pour the tempered egg mixture back into the saucepan with the remaining milk mixture. This technique ensures a smooth custard base, which is essential for the creamy texture we desire in our ice cream.
Importance of Gradual Mixing
When creating a custard, the goal is to achieve a silky, creamy texture. Gradual mixing plays a vital role in preventing clumps and ensuring that the custard becomes smooth. If you add the hot milk mixture too quickly to the egg yolks, it can cause the yolks to seize and scramble, resulting in a lumpy texture. By taking your time and mixing slowly, you allow the eggs to adjust to the heat, creating a beautiful custard that will serve as the foundation of our ice cream.
Combining Mixtures for the Perfect Texture
Once the egg yolks have been tempered and combined with the milk mixture, it’s time to cook the custard. The science behind this step lies in the gentle cooking process that thickens the mixture. As the custard heats, the proteins in the egg yolks coagulate, thickening the mixture and creating a luscious base. The key is to cook the custard over medium-low heat, stirring constantly with a spatula or wooden spoon. This not only prevents the custard from sticking to the bottom of the pan but also ensures even cooking.
Cooking the Custard to the Right Consistency
To determine when the custard is ready, you’ll want to cook it until it coats the back of your spatula or spoon. This is often referred to as the “nappe” consistency. To check, dip your spatula into the custard, then run your finger along the back. If the line holds without dripping, your custard is ready to be removed from heat. Cooking the custard to this stage is essential, as it will continue to thicken slightly as it cools, leading to a perfectly creamy ice cream.
Tips for Checking if the Custard is Ready
1. Visual Cues: Look for a change in color; the custard should be pale yellow and slightly thicker than when you began.
2. Temperature Check: If you have a food thermometer, aim for about 170°F (77°C) to ensure the eggs are fully cooked while still being creamy.
3. Texture Test: As previously mentioned, the back of a spoon test is the most reliable way to check for readiness.
Chilling the Custard: A Vital Step
Once your custard is cooked to perfection, it’s time to chill it. Chilling not only stops the cooking process but also enhances the flavor development. The cooling allows the flavors to meld, creating a more robust taste in your ice cream.
Recommended Chilling Time and Methods
For optimal results, transfer the custard to a clean bowl and cover it with plastic wrap, pressing the wrap directly onto the surface of the custard to prevent a skin from forming. Chill in the refrigerator for at least four hours, but overnight is preferable. If you’re short on time, you can also place the bowl in an ice bath to speed up the cooling process.
Churning the Ice Cream: The Fun Part
Now that the custard is chilled and ready, it’s time to churn it into ice cream. Churning is the process of continuously mixing the custard while it freezes, incorporating air and creating a light, airy texture. This is what distinguishes homemade ice cream from store-bought varieties, which often contain stabilizers and additives.
How Churning Incorporates Air
As the custard freezes in your ice cream maker, the churning process incorporates air into the mixture, expanding it and preventing large ice crystals from forming. This results in a smooth, creamy texture that melts beautifully in your mouth. Depending on your ice cream maker, the churning process typically takes about 20 to 30 minutes.
Tips for Adding the Buttered Pecans
For the best distribution of buttered pecans, add them to the ice cream during the last few minutes of churning. This ensures they are evenly mixed throughout the ice cream without becoming too soft or losing their crunch. If you prefer a chunkier texture, reserve some pecans to sprinkle on top after churning.
Freezing for the Perfect Scoop
After churning, your Buttered Pecan Bliss Ice Cream will likely have a soft-serve consistency. To achieve the right firmness for scooping, transfer the ice cream to an airtight container and freeze it for at least four hours. This final freezing step is essential, as it allows the ice cream to firm up and develop its ultimate texture.
Best Practices for Storing Homemade Ice Cream
1. Use Airtight Containers: To avoid freezer burn, store your ice cream in airtight containers or wrap it tightly with plastic wrap.
2. Layer with Parchment Paper: For added protection, place a piece of parchment paper directly on the surface of the ice cream before sealing the container.
3. Store Flat: If space allows, store your container flat in the freezer to maintain even freezing.
Serving Suggestions
Now that your Buttered Pecan Bliss Ice Cream is perfectly chilled and ready to serve, it’s time to indulge. Here are some delightful ideas for serving this creamy treat:
1. Simple Scoops: Serve the ice cream in a bowl or cone for a classic experience.
2. Sundae Style: Create a sundae by layering the ice cream with hot fudge or caramel sauce, topped with whipped cream and additional pecans.
3. Affogato Twist: For a unique dessert, pour a shot of hot espresso over a scoop of ice cream for an indulgent affogato.
4. Ice Cream Sandwiches: Use your favorite cookies to make ice cream sandwiches, adding a fun twist to traditional servings.
5. Presentation Tips: Use clear glass bowls or dessert cups to showcase the creamy texture and crunchy pecans. Garnish with a sprig of mint or a drizzle of caramel for an inviting presentation.
Flavor Variations and Customizations
One of the joys of making ice cream at home is the ability to customize flavors to suit your taste. Here are some suggestions for modifying the Buttered Pecan Bliss Ice Cream recipe:
1. Chocolate Delight: Swirl in some chocolate fudge during churning for a rich chocolate-pecan combination.
2. Nutty Variations: Experiment with different nuts, such as walnuts or almonds, for a unique twist on the classic recipe.
3. Dairy-Free Option: Substitute the heavy cream and milk with coconut cream and almond milk for a delicious dairy-free version.
4. Lower Sugar Version: Use a sugar substitute like stevia or monk fruit sweetener to create a lower-sugar ice cream that retains great flavor.
Conclusion
Creating your own Buttered Pecan Bliss Ice Cream is not just about the final product, but also about the joy of crafting something delicious from scratch. Each step, from tempering the egg yolks to churning the custard, contributes to a delightful experience that results in a creamy and nutty dessert that’s perfect for any occasion.
We encourage you to try this recipe and explore the world of homemade ice cream. The satisfaction of serving a rich, decadent treat, made with your own hands, is unparalleled. So gather your ingredients and embark on this flavorful journey—your taste buds will thank you!