Cloud eggs blue cheese bacon
 Save
Save
It was a crisp Saturday morning in early spring, the kind where the sun sneaks in through the kitchen window just enough to turn the countertop into a warm, golden stage. I remember the moment I cracked the first egg for this recipe, hearing that satisfying “pop” as the shell gave way, and a faint, buttery scent rose instantly, promising something airy and indulgent. The idea of cloud eggs—those fluffy, pillow‑like whites crowned with a golden yolk—had always fascinated me, but it wasn’t until I tossed in tangy blue cheese and smoky bacon that the dish truly earned its place at my family brunch table. As the bacon sizzled, releasing a perfume that mingled with the earthy sharpness of the cheese, I felt a rush of excitement, knowing we were about to create something both comforting and a little bit daring. But wait—there’s a secret step later on that will take the texture from merely light to ethereally cloud‑like, and you won’t want to miss it.
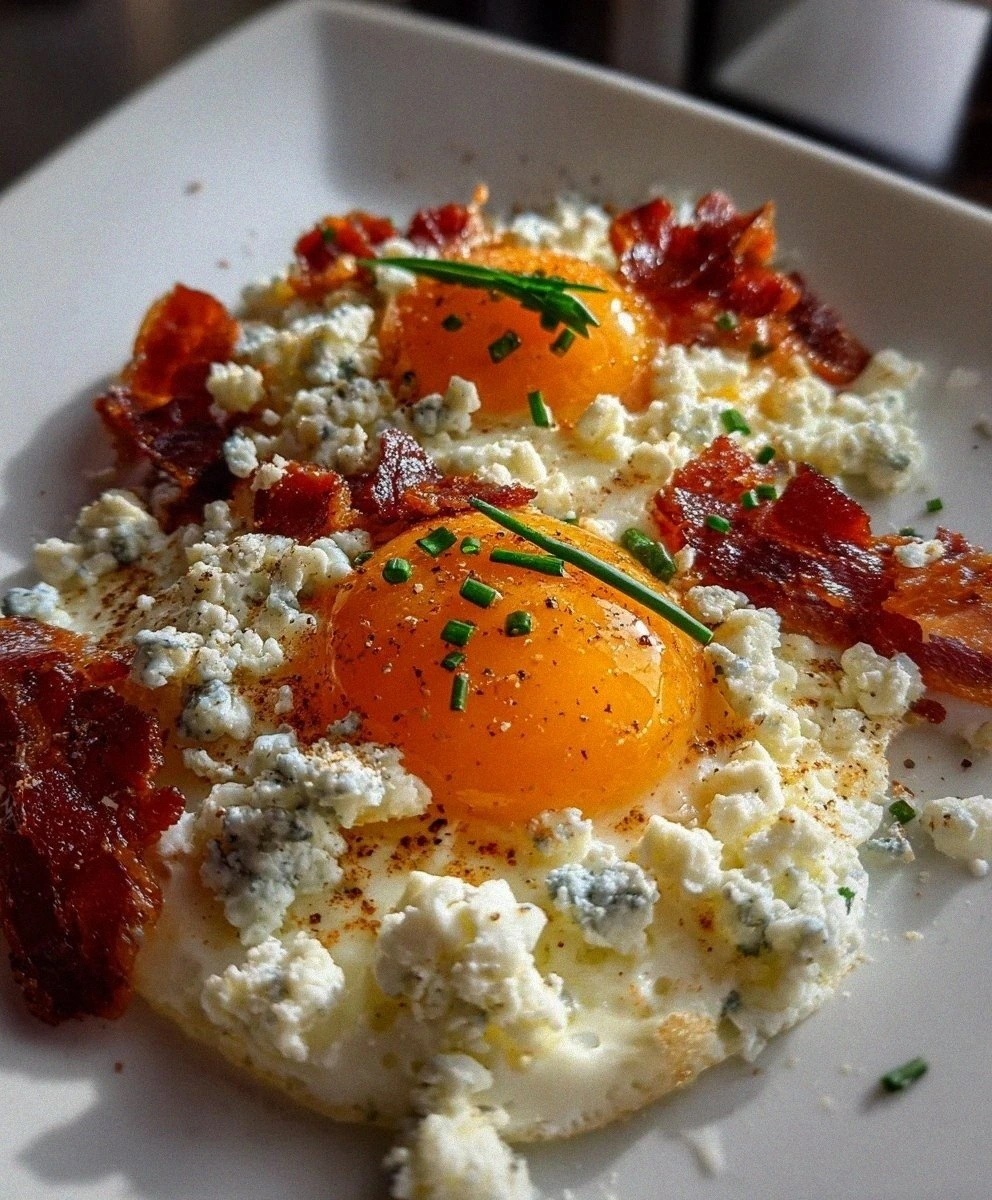
Imagine serving a plate where the whites have risen like a soft cumulus, the yolk sits like a sunrise, and the crumbled blue cheese adds a burst of creamy tang that makes your taste buds do a little dance. The crispy bacon pieces, scattered on top, give a satisfying crunch that contrasts beautifully with the silkiness of the egg cloud, while a pinch of fresh black pepper adds a whisper of heat that lingers just enough to keep you reaching for another bite. This isn’t just a breakfast; it’s a celebration of textures—airy, creamy, crunchy, and velvety—all in one harmonious bite. Have you ever wondered why a dish that looks so simple can feel so luxurious? The answer lies in the balance of flavors and the precise technique that turns ordinary ingredients into a show‑stopping centerpiece.
What makes this recipe truly special is its versatility. Whether you’re feeding a crowd of hungry teenagers, impressing a brunch‑savvy friend group, or simply treating yourself to a weekend indulgence, the cloud eggs blue cheese bacon can be scaled up or down with ease. The ingredients are pantry‑friendly, yet the result feels restaurant‑grade, and the preparation time fits neatly into a lazy weekend schedule. And here’s the thing: you don’t need any fancy equipment—just a couple of ramekins, a sturdy skillet, and a dash of confidence. The best part? Once you master the cloud‑forming technique, you’ll be able to adapt it to sweet desserts or savory appetizers, turning any meal into a memorable experience.
So, are you ready to whisk, bake, and savor your way to a cloud‑filled breakfast that will have everyone asking for seconds? Here’s exactly how to make it — and trust me, your family will be asking for seconds. Grab your favorite skillet, preheat the oven, and let’s dive into the fluffy, cheesy, bacon‑laden adventure that awaits.
🌟 Why This Recipe Works
- Flavor Depth: The combination of sharp blue cheese, salty bacon, and the subtle richness of the egg yolk creates layers of taste that evolve with each bite, keeping your palate intrigued from start to finish.
- Texture Harmony: Light, airy egg whites contrast with the creamy crumble of cheese and the crisp snap of bacon, delivering a multisensory experience that feels both delicate and hearty.
- Ease of Execution: Despite its impressive appearance, the recipe relies on straightforward techniques—whisking, folding, and brief baking—making it accessible even for novice cooks.
- Time Efficient: With a prep time of just 15 minutes and a total cook time under 45 minutes, you can serve a gourmet‑looking dish without spending hours in the kitchen.
- Versatility: This base can be tweaked with herbs, spices, or alternative cheeses, allowing you to customize the flavor profile to match seasonal produce or personal preferences.
- Nutrition Balance: High‑quality protein from eggs and bacon, plus calcium and probiotics from blue cheese, make this a satisfying meal that fuels both body and mind.
- Crowd‑Pleaser Factor: The visual drama of a cloud‑like egg paired with familiar comfort ingredients ensures it’s a hit at brunch tables, family gatherings, or even a casual weekday breakfast.
🥗 Ingredients Breakdown
The Foundation: Eggs & Air
Large eggs are the undisputed stars of this dish. Their fresh, golden yolks provide the rich, buttery center that anchors the airy whites, while the whites themselves, when whisked properly, transform into a light, almost mousse‑like texture. I always recommend using eggs that are at room temperature; they separate more cleanly and whip up faster, saving you precious minutes. If you’re concerned about cholesterol, you can substitute one whole egg with two egg whites for a lighter version, but the full‑egg experience is what gives the cloud its signature silkiness. The key is to handle the whites gently after they’re whipped, so they retain all that trapped air.
Aromatics & Spices: Pepper & Salt
Freshly ground black pepper adds a subtle heat that awakens the palate without overwhelming the delicate flavors of the egg and cheese. Sea salt, on the other hand, enhances the natural sweetness of the yolk and balances the saltiness of the bacon, ensuring the dish isn’t overly salty. A pinch of each goes a long way, and you’ll find that the seasoning truly shines once the cloud eggs have set and the cheese has melted. If you love a little extra kick, a dash of smoked paprika can add a smoky undertone that mirrors the bacon’s flavor.
The Secret Weapons: Blue Cheese & Bacon
Blue cheese brings a creamy, tangy richness that cuts through the airy whites, creating a luxurious mouthfeel that’s both sharp and comforting. Its crumbly texture also adds little pockets of flavor that burst as you bite. When selecting blue cheese, look for a marble‑veined variety with a buttery consistency; this ensures it melts just enough to blend with the whites without turning grainy. Bacon, whether pork or turkey, provides the essential crunch and smoky depth that elevates the entire dish. I love crisping the bacon until it’s just at the edge of caramelization—this brings out a sweet, nutty flavor that pairs beautifully with the cheese.
Finishing Touches: Chives & Optional Extras
A sprinkle of fresh chives adds a pop of bright green color and a mild oniony note that lifts the richness of the cheese and bacon. If you’re feeling adventurous, a dash of truffle oil or a few drops of hot sauce can turn this brunch staple into a gourmet experience. Remember, the goal is to complement, not overpower, the delicate cloud structure. So add any extra herbs or spices just before serving, allowing the heat of the egg to release their aromas without wilting them. This final garnish is the visual cue that tells your guests, “We’ve put thought into every bite.”
With your ingredients prepped and ready, let's get cooking. Here's where the fun really begins...
🍳 Step-by-Step Instructions
🔐 Expert Tips for Perfect Results
The Taste Test Trick
Before you commit to the final bake, spoon a tiny amount of the whipped white mixture onto a heated skillet and watch it puff up. If it turns a light golden color within 30 seconds, you know the whites have the right amount of air. This quick test saves you from a flat cloud later and gives you confidence that the texture will be airy and light.
Why Resting Time Matters More Than You Think
After whisking, let the egg whites rest for a minute or two. This pause allows the protein strands to relax and re‑align, which improves the stability of the foam. I once rushed straight into folding the cheese and bacon, and the clouds collapsed mid‑bake. A brief rest makes the difference between a fluffy cloud and a dense pancake.
The Seasoning Secret Pros Won’t Tell You
Season the whites lightly with a pinch of sea salt before folding in the cheese. The salt draws out a tiny bit of moisture from the cheese, helping it integrate smoothly without creating watery pockets. This subtle step ensures the cheese melts evenly, creating those delightful pockets of tang without compromising the cloud’s lift.
Crisp Bacon Timing
Cook the bacon just until it’s golden‑brown and slightly curled; over‑cooking can make it too brittle, causing it to shatter when you sprinkle it on the finished clouds. I like to keep the bacon on medium heat, allowing the fat to render slowly, which results in a deep, smoky flavor that pairs perfectly with the mild cheese.
The Final Garnish Glow
A light drizzle of high‑quality olive oil over the finished dish adds a glossy sheen that makes the plate look restaurant‑ready. Add a few micro‑greens or a sprinkle of smoked paprika for an extra visual pop, and you’ll have a dish that’s as photogenic as it is delicious. Trust me on this one: the little touches elevate the entire experience.
🌈 Delicious Variations to Try
One of my favorite things about this recipe is how versatile it is. Here are some twists I've tried and loved:
Mediterranean Sunrise
Swap the blue cheese for crumbled feta, add sun‑dried tomatoes, and garnish with fresh oregano. The tangy feta pairs beautifully with the yolk, while the tomatoes contribute a sweet‑savory burst that transports you straight to a sun‑kissed terrace.
Spicy Southwest
Incorporate diced jalapeños and a pinch of cumin into the white mixture, then top with crispy chorizo instead of bacon. The heat from the peppers and the smoky depth of chorizo turn this brunch into a bold, fiesta‑ready plate.
Herb‑Infused Garden
Fold in finely chopped fresh dill, parsley, and a hint of lemon zest. Finish with a sprinkle of toasted pine nuts for crunch. This herbaceous version feels light and bright, perfect for spring mornings when you want something fresh.
Umami Boost
Replace the bacon with sautéed shiitake mushrooms and a dash of soy sauce, and use a bit of grated Parmesan in place of blue cheese. The mushrooms bring an earthy depth, while the Parmesan adds a nutty saltiness that deepens the overall flavor.
Sweet & Savory Fusion
Add a drizzle of maple syrup over the finished clouds and sprinkle toasted walnuts. The sweet maple balances the salty bacon and sharp cheese, creating a delightful contrast that feels both comforting and adventurous.
📦 Storage & Reheating Tips
Refrigerator Storage
Allow the cloud eggs to cool completely, then store them in an airtight container in the fridge for up to 2 days. Place a piece of parchment paper between each cloud to prevent them from sticking together. When you’re ready to serve, gently reheat in a 300°F (150°C) oven for 5‑7 minutes, or until warmed through.
Freezing Instructions
For longer storage, freeze the baked clouds (without the yolk) on a parchment‑lined tray until solid, then transfer to a zip‑top freezer bag. They’ll keep for up to 1 month. To reheat, bake directly from frozen at 350°F (175°C) for 10‑12 minutes, then add a fresh yolk and finish the final minute of baking.
Reheating Methods
The trick to reheating without drying it out? A splash of water in the pan and a quick cover with foil creates steam, reviving the cloud’s fluffiness. Alternatively, a quick microwave burst (30 seconds) works in a pinch, but the oven method preserves the texture best.
❓ Frequently Asked Questions
Can I use egg substitutes for the whites?
How do I prevent the yolk from breaking when I add it?
Can I substitute another cheese for blue cheese?
Is turkey bacon a good replacement?
What if I want the yolk fully cooked?
Can I add herbs directly into the whipped whites?
How many servings does this recipe make?
Can I make this dish ahead of time for a brunch crowd?
When the whites are set, remove the sheet from the oven and gently place a yolk into each indentation. The residual heat will lightly set the yolk’s surface while keeping the interior luxuriously runny. If you prefer a firmer yolk, return the sheet to the oven for an additional 2‑3 minutes, but be careful not to over‑cook the whites again.
Sprinkle the remaining crumbled bacon, a pinch of freshly ground black pepper, and a light dusting of sea salt over each cloud. For an extra pop of color, add a few chopped chives on top; their fresh, mild onion flavor will brighten every bite. The final visual—golden yolk nestled in a fluffy white cloud, speckled with blue cheese and bacon—looks as impressive as it tastes.
Serve the cloud eggs hot, straight from the oven, with toasted sourdough or a crisp green salad on the side. As you cut into the cloud, watch the yolk ooze gently, mingling with the melted cheese and crisp bacon for a symphony of flavors. Go ahead, take a taste — you’ll know exactly when it’s right. And the result? A brunch masterpiece that will have everyone asking for seconds.