Introduction
In recent years, pumpkin and banana recipes have surged in popularity, especially during the fall season. Both ingredients not only bring warmth and comfort to any dish but also offer a wealth of nutritional benefits. Whether it’s the creamy texture of bananas or the earthy sweetness of pumpkin, combining these two ingredients creates a delectable treat that satisfies cravings without the guilt often associated with traditional desserts.
Using whole ingredients in our recipes has become a growing trend among health-conscious individuals. Whole foods are minimally processed and retain their natural nutrients, providing an array of health benefits that enhance overall well-being. This is particularly true for our Deliciously Healthy Pumpkin Banana Bars, which serve as a nutritious option for snacks or desserts. These bars are packed with wholesome ingredients that not only taste great but also nourish your body.
The Appeal of Pumpkin and Banana Bars
The inclusion of pumpkin in our bars is not just for flavor; it brings a multitude of nutritional benefits. Pumpkins are rich in vitamins A and C, crucial for maintaining healthy skin and a robust immune system. They are also high in fiber, which aids in digestion and promotes a feeling of fullness—making them a low-calorie option that can effectively curb overeating.
Bananas, on the other hand, are known for their impressive potassium content, vital for heart health and maintaining proper muscle function. They also provide vitamin B6, which plays an important role in brain health and mood regulation. Their natural sweetness significantly reduces the need for added sugars, making them an ideal ingredient for creating healthier treats.
When compared to traditional desserts, our pumpkin banana bars stand out as a guilt-free alternative. They are lower in refined sugars and unhealthy fats, allowing you to indulge without compromising your health goals. Instead of empty calories, you’re treating yourself to a nourishing snack that fuels your body and satisfies your sweet tooth.
Key Ingredients Breakdown
Ripe Bananas
The foundation of our Pumpkin Banana Bars begins with ripe bananas, and their importance cannot be overstated. Ripe bananas are sweeter and have a softer texture, which not only adds natural sweetness but also provides moisture to the bars. Nutritionally, bananas are packed with vitamins and minerals, including dietary fiber, which aids in digestion, and antioxidants that combat oxidative stress.
To achieve the perfect balance of flavor and texture, look for bananas that are speckled with brown spots. These bananas are at their peak ripeness, ensuring your bars will be deliciously sweet without the need for additional sugars.
Pumpkin Puree
Next, we turn our attention to pumpkin puree. While canned pumpkin is convenient and widely available, making homemade pumpkin puree can elevate the flavor and freshness of your bars. When selecting pumpkins, opt for sugar pumpkins or pie pumpkins, which are smaller and sweeter than the larger varieties typically used for carving.
If you choose to use canned pumpkin, ensure it’s 100% pure pumpkin and not pumpkin pie filling, which contains added sugars and spices. This ingredient is not only flavorful but also adds moisture and nutrition to your bars, making them both satisfying and healthy.
Natural Sweeteners: Honey vs. Maple Syrup
To sweeten our bars, we can choose between honey and maple syrup. Honey, with its unique flavor profile, offers several health benefits, including antimicrobial properties and antioxidants. However, it’s important to note that honey is not vegan.
For those seeking a vegan alternative, maple syrup is an excellent option. It contains essential minerals such as manganese and zinc, and its rich flavor pairs beautifully with the pumpkin and banana combination. Both sweeteners add depth to the bars while keeping them naturally sweetened and wholesome.
Whole Wheat Flour
When it comes to flour, whole wheat flour is the star ingredient in our recipe. Unlike all-purpose flour, whole wheat flour retains the bran and germ of the wheat grain, providing more fiber, vitamins, and minerals. This leads to increased satiety, helping you feel fuller for longer periods. Whole grains also support digestive health and can reduce the risk of chronic diseases.
Spices: Cinnamon and Nutmeg
To enhance the flavor of our pumpkin banana bars, we incorporate warm spices such as cinnamon and nutmeg. Both spices not only elevate the taste but also come with their own health benefits. Cinnamon is known for its ability to regulate blood sugar levels and has anti-inflammatory properties, while nutmeg possesses antioxidants that can help improve digestion.
These spices not only contribute to the delicious aroma of the bars but also promote wellness, making every bite a moment of indulgence wrapped in health.
Step-by-Step Guide to Making Pumpkin Banana Bars
Prepping Your Baking Dish
Before diving into the mixing bowl, it’s crucial to prepare your baking dish properly. Start by preheating your oven to 350°F (175°C). This temperature is ideal for baking the bars evenly, ensuring they cook through while maintaining a moist and tender texture.
Next, grab an 8×8-inch or 9×9-inch baking pan, depending on your desired thickness. Line the bottom of the pan with parchment paper, allowing some overhang on the sides for easy removal later. This step ensures that your bars won’t stick to the pan and allows for effortless cutting once they’re baked. If you prefer, you can also lightly grease the pan with cooking spray or a small amount of oil, but the parchment paper usually does the trick effectively.
Now that your baking dish is ready, you can move on to the fun part: mixing your ingredients to create these deliciously healthy pumpkin banana bars! Stay tuned for the next section, where we’ll guide you through the entire mixing and baking process.
Importance of Greasing or Using Parchment Paper
Before you dive into the mixing and baking process, it’s essential to prepare your baking pan. Greasing the pan or lining it with parchment paper ensures that your delicious pumpkin banana bars release easily once they are baked. This simple step prevents sticking, which can ruin the presentation of your bars and make cleanup a hassle. If you choose to grease the pan, use a light coating of coconut oil or butter, spreading it evenly across the bottom and sides. Alternatively, lining your pan with parchment paper allows for easy lifting and slicing, ensuring that your bars maintain their shape and texture.
Mixing Wet Ingredients
Once your pan is prepared, it’s time to focus on the wet ingredients. In a large mixing bowl, combine the ripe bananas and pumpkin puree. Make sure your bananas are very ripe for the best flavor and natural sweetness. Use a fork or a potato masher to thoroughly mash the bananas until they are smooth. Next, add in the eggs, maple syrup, vanilla extract, and melted coconut oil. Whisk these ingredients together until they are well combined and smooth. The goal here is to create a cohesive mixture that will provide moisture and flavor to your bars.
Tips for Achieving the Perfect Consistency with Bananas and Pumpkin
To ensure your bars are moist but not overly dense, pay attention to the consistency of your banana and pumpkin mixture. The bananas should be mashed to a smooth puree without any large chunks, while the pumpkin should be free of excess water. If you notice your pumpkin puree is particularly watery, consider draining it lightly using a fine mesh sieve before adding it to the mixture. This will help maintain the right balance of moisture in your bars.
Combining Dry Ingredients
Now that your wet ingredients are beautifully blended, it’s time to tackle the dry ingredients. In a separate bowl, mix together the flour, baking powder, baking soda, cinnamon, nutmeg, and salt. Use a whisk to combine these ingredients thoroughly. This ensures even distribution of the leavening agents and spices, which is crucial for achieving the right texture and flavor in your pumpkin banana bars.
Importance of Sifting and Mixing for Even Distribution
Sifting your dry ingredients can be beneficial, especially with the flour and leavening agents. Sifting helps to aerate the flour and removes any lumps, promoting a uniform texture in the final product. If you skip this step, you risk having pockets of baking powder or baking soda in your bars, which could lead to an uneven rise and flavor.
Techniques for Mixing Wet and Dry Ingredients
When you’re ready to combine the wet and dry mixtures, it’s important to do so gently. Add the dry ingredients to the wet mixture in three parts. Using a spatula, fold the dry ingredients into the wet ingredients until just combined. The key is to mix until you see no more dry flour; overmixing can lead to tough and dense bars, which is not the desired outcome.
How to Avoid Overmixing for Light and Fluffy Bars
To keep your bars light and fluffy, be mindful of your mixing technique. Use a folding motion rather than vigorous stirring. This will help to incorporate the ingredients without activating the gluten in the flour, which can contribute to a denser texture. Remember, a few lumps are okay; it’s better to leave some flour streaks than to overmix.
Adding Optional Ingredients
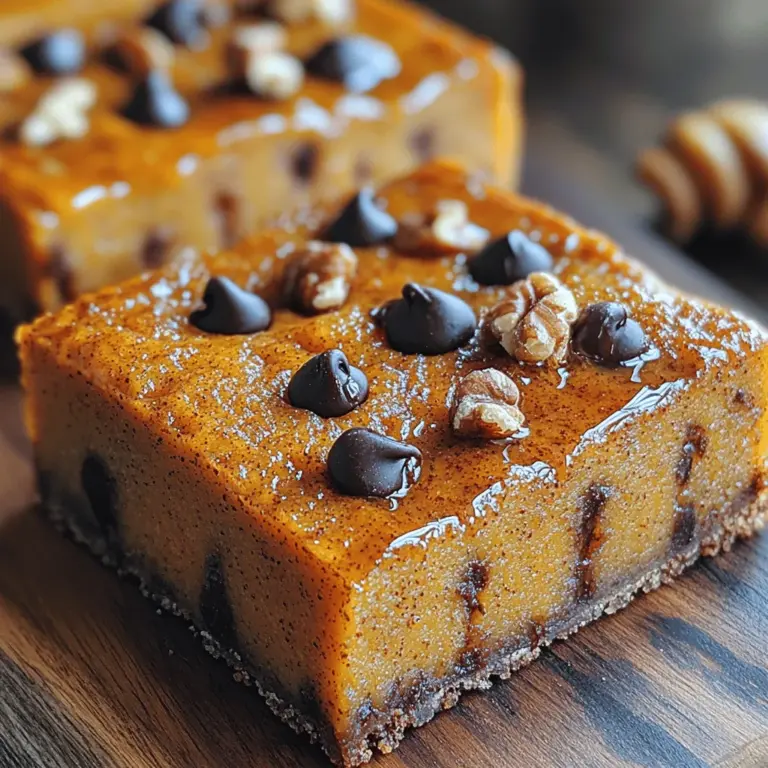
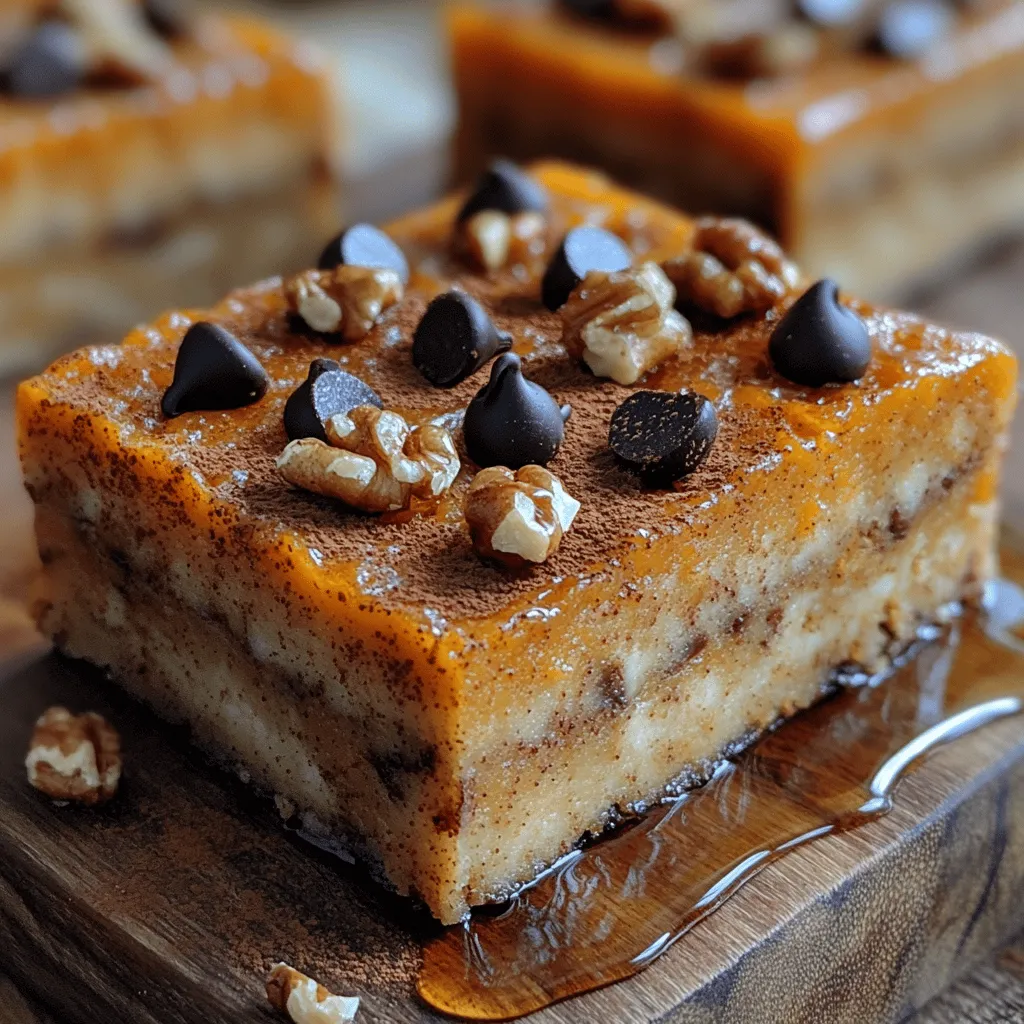
If you want to elevate your pumpkin banana bars further, consider adding optional ingredients such as nuts or chocolate chips. Chopped walnuts or pecans add a delightful crunch and nutty flavor, while dark chocolate chips can introduce a touch of sweetness. Both options enhance the overall flavor profile and texture of the bars.
Benefits of Nuts and Chocolate Chips
Nuts not only provide a satisfying crunch but also add healthy fats and protein, making your bars more filling. Dark chocolate chips, on the other hand, offer antioxidants and can satisfy your sweet tooth without overwhelming the bars with sugar. Choose high-quality chocolate chips with a cocoa content of at least 70% to maximize health benefits while still indulging in a treat.
Suggestions for Other Mix-ins
Feel free to get creative with your mix-ins! Dried fruits like cranberries or cherries can add a chewy texture and a burst of flavor. For a tropical twist, consider adding shredded coconut or chopped pineapple. Spices like ginger or cardamom can also enhance the flavor profile, providing a unique spin on the traditional pumpkin banana bars.
Baking Perfect Pumpkin Banana Bars
Understanding Oven Temperatures
Before placing your prepared mixture into the oven, it’s critical to understand the importance of temperature. Preheat your oven to 350°F (175°C). This temperature is ideal for baking pumpkin banana bars, ensuring they rise properly without burning.
Why Preheating is Crucial for Even Baking
Preheating your oven is a crucial step that many bakers overlook. An oven that isn’t properly preheated can lead to uneven cooking, resulting in a soggy center or burnt edges. Allow your oven to heat fully before placing your bars inside, and avoid opening the oven door during baking, as this can cause temperature fluctuations.
Baking Time and Testing for Doneness
Bake your pumpkin banana bars for approximately 25-30 minutes, or until the top is set and the edges start to pull away from the sides of the pan. To test for doneness, use the toothpick test: insert a toothpick into the center of the bars, and if it comes out clean or with a few moist crumbs, your bars are ready to come out of the oven.
Cooling Tips for Optimal Texture
After removing your pumpkin banana bars from the oven, allow them to cool in the pan for about 10-15 minutes. This cooling period helps the bars firm up, making them easier to slice. Once they are cool enough to handle, transfer them to a wire rack to cool completely. This step is crucial because cutting them too soon can result in crumbly bars.
Why Cooling is Important Before Slicing
Letting your bars cool completely before slicing is vital for achieving the perfect texture. If you slice them while they are still warm, they may fall apart or crumble, affecting the overall presentation. A complete cooling period allows the flavors to settle and ensures the bars hold their shape when cut.
Serving Suggestions and Pairings
These pumpkin banana bars are versatile and can be enjoyed in various ways. Serve them as a healthy breakfast option, perfect for busy mornings on the go. Pair them with a dollop of Greek yogurt for added protein, or spread a layer of almond or peanut butter for a satisfying snack.
Ideas for Serving These Bars
– As a Healthy Breakfast Option: These bars can be a nutritious alternative to traditional breakfast items. Pair them with a piece of fruit, and you have a balanced meal that includes fiber, vitamins, and minerals.
– Pairing with Yogurt or Nut Butter: For an extra boost of flavor and nutrition, serve your bars alongside yogurt or a nut butter of your choice. The creaminess of yogurt complements the moistness of the bars beautifully.
Creative Ways to Enjoy Leftovers
If you have leftovers, don’t worry! Pumpkin banana bars are great for meal prep and can be easily stored. Slice the bars and store them in an airtight container in the refrigerator for up to a week. For a quick snack, pop them in the microwave for a few seconds to warm them up and enjoy fresh out of the oven taste.
Storage Tips and Reheating Suggestions
To maintain freshness, wrap each bar individually in plastic wrap or foil before placing them in an airtight container. This prevents them from drying out. If you want to store them for an extended period, consider freezing them. Just make sure to let them cool completely, then freeze in a single layer before transferring to a freezer-safe bag. When you’re ready to enjoy, thaw them at room temperature or microwave them briefly.
Health Benefits of Pumpkin Banana Bars
These pumpkin banana bars are not only delicious but also a healthy snack option. Low in calories and high in nutrients, they make a perfect alternative to traditional dessert bars laden with sugar and unhealthy fats.
Low-Calorie Snack Option
One of the main health benefits of pumpkin banana bars is that they are low in calories while still being filling. The combination of bananas and pumpkin provides natural sweetness and fiber, helping to keep you satisfied without the guilt.
Nutritional Comparison to Traditional Dessert Bars
When compared to traditional dessert bars that often contain refined sugars, butter, and white flour, pumpkin banana bars stand out as a far healthier choice. They are rich in vitamins A and C from the pumpkin, while bananas provide potassium and vitamin B6. This nutritious profile makes them an excellent addition to a balanced diet.
The Role of These Bars in a Balanced Diet
Incorporating pumpkin banana bars into your diet can help satisfy sweet cravings while still aligning with your health goals. They can be enjoyed as a snack, breakfast, or even dessert, making them incredibly versatile. The inclusion of wholesome ingredients contributes positively to your overall nutrition, especially when paired with other healthy foods.
Conclusion
In summary, these deliciously healthy pumpkin banana bars offer a delightful combination of flavors and health benefits. With their moist texture and natural sweetness, they are sure to become a favorite in your household. Whether you’re looking for a nutritious breakfast, a satisfying snack, or a healthier dessert option, these bars fit the bill perfectly. Their versatility allows them to cater to various dietary preferences, making them a great addition to any meal plan.
Encourage your family and friends to try making these bars, and feel free to experiment with different mix-ins to find your perfect combination. With the right balance of nutrition and taste, pumpkin banana bars can easily become a staple in your kitchen. So grab your ingredients, follow the steps, and enjoy the delightful experience of baking and indulging in these wholesome treats!
