Grilled Mini Sweet Peppers with Goat Cheese: A Flavorful Charred Delight
 Save
Save
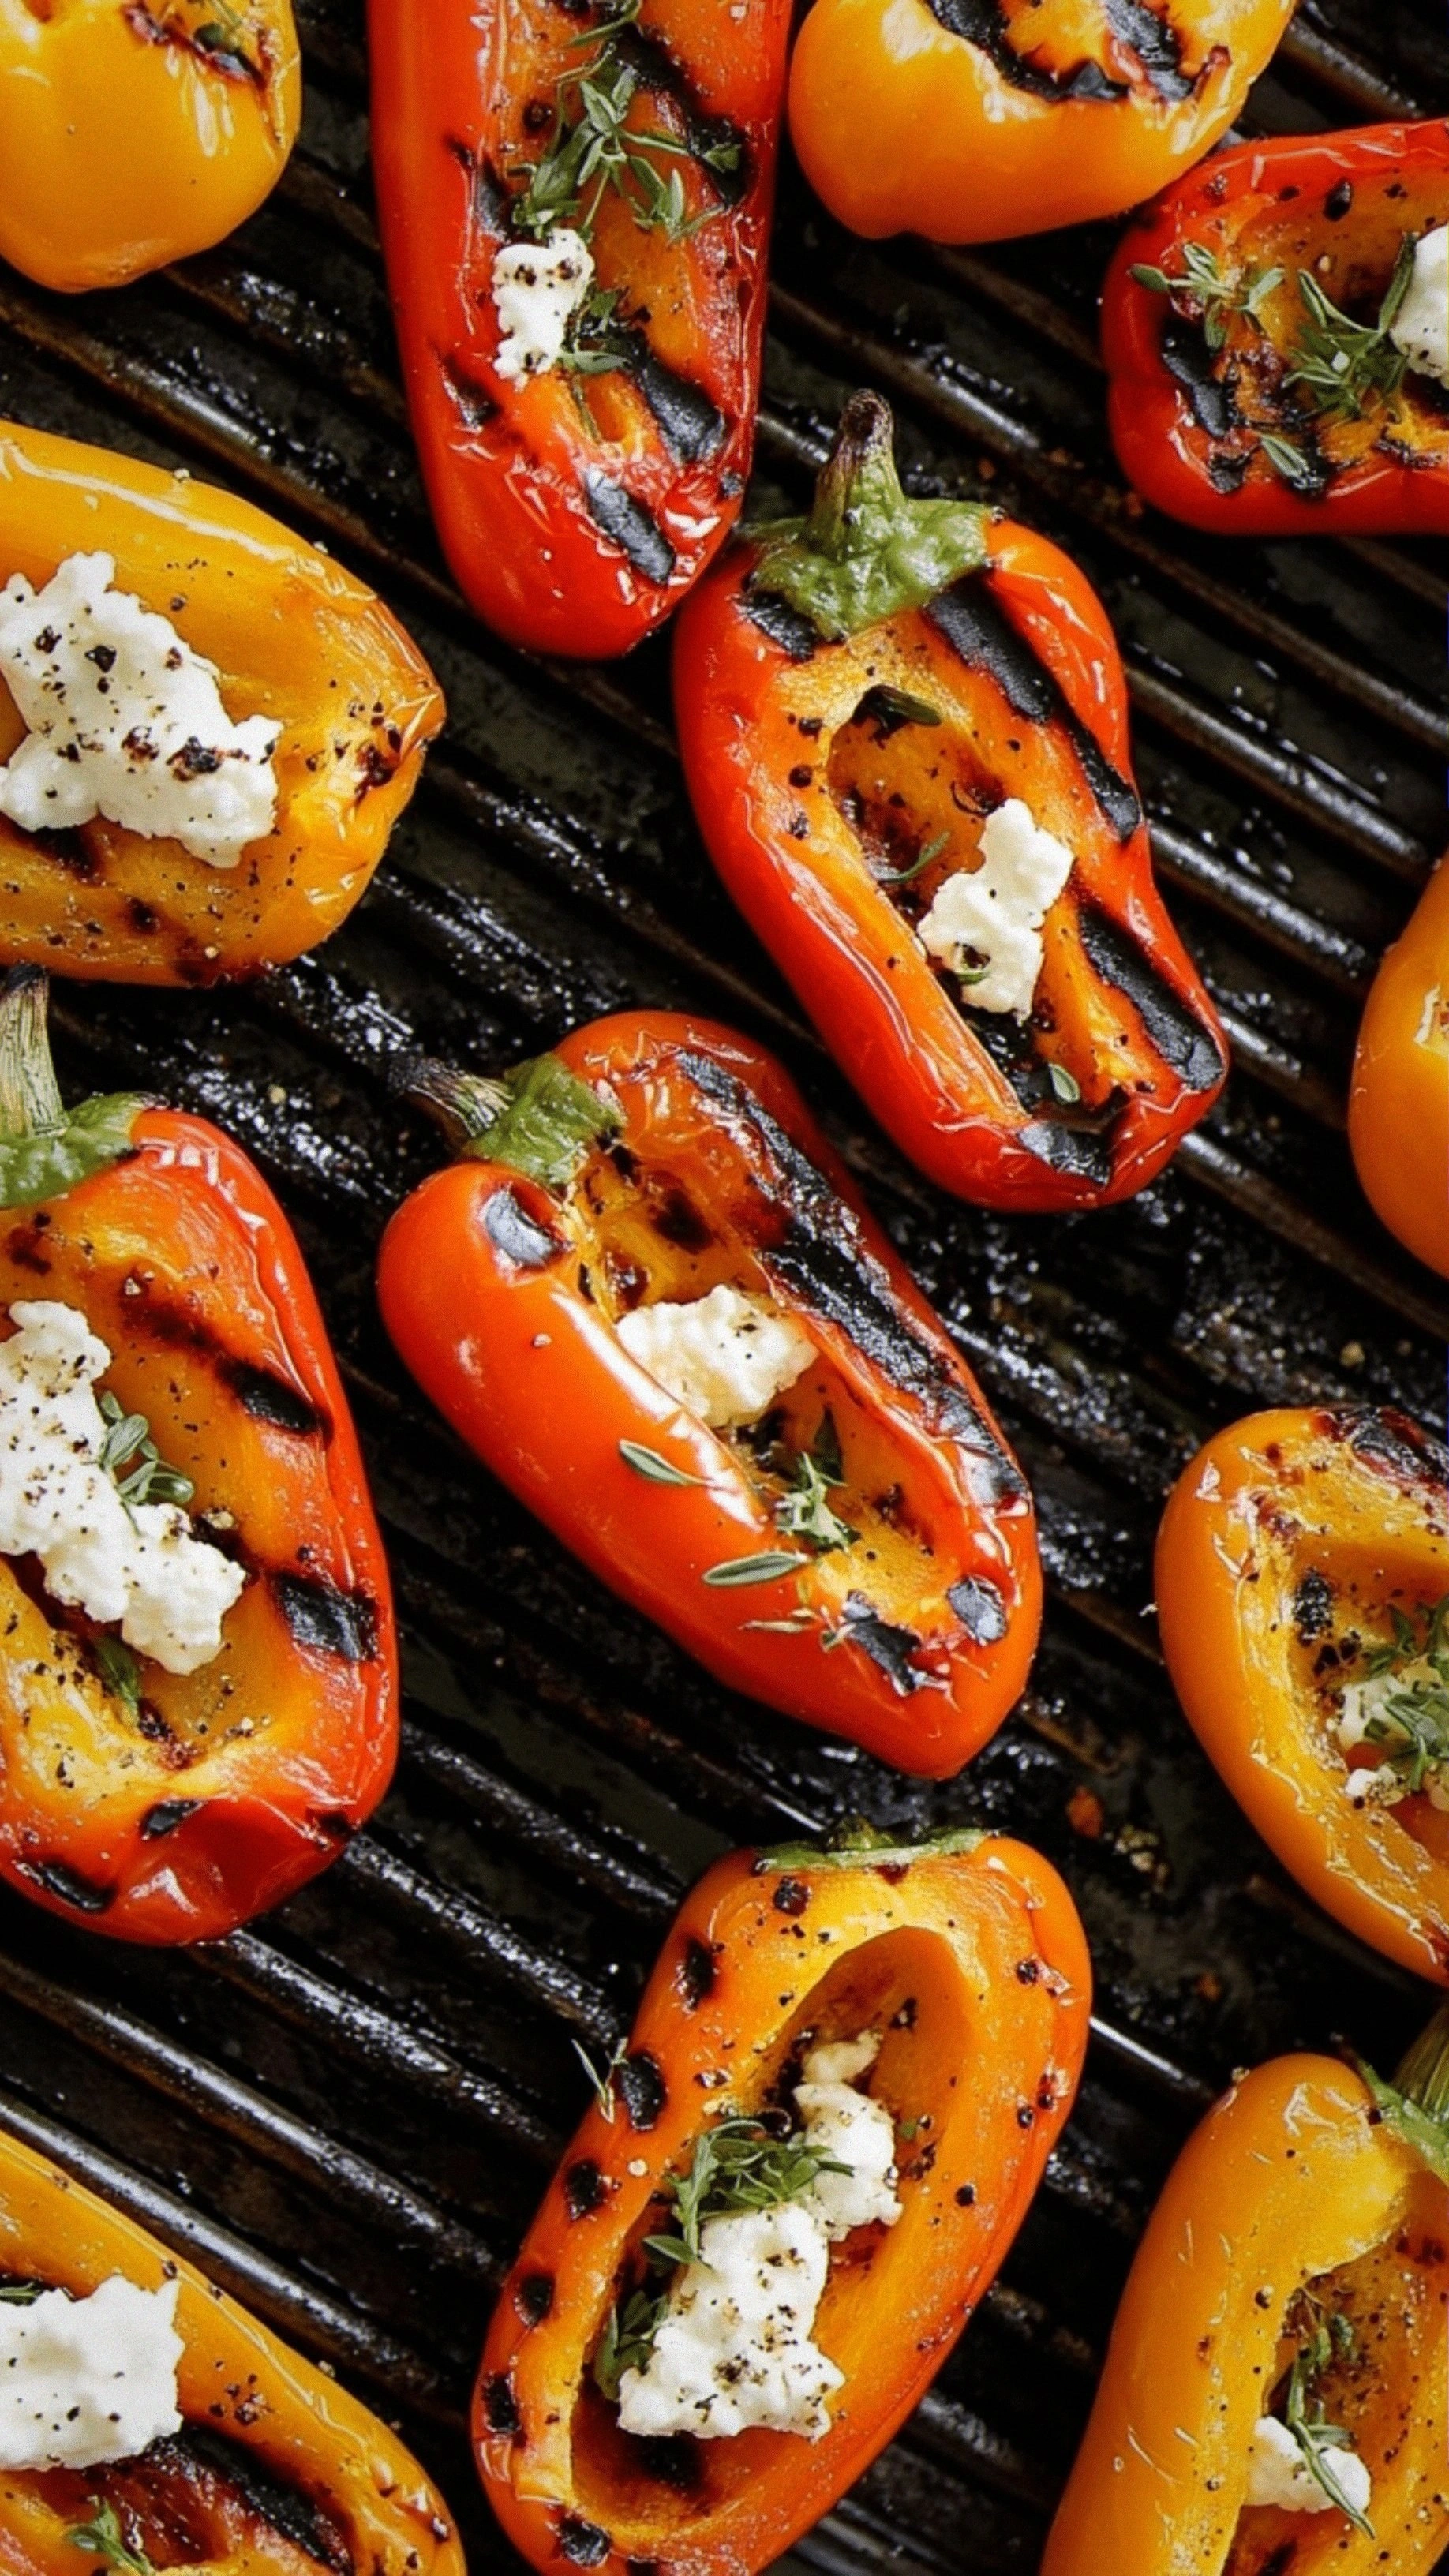
It was a balmy summer evening when I first discovered the magic of grilling tiny, jewel‑bright peppers. I remember the crackle of the grill, the soft hiss as the heat kissed the skins, and the way the air filled with a sweet, smoky perfume that made my whole kitchen feel like an outdoor market in the Mediterranean. My kids were perched on the counter, eyes wide, as I turned the peppers with tongs, watching the colors deepen from bright yellow to a deep, caramelized orange, each one puffing up like a tiny lantern. The moment I sliced open the first pepper and spooned a generous dollop of creamy goat cheese inside, a burst of tangy, buttery richness met the char‑kissed sweetness, and I knew I had stumbled onto a family favorite that would become a staple at every gathering.
What makes this dish so unforgettable is the interplay of textures and flavors that dance on the palate. The outer skin, lightly blistered, offers a delicate crisp that gives way to a tender, juicy interior, while the goat cheese adds a luxurious, slightly tangy creaminess that melts just enough to coat each bite. A drizzle of extra‑virgin olive oil and a sprinkle of fresh herbs finish the picture, adding a fragrant herbaceous note that lifts the whole experience. Imagine serving these vibrant bites on a platter, the colors popping against a rustic wooden board, the aroma of smoky peppers mingling with the earthy scent of thyme—your guests will be drawn in before they even take a bite.
But there’s more to this recipe than just pretty plating. The technique I’m about to share is a shortcut to restaurant‑level flavor without the need for fancy equipment or hard‑to‑find ingredients. You’ll learn why a quick sear on the grill creates that coveted char, how the right amount of goat cheese balances the sweetness, and the secret step that keeps the peppers from drying out. Trust me, the result is a dish that feels both sophisticated and comfortingly home‑cooked, perfect for everything from a casual backyard barbecue to an elegant dinner party.
Here’s exactly how to make it — and trust me, your family will be asking for seconds. As we walk through each stage, I’ll sprinkle in a few personal hacks, a warning about a common pitfall, and a surprise twist that will elevate the dish from great to unforgettable. Ready to fire up the grill and bring a burst of color and flavor to your table? Let’s dive in.
🌟 Why This Recipe Works
- Flavor Depth: Grilling the mini peppers creates a natural caramelization that intensifies their inherent sweetness while adding a subtle smokiness that pairs beautifully with the tangy goat cheese.
- Texture Contrast: The quick char gives the skin a slight crisp, while the flesh stays juicy, creating a satisfying bite that’s complemented by the creamy, spreadable cheese.
- Ease of Execution: With just a handful of ingredients and a simple grill or stovetop grill pan, you can achieve restaurant‑quality results without spending hours in the kitchen.
- Time Efficiency: The prep takes only about fifteen minutes, and the cooking time is a swift thirty minutes, making it perfect for busy weeknights or spontaneous get‑togethers.
- Versatility: These peppers can serve as an appetizer, a side dish, or even a vibrant topping for salads, tacos, or flatbreads, adapting to any menu you envision.
- Nutrition Boost: Mini sweet peppers are packed with vitamin C and antioxidants, while goat cheese contributes protein and calcium, offering a balanced bite that feels indulgent yet wholesome.
- Ingredient Quality: Using fresh, colorful peppers and high‑quality goat cheese ensures each component shines, turning a simple dish into a celebration of flavor.
- Crowd‑Pleasing Factor: The bright colors and interactive nature of stuffing each pepper invite guests to engage, making it a conversation starter at any gathering.
🥗 Ingredients Breakdown
The Foundation: Mini Sweet Peppers
Mini sweet peppers are the heart of this dish. Their naturally high water content means they stay juicy even after a quick char, and their thin skins blister beautifully without becoming tough. Choose a mix of red, orange, and yellow peppers for a visual feast that also offers slightly varied sweetness levels. If you can’t find mini peppers, you can halve regular bell peppers, but the bite‑size charm will be missed. The key is to pick peppers that are firm, glossy, and free of blemishes for the best texture and flavor.
Aromatics & Spices: Olive Oil, Garlic, and Herbs
Extra‑virgin olive oil acts as both a conductor of heat and a flavor carrier, helping the peppers develop that coveted golden‑brown char while adding a fruity richness. A single clove of garlic, minced finely, releases a sweet, mellow aroma that complements the peppers without overpowering them. Fresh thyme leaves bring an earthy, slightly piney note that echoes the smokiness from the grill; if fresh isn’t on hand, dried thyme works just as well, though you’ll need only half the amount.
The Secret Weapons: Goat Cheese and Lemon Zest
Goat cheese is the creamy counterpart that balances the sweet and smoky flavors. Its tangy, buttery profile melts just enough to coat the pepper interior while retaining a pleasant crumbly texture that adds bite. Lemon zest, added just before serving, injects a bright citrus spark that lifts the whole dish, cutting through the richness of the cheese and enhancing the pepper’s natural sweetness. If you’re feeling adventurous, a drizzle of honey can add a subtle floral sweetness that pairs surprisingly well with the tang of the cheese.
Finishing Touches: Salt, Pepper, and Optional Honey
A pinch of sea salt amplifies the flavors, while freshly cracked black pepper introduces a gentle heat that rounds out the taste profile. For those who love a sweet‑savory contrast, a light drizzle of honey right after grilling creates a glossy finish and deepens the caramel notes. Remember, the goal is to enhance, not mask, the natural flavors of the peppers and cheese, so use these seasonings judiciously.
With your ingredients prepped and ready, let's get cooking. Here’s where the fun really begins…
🍳 Step-by-Step Instructions
🔐 Expert Tips for Perfect Results
The Taste Test Trick
Before you start grilling, do a quick taste test of the raw peppers. Slice one in half and sprinkle a pinch of salt; if the flavor pops, you’re set. If it feels flat, a splash of lemon juice will brighten the natural sweetness. This small step ensures that every pepper you serve is already bursting with flavor before the grill even touches it.
Why Resting Time Matters More Than You Think
After grilling, let the peppers rest for at least five minutes before stuffing. This short pause lets the juices redistribute, preventing the cheese from sliding out when you fill them. I once rushed this step and ended up with a soggy mess—lesson learned! A brief rest also allows the residual heat to gently melt the cheese, creating that perfect creamy interior.
The Seasoning Secret Pros Won’t Tell You
A dash of smoked sea salt adds a subtle depth that regular salt can’t match. It’s a tiny tweak that makes the dish feel more sophisticated without any extra effort. I keep a small jar of smoked salt on my countertop for moments like this; a pinch goes a long way in elevating the overall flavor profile.
Grill Marks Are Your Friend
Don’t be afraid of those bold, dark grill marks. They’re not just for show; they’re the result of Maillard reaction, which creates complex, savory notes that you can’t achieve by steaming or baking. If you’re using a stovetop grill pan, press the peppers down lightly with a spatula to ensure even contact and those coveted char lines.
Balancing Sweet and Tangy
If the peppers taste overly sweet for your palate, a splash of balsamic reduction can add a pleasant acidity that balances the dish. Conversely, if you crave more tang, increase the lemon zest or add a few drops of white wine vinegar to the cheese mixture. Experimenting with these adjustments lets you tailor the flavor to your personal taste.
Serving Temperature Secrets
While the peppers are delightful warm, they also hold up well at room temperature, making them perfect for buffet-style gatherings. If you’re serving them cold, a quick re‑heat on a hot skillet for 30 seconds per side revives the char without drying them out. The result is a consistently delicious bite, no matter when you serve it.
🌈 Delicious Variations to Try
One of my favorite things about this recipe is how versatile it is. Here are some twists I’ve tried and loved:
Mediterranean Twist
Swap goat cheese for crumbled feta, add a pinch of oregano, and finish with a drizzle of olive tapenade. The salty feta pairs beautifully with the sweet peppers, creating a classic Mediterranean flavor profile that’s perfect for summer gatherings.
Spicy Kick
Mix a teaspoon of harissa paste into the goat cheese mixture and sprinkle a few red pepper flakes on top before serving. The heat from the harissa cuts through the sweetness, delivering a bold, exciting bite that’s great for spice lovers.
Sweet & Savory Fusion
Add a thin slice of prosciutto inside each pepper before stuffing with cheese, and finish with a light honey glaze. The salty prosciutto complements the sweet pepper and creamy cheese, while the honey adds a glossy, caramelized finish.
Herb Garden Delight
Incorporate fresh herbs like mint, basil, and dill into the cheese mixture, and garnish with a sprinkling of microgreens. This herbaceous version feels fresh and light, ideal for spring or a garden party setting.
Vegan Version
Replace goat cheese with a cashew‑based vegan cheese, and use maple syrup instead of honey. The result is a plant‑based delight that retains the creamy texture and sweet‑savory balance, proving that everyone can enjoy this charred wonder.
Asian Inspiration
Stir a teaspoon of toasted sesame oil and a dash of soy sauce into the cheese, then top with toasted sesame seeds and a sprinkle of chopped scallions. The umami‑rich flavor adds an unexpected yet delightful twist that pairs well with a side of jasmine rice.
📦 Storage & Reheating Tips
Refrigerator Storage
Place the stuffed peppers in an airtight container and store them in the fridge for up to three days. To keep them from drying out, layer a sheet of parchment paper over the top before sealing. This method preserves the vibrant colors and maintains the creamy texture of the cheese.
Freezing Instructions
If you want to make a larger batch, freeze the grilled, unstuffed peppers on a baking sheet first, then transfer them to a freezer‑safe bag. They’ll keep for up to two months. When you’re ready to use them, thaw overnight in the fridge and proceed with the stuffing step as usual.
Reheating Methods
To reheat, preheat a skillet over medium heat, add a splash of olive oil, and warm the peppers for 2‑3 minutes per side until the cheese softens and the skins regain a slight crisp. Alternatively, pop them under a broiler for 2 minutes, watching closely to avoid burning. The trick to reheating without drying them out? A splash of water or a drizzle of oil keeps the peppers moist while reviving the char.
❓ Frequently Asked Questions
Can I use regular bell peppers instead of mini sweet peppers?
What type of goat cheese works best?
Do I need a grill, or can I use the oven?
Can I make this dish ahead of time?
Is there a vegan alternative for the cheese?
How do I prevent the peppers from bursting?
What wine pairs best with this dish?
Can I add other fillings besides goat cheese?
Arrange the stuffed peppers on a serving platter, drizzle the remaining olive oil over the top, and sprinkle fresh thyme leaves for a fragrant finish. For an extra pop of color, you can add a few microgreens or a dusting of smoked paprika. The final visual should be a rainbow of glossy, stuffed peppers that look as good as they taste.
Serve the peppers warm or at room temperature, letting guests pick them up with a fork or even their hands. The cheese will be soft enough to spread, yet firm enough to hold its shape, creating a perfect bite‑size indulgence. Pair with a crisp white wine, a light rosé, or a sparkling water with a slice of lemon for a refreshing complement. Trust me on this one: the combination of smoky pepper, tangy cheese, and bright citrus will have everyone reaching for another.