Introduction
If you’re on the hunt for a delightful dessert that’s both easy to prepare and irresistibly delicious, look no further than No-Bake Mini Strawberry Banana Pudding Crunch Cheesecakes. This dessert perfectly marries the creamy richness of cheesecake with the lightness of banana pudding, all while incorporating the fresh, vibrant flavors of strawberries and bananas. What makes it even better? The simplicity of a no-bake recipe, allowing you to whip up these mini indulgences without the need for an oven.
No-bake desserts have gained immense popularity due to their convenience and quick preparation time, making them a favorite for busy home cooks and those who want to impress guests without spending hours in the kitchen. Whether you’re hosting a summer barbecue, celebrating a birthday, or simply treating yourself to something sweet, these mini cheesecakes are sure to satisfy your cravings. With their combination of creamy cheesecake filling, smooth banana pudding, and a crunchy graham cracker crust, they offer an irresistible blend of textures and flavors that will leave your taste buds dancing.
In this article, we will guide you through creating these delightful cheesecakes from scratch. From their essential ingredients to detailed step-by-step instructions, you’ll have everything you need to create a show-stopping dessert that is not only delicious but also visually appealing. Let’s dive into the exciting world of No-Bake Mini Strawberry Banana Pudding Crunch Cheesecakes!
Understanding the Ingredients
Before we jump into the preparation, it’s essential to understand the key ingredients that make up these mini cheesecakes. Each component plays a crucial role in achieving the perfect flavor and texture, ensuring that every bite is as delightful as the last.
Graham Cracker Crumbs
The cornerstone of our crust, graham cracker crumbs provide a sweet, slightly crunchy base for the cheesecakes. Their subtle flavor complements the sweetness of the filling and adds a satisfying crunch that contrasts beautifully with the creamy layers above. When selecting your graham crackers, opt for the plain variety to avoid overpowering the other flavors.
Unsalted Butter
Unsalted butter is vital for binding the graham cracker crumbs together, creating a sturdy crust that holds the cheesecake layers in place. Using unsalted butter allows you to control the overall saltiness of the dessert, ensuring that the sweet flavors shine through without being overshadowed.
Granulated and Powdered Sugar
Both types of sugar are essential for enhancing the sweetness and texture of the cheesecakes. Granulated sugar is incorporated into the crust, providing a touch of sweetness that complements the buttery flavor. Powdered sugar, on the other hand, is mixed into the cheesecake filling, lending a smooth texture and preventing any graininess that might result from using granulated sugar.
Cream Cheese
As the base of our cheesecake filling, cream cheese lends its rich, creamy texture that makes cheesecakes so beloved. When selecting cream cheese, choose a full-fat variety for the best flavor and consistency. It’s important to soften the cream cheese before using it, as this will make it easier to beat and incorporate into the filling, resulting in a smooth and luscious texture.
Heavy Whipping Cream
Heavy whipping cream is the secret ingredient that elevates our cheesecakes to new heights. By whipping the cream to stiff peaks, you introduce air into the mixture, creating a light and airy texture that balances the rich cream cheese. This step is crucial for achieving that melt-in-your-mouth experience that makes these mini cheesecakes so enjoyable.
Vanilla Extract
A classic flavor enhancer, vanilla extract adds depth and warmth to the cheesecake filling. The aromatic notes of vanilla complement both the cream cheese and the banana pudding, creating a harmonious blend of flavors. Always opt for pure vanilla extract for the best results, as artificial varieties may lack the same complexity.
Banana Pudding Mix & Cold Milk
The banana pudding mix is what gives these cheesecakes their signature flavor and creaminess. When mixed with cold milk, it transforms into a velvety pudding that adds a delightful layer to the dessert. This component not only provides a burst of banana flavor but also contributes to the overall creaminess of the cheesecake.
Fresh Fruits (Bananas and Strawberries)
Fresh bananas and strawberries are the stars of this recipe, bringing natural sweetness and vibrant color to the cheesecakes. The bananas add a rich, fruity flavor that pairs perfectly with the cream cheese and pudding layers, while the strawberries introduce a refreshing brightness that balances the richness of the dessert. For the best results, use ripe but firm bananas and fresh strawberries to ensure optimal flavor and texture.
Whipped Topping
While optional, whipped topping can be used as a garnish for these mini cheesecakes, adding an extra layer of creaminess and visual appeal. If you prefer a lighter option, you can also make your own whipped cream using heavy whipping cream and a bit of powdered sugar.
Step-by-Step Instructions for No-Bake Mini Cheesecakes
Preparing the Crust
The first step in crafting these delightful mini cheesecakes is to prepare the crust. This step is crucial as it forms the foundation for the entire dessert. Follow these detailed instructions to achieve the perfect crust texture:
1. Gather Your Ingredients: Start by measuring out the graham cracker crumbs and unsalted butter. You will need about 1 ½ cups of graham cracker crumbs and ½ cup of melted unsalted butter.
2. Mix the Crust Ingredients: In a medium-sized mixing bowl, combine the graham cracker crumbs with granulated sugar (approximately 2 tablespoons). Pour in the melted butter and stir until the mixture is well combined and resembles wet sand. It should hold together when pressed.
3. Pressing the Crust: Line a muffin tin with cupcake liners for easy removal. Using a spoon or your fingers, evenly distribute the crust mixture into each liner, pressing it down firmly to create a solid base. Aim for about 1 tablespoon of crust per liner. This step is vital to ensure that the crust holds up when you remove the cheesecakes from the muffin tin.
4. Chilling the Crust: Once the crusts are pressed into the liners, place the muffin tin in the refrigerator for about 15-20 minutes. This chilling time allows the butter to firm up, helping to stabilize the crust.
Making the Cheesecake Filling
While the crust is chilling, you can move on to preparing the cheesecake filling. This mixture is what brings all the flavors together, resulting in a smooth and creamy texture. Here’s how to make it:
1. Prepare the Cream Cheese: In a large mixing bowl, add 8 ounces of softened cream cheese. Using an electric mixer, beat the cream cheese on medium speed until it becomes creamy and smooth, about 2-3 minutes.
2. Incorporate the Powdered Sugar: Gradually add in ½ cup of powdered sugar while continuing to mix. This will sweeten the cream cheese and ensure an even texture. Scrape down the sides of the bowl as needed to ensure all ingredients are well combined.
3. Whip the Heavy Cream: In a separate bowl, pour in 1 cup of heavy whipping cream. Using a clean electric mixer, whip the cream on high speed until stiff peaks form. This process usually takes about 3-5 minutes. Be careful not to over-whip, as this can make the cream grainy.
4. Folding Techniques: Once the whipping cream is ready, gently fold it into the cream cheese mixture using a spatula. This technique is essential for maintaining the airiness of the whipped cream. Start by adding a small amount of the whipped cream to the cream cheese mixture to lighten it, then gradually fold in the remaining whipped cream until fully incorporated.
Preparing the Banana Pudding
Now that the cheesecake filling is ready, it’s time to prepare the banana pudding layer that will add a delightful twist to our mini cheesecakes:
1. Mix the Pudding: In a medium bowl, combine one package (3.4 ounces) of banana pudding mix with 2 cups of cold milk. Whisk the mixture together for about 2 minutes until it thickens. The pudding should be creamy and smooth.
2. Layering Process: To assemble the cheesecakes, take the chilled crusts out of the refrigerator. Start by spooning a layer of the banana pudding over the crust, filling each liner about halfway.
3. Adding the Cheesecake Filling: After adding the banana pudding layer, carefully spoon the cheesecake filling on top, filling each liner to the brim. The combination of the banana pudding and cheesecake filling creates a beautiful contrast of colors and flavors.
4. Topping with Fresh Fruits: Finally, slice fresh bananas and strawberries and arrange them on top of each mini cheesecake. This not only adds a pop of color but also enhances the dessert’s flavor profile with fresh fruit.
5. Chill the Mini Cheesecakes: Place the muffin tin back in the refrigerator and let the mini cheesecakes chill for at least 4 hours, or ideally overnight. This chilling time allows the flavors to meld together and helps the cheesecakes set properly.
With these steps, you will have laid a solid foundation for creating your No-Bake Mini Strawberry Banana Pudding Crunch Cheesecakes. The combination of a crunchy graham cracker crust, creamy cheesecake filling, and luscious banana pudding, topped with fresh fruits, is sure to be a hit at any gathering or simply for a sweet treat at home. The next part of our article will delve into tips for achieving the best results and address some common questions about this delightful dessert.

Whisking Techniques for Smooth Pudding Consistency
Achieving a silky-smooth pudding consistency is crucial for your No-Bake Mini Strawberry Banana Pudding Crunch Cheesecakes. Begin by using a whisk instead of a spoon; this will aerate the mixture and ensure that all ingredients blend seamlessly. When combining the cream cheese and sugar, whisk vigorously until the mixture is light and fluffy. Gradually add the milk, continuing to whisk until no lumps remain. If you find that your pudding is still clumpy, consider using an electric mixer on low speed to achieve that perfect creamy texture. Remember, the smoother your pudding, the more delightful your cheesecakes will be!
Importance of Allowing Pudding to Set
Once you’ve whisked your pudding to perfection, it’s essential to allow it to set before layering. This step helps the flavors meld while thickening the mixture for better layering. Pour the pudding into a bowl and cover it with plastic wrap, pressing the wrap directly onto the surface to prevent a skin from forming. Let it sit in the refrigerator for at least 30 minutes. This short wait will pay off, as a well-set pudding will create a more stable cheesecake that holds its shape beautifully when you serve it.
Layering the Cheesecakes
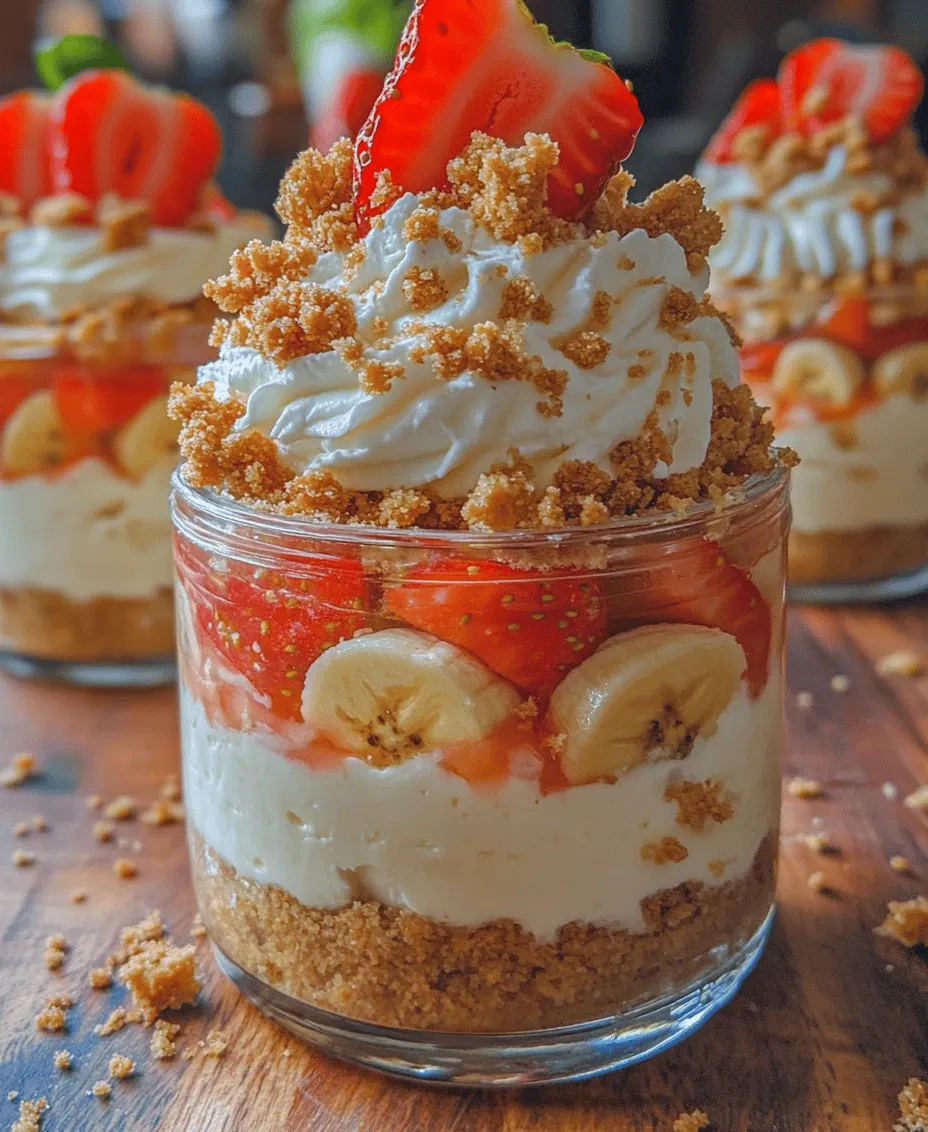
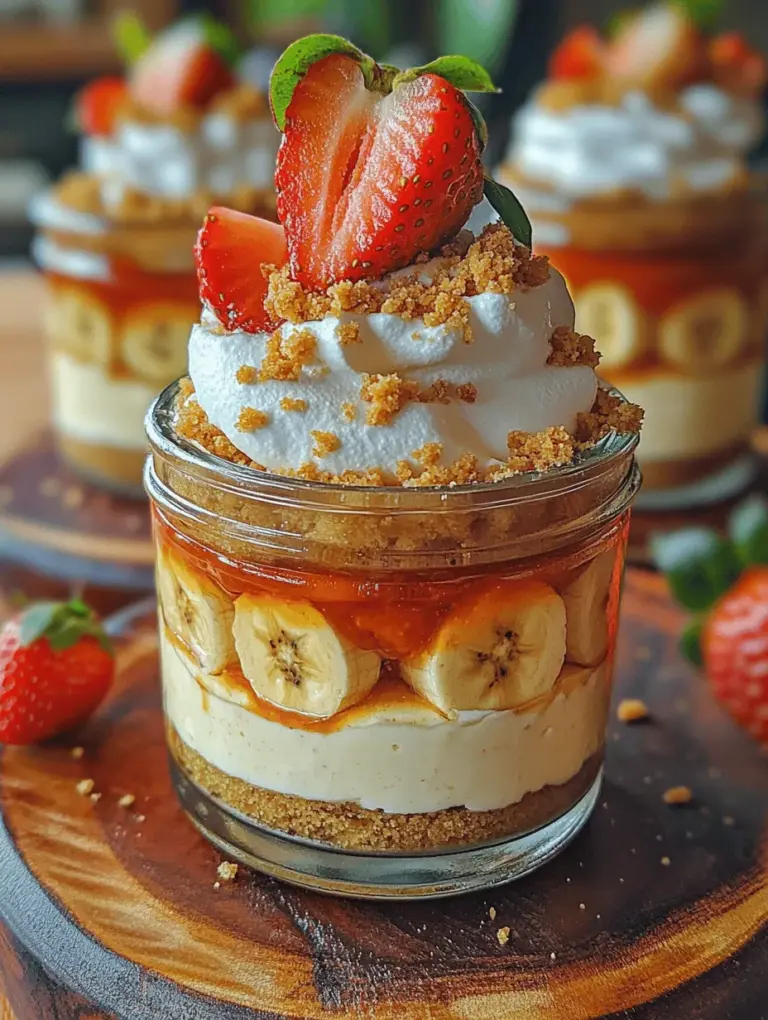
Layering your cheesecakes is one of the most enjoyable parts of this recipe. The right layering order not only enhances the visual appeal but also ensures that each spoonful is a delightful mix of flavors and textures. Start with a generous spoonful of your crust mixture at the bottom of your serving cups. Press it down gently to create a solid base. Next, add a layer of the creamy cheesecake pudding, followed by sliced strawberries and bananas. Repeat this process until you reach the top of your cups, finishing with a layer of pudding. This layering allows the flavors to build, ensuring that every bite is equally delicious.
Suggested Layering Order for Optimal Flavor Distribution
For optimal flavor distribution, consider this layering order: crust, cheesecake pudding, banana slices, cheesecake pudding, strawberry slices, and finally, a topping of whipped cream or additional fruit. This arrangement ensures that the crust provides a crunchy texture at the bottom while the fruits add freshness and color throughout the layers. The final touch of whipped cream not only adds to the aesthetic but also a creamy indulgence that ties everything together.
Visual Appeal and Presentation Tips
Presentation is key when it comes to desserts. For your No-Bake Mini Strawberry Banana Pudding Crunch Cheesecakes, consider using clear glass cups or jars that allow the beautiful layers to shine through. To elevate the visual appeal, you can garnish each cheesecake with a slice of fresh strawberry or banana on the top, along with a sprinkle of crushed graham crackers or a drizzle of chocolate sauce. Additionally, using colorful serving dishes can make the dessert pop and catch the eye. A sprig of mint on top can also provide a refreshing touch and a beautiful contrast to the vibrant colors of the fruit and pudding.
Chilling Process
After layering your cheesecakes, the chilling process is essential for setting the flavors and textures. Transfer the filled cups to the refrigerator and allow them to chill for at least 4 hours, although overnight is even better if time permits. Chilling helps the pudding to firm up and allows the flavors to deepen, resulting in a more enjoyable dessert experience. The waiting time might require some patience, but it’s vital for achieving the perfect no-bake cheesecake texture.
Explanation of Chilling Time and Its Effects on Texture and Flavor
Chilling for several hours enhances the texture of your cheesecakes, making them creamy yet firm enough to hold their shape when served. The time in the fridge allows the flavors to meld beautifully. The combination of creamy cheesecake, soft fruit, and crunchy crust reaches a harmonious balance that can only be achieved through this chilling process. Remember, the longer you let them chill, the better the flavor and texture will be.
Importance of Patience for Best Results
While the eagerness to dive into your delicious cheesecakes is understandable, exercising patience during the chilling process is essential. Rushing this step can lead to a dessert that is too soft and difficult to serve. When you allow the cheesecakes to chill properly, you’re rewarded with a dessert that looks stunning and tastes exquisite. Plus, the anticipation will only make the first bite even more satisfying!
Serving Suggestions
When it comes to serving your No-Bake Mini Strawberry Banana Pudding Crunch Cheesecakes, creativity can make a significant difference in presentation and enjoyment. For a fun twist, consider serving them in individual mason jars for a rustic look. You can also use small dessert plates to create an elegant display.
Creative Garnishing Ideas for Presentation
Garnishes can elevate your dessert from ordinary to extraordinary. A dollop of whipped cream on top, paired with a sprinkle of crushed graham crackers or a few fresh fruit slices, can enhance both flavor and visual appeal. For an extra touch of indulgence, consider drizzling some melted chocolate or caramel sauce over the top. Edible flowers can also add a beautiful touch of color and sophistication, making your cheesecakes suitable for any occasion.
Serving Size and Portioning Tips
These mini cheesecakes are designed to be rich and satisfying, so keep the serving size in mind. Typically, one serving consists of a small cup or jar filled with your layered dessert. This portion size allows for indulgence without overwhelming your guests. If you’re serving at a gathering, consider offering a variety of flavors and toppings so everyone can find something they enjoy.
Flavor Pairings and Variations
While the classic strawberry-banana combination is delightful, there are many ways to enhance your cheesecakes with different flavors and combinations.
Suggested Flavor Pairings to Enhance the Dessert Experience
Consider incorporating chocolate into your mini cheesecakes for a richer taste. A drizzle of chocolate sauce or chocolate shavings can add a decadent touch. Additionally, you can experiment with different fruits like blueberries, raspberries, or peaches, which can provide a burst of flavor and color.
Chocolate Drizzle or Shavings
If you’re a chocolate lover, adding a chocolate drizzle or shavings on top of your cheesecakes can complement the sweetness of the pudding and fruit. To create a simple chocolate drizzle, melt chocolate chips in the microwave or over a double boiler, then drizzle over the top just before serving.
Different Fruit Combinations
Don’t hesitate to mix and match fruits to create your unique version of this dessert. Blueberries and raspberries not only taste great but also add a vibrant pop of color. You could also use diced mango or kiwi for a tropical twist.
Variations on the Classic Recipe
For those who prefer alternatives, consider gluten-free options by using crushed gluten-free cookies for the crust. You can also create a dairy-free version by substituting traditional cream cheese and whipped cream with dairy-free alternatives, such as coconut whipped cream and cashew cream cheese.
Nutritional Information
When indulging in desserts, it’s essential to consider the nutritional content. Each serving of your No-Bake Mini Strawberry Banana Pudding Crunch Cheesecake typically contains approximately 250 calories, depending on the specific ingredients used. With a balance of creamy, fruity, and crunchy components, this dessert can be a guilt-free treat when enjoyed in moderation.
Overview of the Nutritional Content Per Serving
Here’s a brief overview of what you can expect in terms of nutrition per serving:
– Calories: 250
– Total Fat: 12g
– Saturated Fat: 6g
– Cholesterol: 40mg
– Sodium: 150mg
– Total Carbohydrates: 32g
– Dietary Fiber: 1g
– Sugars: 18g
– Protein: 3g
Discussion on the Balance of Indulgence and Nutrition
While this dessert is undeniably indulgent, it also includes fresh fruit, which provides vitamins and antioxidants. By using lighter cream cheese and controlling added sugars, you can enjoy this dessert while keeping your nutritional goals in check.
Conclusion
The No-Bake Mini Strawberry Banana Pudding Crunch Cheesecakes are not just a treat; they are a delightful experience that combines the sweetness of ripe fruits with the rich creaminess of cheesecake. Their layered design offers visual appeal and an exciting mix of textures, making them perfect for gatherings, celebrations, or even a personal indulgence.
With the simplicity of preparation and the opportunity for creative variations, these mini cheesecakes are a must-try for any dessert lover. Whether you’re serving them at a party or enjoying them during a quiet evening at home, these cheesecakes are sure to bring joy to your taste buds. So gather your ingredients and get ready to whip up this delightful treat; it’s a dessert that you and your loved ones will cherish!


