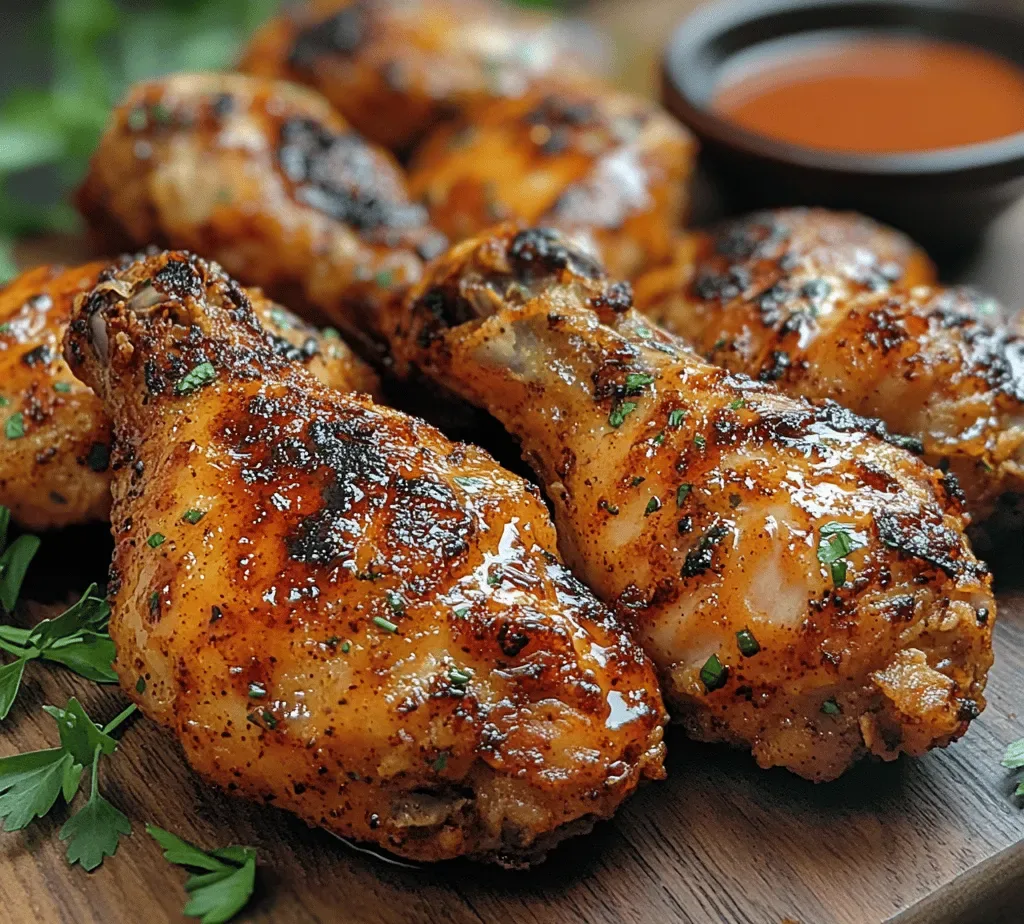
The Ultimate Crunchy Fried Chicken: Recipe Introduction

WANT TO SAVE THIS RECIPE?

Fried chicken is more than just a meal; it’s a culinary tradition that resonates across cultures and generations. The crispy exterior combined with tender, juicy chicken has made it a beloved dish in homes and restaurants alike. Whether served at family gatherings, festive celebrations, or casual weeknight dinners, crispy fried chicken holds a special place in many hearts. The appeal of fried chicken lies not only in its delicious taste but also in the comforting memories it evokes.

Creating the perfect crunchy fried chicken, however, requires attention to detail, especially when it comes to achieving that coveted crispy coating. A flavorful, crunchy crust is essential, as it enhances the overall eating experience and adds texture to the tender meat inside. In this article, we will introduce you to the ultimate fried chicken recipe that promises to do just that. This recipe is designed for both novice cooks seeking to impress their loved ones and seasoned chefs looking to refine their technique.

The beauty of this recipe lies in its adaptability—perfect for picnics, barbecues, family dinners, or even as a comforting solo meal. With its straightforward steps and readily available ingredients, this dish can be tailored for any occasion or personal preference, ensuring that you can serve up a plate of scrumptious fried chicken any day of the week.

The Magic of Marination

One of the most critical steps in achieving juicy and flavorful fried chicken is the marination process. Marinating chicken not only infuses it with flavor but also tenderizes the meat, ensuring every bite is both succulent and satisfying. For our ultimate crunchy fried chicken, we recommend using buttermilk as the base for the marinade.

Buttermilk is a magical ingredient when it comes to fried chicken. The acidity in buttermilk helps break down the proteins in the chicken, resulting in a more tender texture. Additionally, the creamy consistency allows flavors to cling to the meat, ensuring that every piece is perfectly seasoned.

For those who enjoy a little kick, consider adding hot sauce to the buttermilk marinade. This optional ingredient elevates the flavor profile, providing a subtle heat that complements the crispy crust without overwhelming the palate. Depending on your heat preference, you can adjust the amount of hot sauce to suit your taste.

To achieve optimal results, we recommend marinating the chicken for at least four hours, but overnight is ideal. This allows the flavors to penetrate deeply into the meat, ensuring it is not only flavorful but also tender throughout.

Creating the Perfect Dry Mixture

While marination is crucial for flavor and tenderness, the dry mixture is where the magic of crunch happens. The combination of ingredients in the dry mix is what forms that irresistible, golden-brown crust we all know and love. Let’s break down the essential components of this dry mixture:

Flour: The foundational ingredient for the crust, all-purpose flour acts as the base of the coating. It provides the structure needed to create a crispy layer when fried.

Baking Powder: This ingredient plays a key role in achieving lightness and crispness in the coating. The baking powder creates air pockets as the chicken fries, enhancing the crunchiness of the crust.

Garlic and Onion Powder: These two ingredients are essential for enhancing the flavor profile of the fried chicken. Garlic powder adds a savory depth, while onion powder provides an aromatic quality that complements the chicken perfectly.

Smoked Paprika: Not only does smoked paprika add a beautiful color to the crust, but it also introduces a subtle smokiness that elevates the overall flavor. This ingredient is perfect for adding depth without overpowering the dish.

Cayenne Pepper: For those who enjoy a bit of heat, cayenne pepper is a versatile addition that allows you to adjust the spice level to your liking. Start with a small amount and increase as desired to find your perfect balance.

Salt and Black Pepper: These essential seasonings are the backbone of any savory dish. They enhance the natural flavors of the chicken and bring all the other spices together, ensuring a well-rounded taste.

Once you’ve gathered your dry ingredients, combine them in a bowl, whisking them together to ensure an even distribution of flavors. If you feel adventurous, this is also the perfect time to customize your spice blend. Consider adding herbs like dried thyme or oregano for added complexity, or even a pinch of sugar for a hint of sweetness.

The Art of Coating Chicken

Now that you have beautifully marinated chicken and a perfectly seasoned dry mixture, it’s time to coat your chicken and prepare for frying. This step is crucial, as the coating is what will ultimately give your fried chicken its signature crunch.

Start by removing the chicken pieces from the buttermilk marinade, allowing any excess liquid to drip off. This will ensure that the dry mixture adheres properly to the chicken. Next, take each piece of chicken and dredge it in the dry mixture, making sure to coat every surface thoroughly. Press the flour mixture onto the chicken to create a thick, even layer that will fry up crispy and golden.

For an extra crunch, consider double-dipping your chicken. After the first coating, return the chicken to the buttermilk marinade for a moment before dredging it in the dry mixture again. This double layer of coating will create an even thicker crust, resulting in an incredibly crunchy bite.

Once all the chicken pieces are coated, let them rest for a few minutes on a wire rack. This resting period allows the coating to set, ensuring it adheres properly during the frying process. While the chicken rests, you can prepare your frying oil.

When it comes to frying, selecting the right oil is essential. A high smoke point oil, such as vegetable oil, canola oil, or peanut oil, is ideal for frying chicken. These oils can withstand high temperatures without burning, ensuring that your chicken cooks evenly and achieves that perfect crunch.

Heat the oil in a deep skillet or a heavy-bottomed pot to about 350°F (175°C). To test if the oil is ready, drop a small piece of the dry mixture into the oil. If it sizzles and bubbles, you’re good to go! Carefully add the chicken pieces to the hot oil, making sure not to overcrowd the pan. Fry in batches if necessary to maintain the oil temperature and ensure even cooking.

As the chicken fries, resist the urge to move it around too much. Let it cook undisturbed for the first few minutes to allow the crust to form properly. After about five to seven minutes, gently flip the chicken pieces to ensure even browning on both sides.

Once the chicken is golden brown and cooked through—typically around 15 to 18 minutes depending on the size of the pieces—it’s time to remove them from the oil. Use a slotted spoon or tongs to carefully transfer the fried chicken to a wire rack set over a baking sheet. This will allow excess oil to drain off, keeping your chicken crispy without becoming soggy.

As you continue to fry the remaining pieces, consider seasoning the freshly fried chicken with a sprinkle of salt. This finishing touch enhances the flavors and ensures that each bite is packed with savory goodness.

With these initial steps, you’re well on your way to creating the ultimate crunchy fried chicken. The marination, dry mixture, and coating techniques are fundamental in achieving that perfect balance of flavor and texture. Stay tuned as we delve deeper into tips for achieving the best results with your fried chicken and explore common questions that arise throughout the cooking process.

One of the most critical steps in achieving juicy and flavorful fried chicken is the marination process. Marinating chicken not only infuses it with flavor but also tenderizes the meat, ensuring every bite is both succulent and satisfying. For our ultimate crunchy fried chicken, we recommend using buttermilk as the base for the marinade.

Step-by-Step Guide on the Coating Process

The coating process is crucial in creating the ultimate crunchy fried chicken. Start by preparing your chicken pieces: ensure they are thoroughly washed and dried. A dry surface allows the coating to adhere better, enhancing crispiness.

1. Seasoning the Chicken: Begin by seasoning your chicken pieces with a mixture of salt, black pepper, garlic powder, and any other spices you prefer. Let it marinate for at least 30 minutes to an hour for the flavors to penetrate.

2. Preparing the Coating: In a separate bowl, combine flour, cornstarch, and your chosen spices. The cornstarch is key to achieving that extra crunch. The typical ratio is about 2 parts flour to 1 part cornstarch.

3. Dipping Process: Take each seasoned chicken piece and first dip it into a bowl of buttermilk or an egg wash. This step is essential as it acts as a glue for the dry coating. Let any excess liquid drip off before proceeding.

4. Coating the Chicken: Next, thoroughly coat the chicken in the flour mixture. Press the flour onto the surface to ensure an even, thick layer. A good rule of thumb is to use your hands to toss the chicken in the flour, ensuring all sides are covered.

5. Double-Dipping Technique: For extra crunch, repeat the dipping process. Dip the flour-coated chicken back into the buttermilk or egg wash and then into the flour mixture again. This double-dipping creates a thicker crust that will fry up beautifully crispy.

6. Visual Cues: Look for a uniform coating that should be neither too thick nor too thin. The coating should appear somewhat lumpy and textured, as this irregularity helps in forming a crunchy crust during frying.

The Science Behind Achieving the Ideal Crust

The perfect fried chicken crust is the result of a few scientific principles at play. First, the flour and cornstarch mixture creates a barrier that crisps up as it cooks. When heat is applied, the moisture in the chicken evaporates, and the starches gelatinize, forming a rigid structure that locks in the juices. This is why a well-prepared coating is critical.

Moreover, frying at the right temperature (around 350°F to 375°F) ensures that the outer layer cooks faster than the inner meat, creating a crispy exterior while keeping the meat juicy. The oil’s heat causes the water within the chicken to steam, which in turn helps puff up the coating.

Frying Techniques for Perfect Chicken

Selecting the right oil and frying equipment is essential for achieving that perfect crunchy fried chicken.

Oil Selection and Frying Equipment

Choose an oil with a high smoke point, such as peanut oil, canola oil, or vegetable oil. These oils not only withstand higher temperatures but also contribute to the flavor of the chicken. A deep fryer works best for even cooking, but a heavy-bottomed pot can also do the job.

Importance of Oil Temperature

Getting the oil temperature right is crucial. If the oil is too cool, the chicken will absorb more oil, resulting in greasy, soggy pieces. Conversely, if the oil is too hot, the crust may burn before the chicken is fully cooked. Use a thermometer to monitor the oil temperature, ensuring it stays between 350°F and 375°F.

Explanation of the Frying Process and Timing

Once your oil is at the right temperature, carefully add the chicken pieces, skin side down. Avoid overcrowding the pan, as this will lower the oil temperature and lead to uneven cooking. Fry in batches if necessary.

Cook the chicken for about 12-15 minutes per batch, turning occasionally to ensure even browning. A good indicator of doneness is when the chicken reaches an internal temperature of 165°F.

Tips for Avoiding Overcrowding the Pan

To avoid overcrowding, ensure there is enough space between each piece of chicken. This is crucial for maintaining the oil temperature and achieving that desired crunch. If you’re frying multiple batches, consider using a cooling rack placed over a baking sheet to hold the cooked chicken while you finish the rest.

Monitoring the Internal Temperature

Using a meat thermometer is vital for food safety. Insert the thermometer into the thickest part of the chicken (avoiding the bone) to check for doneness. Once it reaches 165°F, the chicken is safe to eat and ready to be removed from the oil.

Draining and Resting for Maximum Crispiness

After frying, the next steps are all about preserving that crispiness and flavor.

Importance of Draining Fried Chicken Properly

Once cooked, transfer the chicken to a plate lined with paper towels or a wire rack. This step is essential as it allows excess oil to drain away, preventing the coating from becoming soggy.

Explanation of How Resting Affects Juiciness and Crunch

Letting the chicken rest for about 10-15 minutes before serving is crucial. This resting period allows the juices to redistribute throughout the meat, ensuring each bite is moist. Moreover, it helps set the crust, making it even crispier.

Best Practices for Serving Fried Chicken to Retain Its Texture

Serve the fried chicken hot, ideally straight from the fryer. If you need to keep it warm for a short period, place it in a low-temperature oven (around 200°F) on a wire rack to allow air circulation, which helps maintain crispness.

Serving Suggestions and Pairings

Fried chicken is a versatile dish that pairs beautifully with a variety of sides and sauces.

Ideas for Dipping Sauces

Honey Mustard: A sweet and tangy option that complements the savory flavors of fried chicken.

Spicy Ranch: Add hot sauce to ranch dressing for a creamy, spicy dip.

Buffalo Sauce: For those who love heat, a classic buffalo sauce can elevate your fried chicken experience.

Suggested Sides that Pair Well with the Dish

Consider these classic sides to serve alongside your crunchy fried chicken:

Coleslaw: The cool, crisp slaw balances the richness of the chicken.

Biscuits: Flaky biscuits with butter are a traditional companion.

Corn on the Cob: Sweet corn adds a refreshing crunch.

Mashed Potatoes: Creamy potatoes can soak up any extra gravy or sauce.

Creative Serving Options for Different Occasions

Picnic Style: Pack a fried chicken basket with sides and drinks for a perfect outdoor meal.

Game Day: Serve your fried chicken as finger food with a variety of dipping sauces for guests to enjoy during the game.

Family Feast: Lay out a spread with fried chicken as the centerpiece, accompanied by flavorful sides and beverages for a delightful family gathering.

Conclusion

Achieving the ultimate crunchy fried chicken is a rewarding culinary endeavor that combines technique, science, and a bit of love. By following the detailed steps of marinating, coating, frying, and resting, you can create a dish that is not only crispy on the outside but juicy and flavorful on the inside.

Don’t hesitate to experiment with your spices and sides to make this recipe your own. The joy of sharing homemade fried chicken with family and friends is unparalleled, and with this recipe in hand, you are well on your way to impressing everyone at your next gathering. Embrace the process, enjoy the delicious results, and let each bite of your crunchy fried chicken bring smiles to your table.

One of the most critical steps in achieving juicy and flavorful fried chicken is the marination process. Marinating chicken not only infuses it with flavor but also tenderizes the meat, ensuring every bite is both succulent and satisfying. For our ultimate crunchy fried chicken, we recommend using buttermilk as the base for the marinade.

The Best Fried Chicken – Extra Crispy & Juicy!

Discover the secret to crafting the ultimate crunchy fried chicken that guarantees a crispy exterior and juicy interior. This recipe is perfect for both novice cooks and seasoned chefs, combining simple ingredients and straightforward steps. Learn the art of marination with buttermilk, the magic behind achieving the ideal dry mixture, and tips for frying to perfection. Whether for family gatherings or cozy dinners, this beloved dish is sure to impress and create delightful memories around your table.

Ingredients
  

3 lbs chicken pieces (legs, thighs, breasts)

1 cup buttermilk

1 tablespoon hot sauce (optional, for a kick)

2 cups all-purpose flour

1 teaspoon baking powder

1 tablespoon garlic powder

1 tablespoon onion powder

1 tablespoon smoked paprika

1 teaspoon cayenne pepper (adjust to taste)

1 tablespoon salt

1 teaspoon black pepper

Vegetable oil (for frying)

Instructions
 

Marinate the Chicken: In a large bowl, combine the buttermilk and hot sauce (if using). Add the chicken pieces, ensuring they are well coated. Cover and refrigerate for at least 4 hours, or overnight for best results.

    Prepare the Dry Mixture: In another large bowl, whisk together the flour, baking powder, garlic powder, onion powder, smoked paprika, cayenne pepper, salt, and black pepper. This will give your chicken that amazing flavor and crunch.

      Coat the Chicken: Remove the marinated chicken from the refrigerator. Let the excess buttermilk drip off, then place the chicken pieces into the flour mixture. Turn to coat thoroughly. For an extra crispy crust, repeat this step—first dip the coated chicken back into the buttermilk and then dredge it in the flour again.

        Heat the Oil: In a large, heavy-bottomed frying pan or Dutch oven, pour in vegetable oil to a depth of about 3 inches. Heat the oil to 350°F (175°C). Use a thermometer to monitor the temperature, as it’s crucial for crispy chicken.

          Fry the Chicken: Once the oil is hot, carefully add the coated chicken pieces in batches for frying. Avoid overcrowding the pan. Cook for about 10-15 minutes per side until golden brown and the internal temperature reaches 165°F (75°C).

            Drain the Chicken: As each batch finishes, remove the chicken and place it on a wire rack set over a baking sheet to drain excess oil. This helps keep the chicken crispy.

              Rest and Serve: Let the chicken rest for at least 5 minutes before serving. This helps lock in the juiciness and flavor. Serve with your favorite dipping sauces or sides!

                Prep Time, Total Time, Servings: 15 mins | 4 hrs (plus marination) | 4-6 servings

                  WANT TO SAVE THIS RECIPE?

                  Leave a Comment

                  Recipe Rating