No-Bake Biscoff Cheesecake Truffles: A Delightful Dessert Experience
In recent years, no-bake desserts have surged in popularity, capturing the hearts of dessert lovers everywhere. These treats offer a delightful alternative to traditional baking, allowing for quick and easy preparation without the need for an oven. Whether you’re hosting a gathering, celebrating a special occasion, or simply satisfying a sweet craving, no-bake desserts such as cheesecake truffles provide a perfect solution. Among these, the No-Bake Biscoff Cheesecake Truffles stand out as a rich and indulgent treat that’s incredibly simple to make.
At the heart of this delectable recipe are Biscoff cookies, known for their unique flavor profile that combines caramel, spice, and a hint of nuttiness. Originating from Europe, these cookies have become a favorite in many households, often enjoyed with coffee or tea. Their distinct taste not only adds depth to desserts but also complements the creamy textures typical of cheesecake-based treats. When combined with cream cheese and Biscoff spread, these cookies create a harmonious blend that elevates the taste and experience of the truffles.
The concept of cheesecake truffles is a creative spin on traditional cheesecake, offering all the creamy goodness in a bite-sized form. These truffles are rich, velvety, and packed with flavor, making them an irresistible treat for cheesecake aficionados and casual dessert lovers alike. Their appeal lies not only in their taste but also in their convenience; the no-bake nature of this recipe allows anyone, regardless of baking skills, to whip up a batch in no time.
Understanding the Ingredients
Biscoff Cookies: The Perfect Base
Biscoff cookies are the star ingredient in this recipe, and for good reason. These delightful cookies are made from a blend of brown sugar, flour, and spices, resulting in a crunchy texture and a distinctive caramelized taste. Their unique flavor profile is both warming and comforting, making them an excellent foundation for the creamy filling of the truffles. When crushed, Biscoff cookies create a crumbly base that enhances the overall texture and flavor of the dessert.
The Role of Cream Cheese
Cream cheese plays a pivotal role in the creation of these truffles. Known for its smooth and creamy texture, cream cheese adds richness and tanginess that balances the sweetness of the other ingredients. In no-bake desserts, cream cheese is often the key component that helps bind everything together while providing that luscious mouthfeel we associate with cheesecake. The result is a truffle that melts in your mouth, offering an indulgent experience with every bite.
Biscoff Spread: The Creamy Dream
To take these truffles to the next level, Biscoff spread is incorporated into the mixture. This velvety spread, made from crushed Biscoff cookies, brings an extra layer of flavor and creaminess to the truffles. Its rich, caramel-like taste perfectly complements the other ingredients, enhancing the overall flavor profile without overwhelming it. Using Biscoff spread not only adds depth but also ensures that every truffle is infused with that signature Biscoff goodness.
The Importance of Powdered Sugar
Powdered sugar is another essential ingredient in this recipe. Unlike granulated sugar, powdered sugar dissolves more easily, which is particularly beneficial in no-bake desserts. It helps to sweeten the truffle mixture without leaving a gritty texture. The fine consistency of powdered sugar allows it to blend seamlessly with cream cheese and Biscoff spread, resulting in a smooth and luscious filling that is both sweet and satisfying.
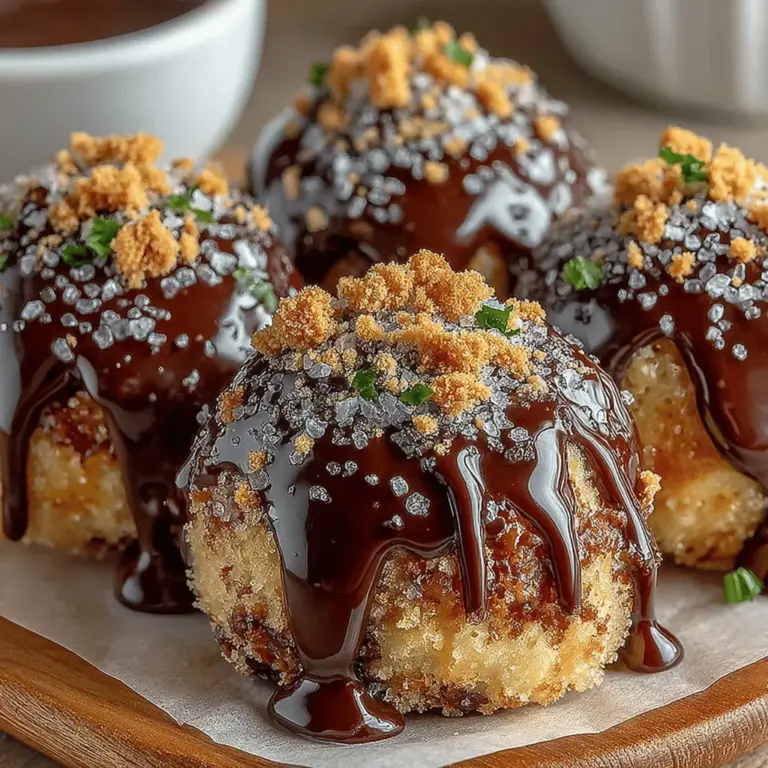
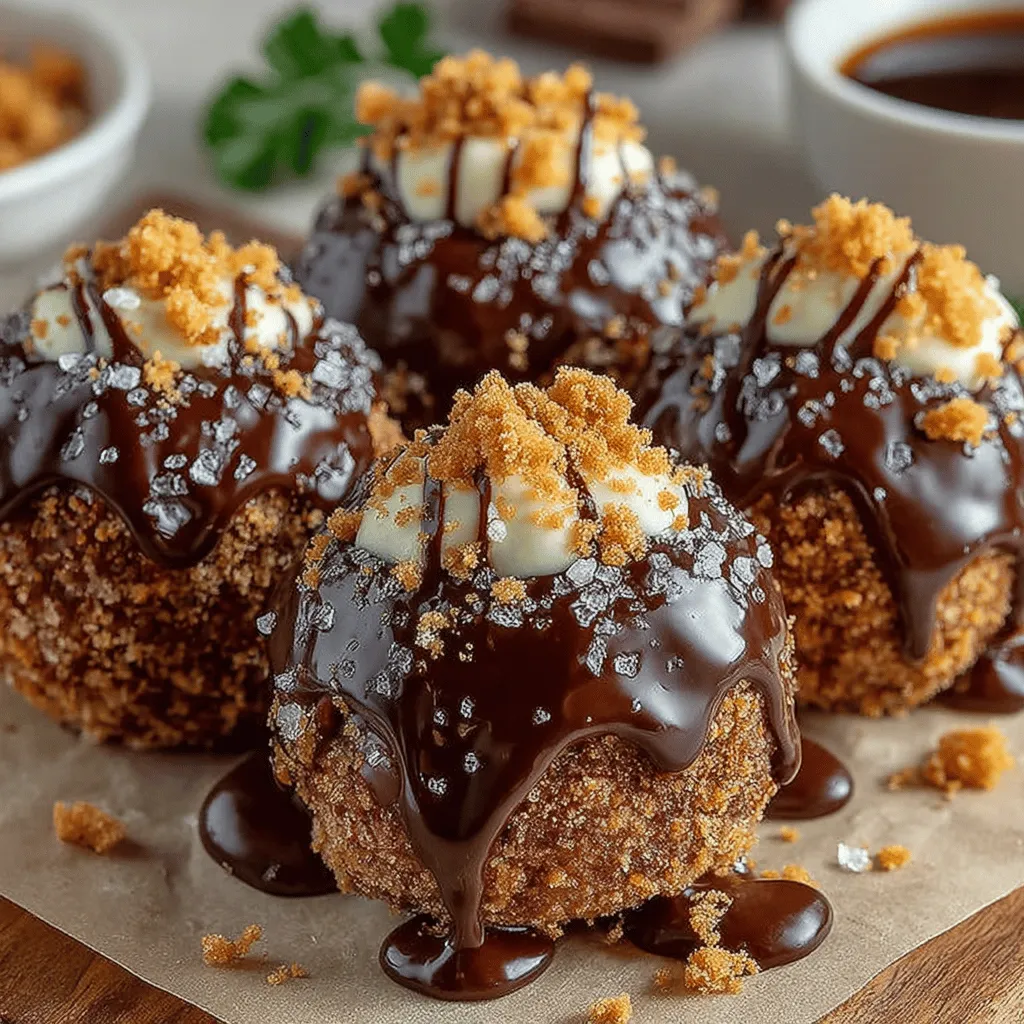
Melted Chocolate Coating
To finish off these delightful truffles, a chocolate coating is used. Depending on personal preference, you can choose between milk, dark, or even white chocolate. The chocolate coating not only adds a rich flavor contrast to the sweet and creamy filling but also provides an aesthetically pleasing finish. The glossy exterior enhances the overall presentation, making these truffles perfect for gifting or serving at gatherings.
Optional Ingredients
While the core ingredients create a fantastic no-bake truffle, there are optional additions that can elevate the flavor even further. A sprinkle of sea salt can enhance the sweetness and provide a delightful contrast, while extra crushed Biscoff cookies can be used as a garnish, adding texture and visual appeal. These small tweaks can personalize the truffles, allowing you to cater to different tastes and preferences.
Step-by-Step Guide to Making No-Bake Biscoff Cheesecake Truffles
Preparation Before You Start
Before diving into the making of your No-Bake Biscoff Cheesecake Truffles, it’s essential to prepare your workspace and gather all the ingredients. This step not only streamlines the process but also ensures that you don’t miss any crucial components during preparation. Make sure to have all your ingredients measured out and ready to go, as this will allow you to focus on the mixing and shaping of the truffles without interruptions.
Crushing the Biscoff Cookies
The first step in creating these truffles is to crush the Biscoff cookies into fine crumbs. Achieving the right consistency is crucial for the texture of the truffles. You can use a food processor for a quick and efficient method, pulsing the cookies until they resemble fine sand. Alternatively, for a more hands-on approach, you can place the cookies in a resealable plastic bag and crush them with a rolling pin. Aim for a uniform crumb that will blend seamlessly with the cream cheese and other ingredients, ensuring that each truffle has that signature Biscoff flavor.
By following these initial steps and understanding the key ingredients in the No-Bake Biscoff Cheesecake Truffles, you set yourself up for success in creating a dessert that is as delightful to make as it is to eat. Stay tuned for the next part of this article, where we will delve into the detailed assembly and finishing touches that make these truffles irresistible.
Mixing the Filling
To achieve the perfect no-bake Biscoff cheesecake truffles, start by mixing the filling. In a medium mixing bowl, beat the softened cream cheese using an electric mixer on medium speed until it is smooth and free of lumps. This is a crucial step; if your cream cheese is too cold, it can lead to a lumpy mixture that doesn’t blend well with the other ingredients.
Once your cream cheese is smooth, add in the powdered sugar, vanilla extract, and a generous amount of Biscoff spread. Continue to mix until fully incorporated. The key here is to ensure that the mixture is both creamy and well-blended, as this will form the base of your truffles.
Tips for Achieving a Smooth and Creamy Mixture
1. Ingredient Temperature: Always use softened cream cheese. This allows for a smoother blend and prevents lumps. To soften cream cheese quickly, you can cut it into smaller cubes and leave it at room temperature for about 30 minutes. Alternatively, microwave it in 10-second bursts, ensuring it does not melt.
2. Mixing Technique: Start mixing on a low speed to combine the ingredients before increasing to medium speed to avoid splattering. This gradual increase in speed helps to maintain a smooth texture.
Incorporating Crushed Cookies
Once your cream cheese mixture is smooth, it’s time to fold in the crushed Biscoff cookies. Use a spatula to gently fold the cookies into the cream cheese mixture. This step is vital; folding preserves the airiness of the mixture, giving your truffles a light and fluffy texture.
How to Fold Ingredients Without Losing Airiness
1. Gentle Motion: Use a spatula or wooden spoon and scoop from the bottom to the top, turning the bowl slightly with each fold. This technique helps to keep air in the mixture.
2. Avoid Over-Mixing: Fold just until you see no more streaks of cream cheese. Over-mixing can deflate the mixture, resulting in denser truffles.
Forming the Truffles
The next step is to form your truffles. Using a cookie scoop or a tablespoon, portion out the mixture and roll it between your hands to create uniform balls. Aim for about 1-inch size for each truffle.
Best Practices for Uniformity in Size
1. Use a Scoop: A cookie scoop ensures that each truffle is consistent in size, which helps with even coating and presentation.
2. Weigh Portions: If you’re looking for precision, consider weighing each portion of the mixture to ensure uniformity.
Suggestions for Rolling Technique
– Wet Hands: Keeping your hands slightly damp can prevent the mixture from sticking to your palms, making the rolling process smoother.
– Roll Firmly but Gently: Apply enough pressure to form a ball, but avoid squishing the mixture. The goal is to maintain the truffle’s softness while achieving a smooth exterior.
Chilling Process Explained
Once your truffles are formed, place them on a parchment-lined baking sheet. The next crucial step is chilling. Cover the tray with plastic wrap and refrigerate for at least 30 minutes or until they are firm to the touch.
Why Chilling is Crucial for Firmness
Chilling the truffles helps them to set. This firmness is essential for the dipping process later, as it ensures that the truffles retain their shape when coated in chocolate. If they are too soft, they will lose their form during dipping.
Melting the Chocolate
While your truffles chill, you can prepare the chocolate coating. Use high-quality chocolate, either dark, milk, or white chocolate, depending on your preference.
Techniques for Melting Chocolate Safely Without Burning
1. Double Boiler Method: Place a heatproof bowl over a pot of simmering water, ensuring the bottom of the bowl doesn’t touch the water. Stir the chocolate until smooth.
2. Microwave Method: Place chopped chocolate in a microwave-safe bowl and heat in 30-second intervals, stirring in between until melted and smooth. This method requires caution to prevent overheating.
Coating the Truffles
Once your chocolate is melted and your truffles are firm, it’s time to coat them. Using a fork, dip each truffle into the melted chocolate, ensuring it is fully covered.
Step-by-Step on How to Dip Without Making a Mess
1. Draining Excess Chocolate: After dipping, gently tap the fork against the edge of the bowl to let excess chocolate drip off. This will help prevent clumping.
2. Using a Toothpick: For easier handling, you can insert a toothpick into the truffle before dipping, allowing you to easily coat it without your fingers getting messy.
Options for Decorating with Crushed Cookies
For added texture and a beautiful presentation, consider rolling the freshly coated truffles in crushed Biscoff cookies or sprinkling some on top before the chocolate sets. This not only enhances the visual appeal but also intensifies the Biscoff flavor.
Final Chill for the Chocolate
After coating, return the truffles to the parchment-lined tray and refrigerate again for about 15-20 minutes to allow the chocolate to set completely.
Importance of Allowing the Coating to Set Properly
Allowing the chocolate to set is essential for achieving that perfect bite. If you skip this step, the chocolate may remain soft and could easily smudge or melt when handled, ruining the presentation.
Serving Suggestions and Pairings
These no-bake Biscoff cheesecake truffles are perfect for a variety of occasions. Their rich flavor and elegant look make them an ideal dessert for parties, holiday gatherings, or as delightful homemade gifts.
Ideal Occasions to Serve Biscoff Cheesecake Truffles
– Parties: These truffles are a crowd-pleaser and can be made ahead of time, allowing you to enjoy the celebration without stressing over dessert.
– Gatherings: Whether it’s a casual get-together or a formal dinner, these truffles are sure to impress your guests.
– Gifts: Package them in a decorative box or jar to give as a thoughtful gift to friends or family.
Pairing Ideas
To truly enjoy the rich flavors of your truffles, consider pairing them with:
– Coffee: The bitterness of coffee complements the sweetness of the truffles beautifully.
– Tea: A warm cup of tea can balance the richness of the cheesecake.
– Milk: For a classic pairing, serve with a glass of cold milk.
Creative Presentation Ideas for Serving
– Platter Display: Arrange the truffles on a decorative platter, garnished with whole Biscoff cookies or a drizzle of chocolate.
– Individual Cups: Serve each truffle in small cupcake liners or decorative cups for an elegant touch.
– Height Variation: Use cake stands or tiered trays to create a visually appealing display.
Nutritional Information
Each no-bake Biscoff cheesecake truffle contains approximately 90-100 calories. The exact calorie count may vary based on exact ingredient quantities and chocolate used.
Overview of Key Nutrients Provided by the Ingredients
– Calcium: Sourced from cream cheese, important for bone health.
– Iron: Found in Biscoff cookies, contributing to your daily iron intake.
– Antioxidants: Dark chocolate offers antioxidants that can support heart health.
Considerations for Dietary Restrictions
For those with dietary concerns, consider using gluten-free Biscoff cookies and ensuring your chocolate is gluten-free as well.
Conclusion
Creating no-bake Biscoff cheesecake truffles is a delightful experience that combines simplicity with indulgence. The ease of preparation and the impressive results make these truffles a must-try for any dessert lover.
We encourage you to experiment with this recipe and enjoy the delightful flavors that come from the combination of creamy cheesecake and the unique taste of Biscoff cookies. Whether you’re serving them at a gathering or enjoying them at home, these truffles are sure to bring joy and satisfaction. Embrace the joy of creating simple, yet show-stopping desserts right in your own kitchen!
