Introduction
Imagine biting into a warm, flaky pastry that crumbles at the touch, revealing a creamy, rich filling that dances on your taste buds. This is the experience that an Easy Cheese Danish Delight promises to deliver. A beloved pastry in bakeries and homes alike, the Cheese Danish combines rich flavors and airy textures, making it an irresistible treat for breakfast, dessert, or even a delightful afternoon snack.
The beauty of this Easy Cheese Danish Delight recipe lies in its simplicity, allowing both novice and experienced bakers to whip up a delicious pastry with minimal fuss. The allure of homemade pastries is not just in their taste but also in the satisfaction of using fresh, quality ingredients to create something special. In this article, we will delve into the history and cultural significance of Cheese Danishes, explore the essential ingredients that make up this delightful treat, and provide step-by-step instructions to guide you through the baking process.
The Allure of Cheese Danishes
To fully appreciate the Cheese Danish, it’s vital to understand its roots. Originating from Denmark, this pastry has traveled far beyond its humble beginnings to become a staple in bakeries around the world. The Danish pastry itself has a rich history that dates back to the 19th century when Austrian bakers introduced laminated dough techniques to Denmark. This method of folding butter into dough creates the signature flaky texture we associate with danishes today.
The Cheese Danish, in particular, showcases the Danish penchant for delicious fillings. Traditionally made with a cream cheese filling, this pastry has evolved into numerous variations across different cultures. In the United States, for instance, Cheese Danishes are often enjoyed with fruit toppings like cherries or blueberries, adding a burst of color and freshness. In other countries, like Sweden and Norway, these pastries might feature different cheeses or flavorings, highlighting their versatility.
Culturally, the Cheese Danish holds a special place as a symbol of indulgence and comfort. It is often served at gatherings, celebrations, and even as a special breakfast treat, making it a pastry that brings people together. Whether enjoyed alone with a cup of coffee or shared with loved ones, the Cheese Danish is a delightful reminder of the joy that homemade pastries can bring.
Ingredients Overview
Creating the Easy Cheese Danish Delight requires a handful of key ingredients, each playing an integral role in building the flavor and texture of the finished pastry. Let’s break down these essential components:
– Cream Cheese: The star of the filling, cream cheese provides a creamy texture and tangy flavor that is essential for a well-balanced Cheese Danish. Its rich profile makes it ideal for blending with sweeteners and flavorings.
– Granulated Sugar: This ingredient is crucial for balancing the flavors in the filling. It enhances the sweetness while allowing the tanginess of the cream cheese to shine through, creating a harmonious blend.
– Vanilla Extract: A splash of vanilla extract adds depth and warmth to the cream cheese filling. Its aromatic qualities elevate the overall taste, making every bite more enjoyable.
– Puff Pastry: The convenience of using frozen puff pastry cannot be overstated. It allows for quick preparation while delivering a flaky, buttery texture that is the hallmark of a great Danish. The layers created by the pastry make it light and airy, providing the perfect base for the filling.
– Egg Wash: This simple mixture of egg and water is brushed onto the pastry before baking, giving it a golden, glossy finish that is visually appealing and inviting.
– Powdered Sugar and Milk: These ingredients come together to create a sweet drizzle that not only enhances the flavor but also adds a decorative touch to the finished pastries.
– Optional Fresh Fruit: For those looking to elevate their Cheese Danish, adding fresh fruit such as raspberries, strawberries, or apricots can provide a refreshing contrast and a pop of color, making the dish even more enticing.
Step-by-Step Instructions for Success
Now that we have a clear understanding of the ingredients, let’s dive into the preparation and cooking process. This section will ensure clarity and confidence as you embark on your baking journey.
Prepping the Kitchen
A successful baking experience begins with a clean and organized workspace. Before you start, take a few moments to gather all your ingredients and tools. Here’s what you’ll need:
– A baking sheet lined with parchment paper
– A mixing bowl
– A hand mixer or stand mixer
– A rolling pin (if you choose to roll out the puff pastry)
– A pastry brush for the egg wash
– Measuring cups and spoons
An organized kitchen not only makes the process smoother but also helps prevent any last-minute scrambling for ingredients. Once your space is prepped, you’re ready to move on to the filling.
Making the Cheese Filling
Achieving the perfect creamy consistency for the cheese filling is key to a delicious Cheese Danish. Start by taking the cream cheese out of the refrigerator and allowing it to soften at room temperature for about 30 minutes. This will make it easier to mix and create a smooth filling.
In a mixing bowl, combine the softened cream cheese, granulated sugar, and vanilla extract. Using a hand mixer or a stand mixer, beat the mixture on medium speed until it becomes creamy and well-combined. Take a moment to taste the filling; it should be sweet with a hint of tanginess from the cream cheese.
For those looking to add a twist to the classic flavor, consider incorporating a touch of lemon zest for brightness or a few drops of almond extract for a nutty undertone. Both options can elevate the filling and provide a unique flavor profile.
Preparing the Puff Pastry
While the cheese filling is coming together, it’s time to prepare the puff pastry. If you’re using frozen puff pastry, make sure to take it out of the freezer and let it thaw in the refrigerator for a few hours or at room temperature for about 30 minutes. Preheat your oven to 400°F (200°C) during this time so that it’s ready for baking.
Once your puff pastry is thawed, lightly flour your work surface to prevent sticking. Unroll the pastry and, if necessary, roll it out gently with a rolling pin to achieve an even thickness. The goal is to create a rectangle or square, depending on how you want to cut your pastries.
Next, cut the pastry into rectangles or squares, each large enough to hold a generous dollop of the cheese filling. Place the cut pastry pieces on your prepared baking sheet, leaving enough space between each one so they can expand while baking.
With the puff pastry ready, you are well on your way to creating a batch of Easy Cheese Danish Delights that are sure to impress. As we continue through the recipe, the anticipation will build, and soon, the delightful aroma of freshly baked pastries will fill your kitchen.
Stay tuned for the next steps, where we’ll assemble the pastries and watch them transform into golden, flaky delights!

Handling Puff Pastry Effectively
Working with puff pastry can be a delightful experience, but it’s important to handle it correctly to ensure that your Easy Cheese Danish Delight turns out perfectly. To prevent sticking, always keep your workspace and the pastry cool. If the pastry warms up too much, it can become sticky and hard to manage. A good tip is to lightly flour your work surface and rolling pin before you start. If you notice that the dough is becoming too soft, place it back in the refrigerator for a few minutes to firm up.
When it comes to cutting the pastry into uniform squares, precision is key for even baking. Use a sharp knife or a pizza cutter to cut the pastry into squares, typically about 4×4 inches. This size allows for a generous filling and enough edge for folding. A ruler can come in handy if you want to be particularly exact. Ensuring that your squares are the same size means they will bake evenly, resulting in a delightful texture and appearance.
Assembling the Danishes
Assembling your Easy Cheese Danish Delight is where the fun begins! When folding the pastry, there are two main styles to consider: traditional and open-faced. For a traditional Danish, you’ll want to create a small border by folding over the edges of the pastry and pinching them to create a seal. This method helps to contain the cream cheese filling while giving it a lovely raised edge.
If you’re going for an open-faced style, simply leave the center of the pastry square flat while folding up the corners slightly to create a border. This style is visually appealing and allows for a generous amount of filling to be displayed on top. Regardless of which style you choose, it’s crucial to seal the edges properly to prevent leaks during baking. To ensure a good seal, brush a little water along the edges of the pastry before pinching them together.
Baking the Danishes
Baking your danishes to perfection requires attention to detail, starting with preheating your oven. Make sure to preheat the oven to 400°F (200°C) before placing the pastries inside. This high temperature is essential for achieving that beautiful puffiness and golden color that makes danishes so appealing.
Using parchment paper on your baking sheet is another important step to prevent sticking. Lay out your assembled danishes on the parchment-lined sheet, leaving space between each pastry to allow for expansion during baking.
When it comes to knowing when your pastries are perfectly done, keep an eye on the color and puffiness. They should be golden brown and puffed up with a flaky texture. Typically, baking takes about 15-20 minutes, but ovens can vary, so it’s wise to check them a few minutes before the time is up.
Creating the Drizzle
The drizzle adds a finishing touch to your Easy Cheese Danish Delight, making it not just delicious but visually appealing as well. To achieve the right consistency for your drizzle, combine powdered sugar with a small amount of milk or cream in a bowl. Start with a tablespoon of milk and gradually add more until you reach a smooth, pourable consistency. If you want to experiment with flavors, consider adding extracts like vanilla, almond, or lemon zest for an extra layer of taste.
Once your danishes have cooled slightly after baking, drizzle the icing over the top using a piping bag or a simple spoon. This step elevates the presentation and adds a sweet contrast to the creamy cheese filling.
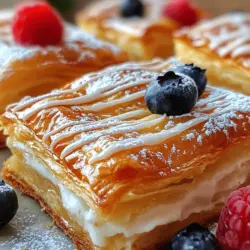
Garnishing and Serving Suggestions
When it comes to presenting your delicious danishes, creativity can really enhance the experience. Arrange the danishes on a decorative platter, perhaps garnishing with fresh fruit like berries or citrus slices for a pop of color. You could also sprinkle some powdered sugar over the top for an elegant finish.
For serving, consider pairing these treats with a warm cup of coffee, a soothing herbal tea, or even a refreshing glass of fruit juice. The rich flavors of the danishes complement these beverages beautifully, making for a delightful breakfast or afternoon snack.
Nutritional Information
Understanding the nutritional aspects of your Easy Cheese Danish Delight is important, especially if you are mindful of dietary choices. On average, one serving of these danishes (one pastry) contains approximately 250-300 calories, depending on the size and specific ingredients used. The cheese filling provides a good source of protein and calcium, while the pastry contributes carbohydrates and some fats.
For those with dietary considerations, keep in mind that traditional puff pastry contains gluten. If you are gluten-sensitive or have celiac disease, look for gluten-free puff pastry options available at most grocery stores. Additionally, the cream cheese filling can be modified to use dairy alternatives for a dairy-free version.
Variations and Customizations
One of the best aspects of the Easy Cheese Danish Delight is its versatility. Here are a few ideas to customize your pastries to your liking:
– Flavor Variations: Try adding different extracts to the cream cheese filling, such as almond extract for a nutty flavor or orange zest for a bright citrus kick. You could even mix in some mini chocolate chips for a sweet surprise.
– Topping Ideas: Get creative with your toppings! Consider drizzling chocolate over the top, adding chopped nuts for crunch, or incorporating fresh fruit like sliced strawberries or blueberries on top of the cream cheese filling before baking.
– Dietary Alternatives: If you’re looking to make the danishes gluten-free, many brands offer puff pastry made from alternative flours. For a dairy-free option, substitute cream cheese with a plant-based cream cheese or a mixture of cashew cream and nutritional yeast.
Conclusion
Creating Easy Cheese Danish Delights at home is a joyful experience that combines the art of baking with the satisfaction of enjoying homemade treats. The process of preparing, assembling, and baking these pastries allows you to explore your creativity while indulging in delicious flavors. Whether you stick to the classic recipe or venture into customizations, the result is a delightful pastry that is sure to impress.
As you embark on your baking adventure, don’t hesitate to experiment with different flavors and toppings to make this recipe your own. The ease of preparation and the rewarding experience of sharing your creations with family and friends make this recipe a must-try. Embrace the joy of baking, and enjoy the delectable results of your Easy Cheese Danish Delights!