Introduction
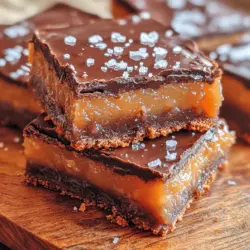
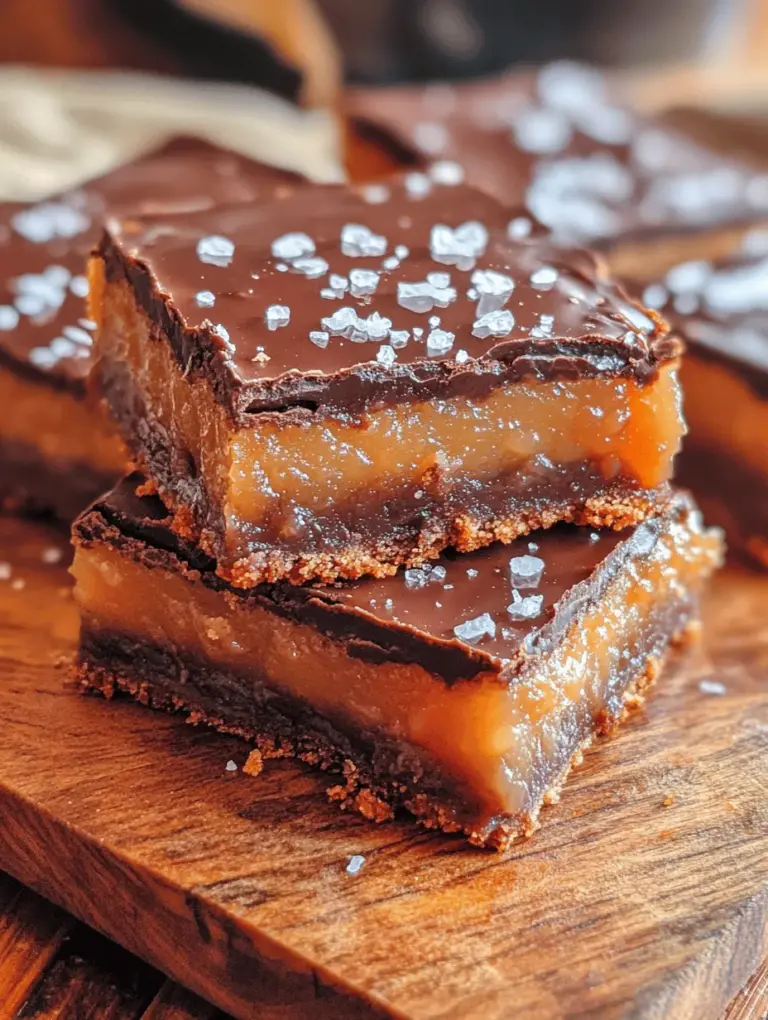
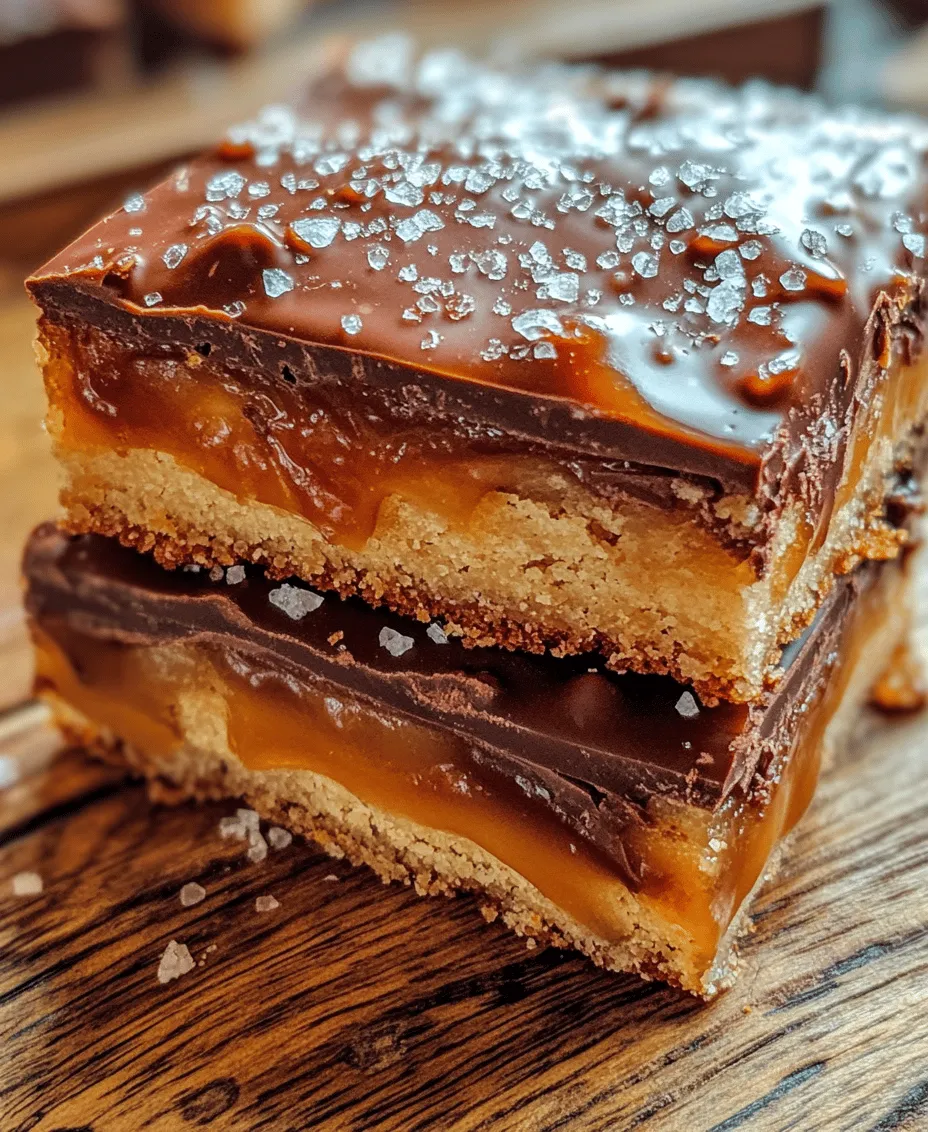
If there’s one dessert that can effortlessly steal the spotlight at any gathering, it’s the Salted Caramel Chocolate Sugar Cookie Bars. These delectable treats offer a perfect fusion of flavors, combining sweet chocolate, rich caramel, and a hint of salt that tantalizes the taste buds. The texture is equally captivating, with a soft, chewy cookie base that cradles a luscious layer of gooey caramel. Whether you’re hosting a birthday party, a holiday celebration, or simply craving a sweet indulgence, these bars are versatile enough to suit any occasion.
What makes these cookie bars particularly appealing is the harmonious balance of flavors. The sweetness of the chocolate and sugar is beautifully complemented by the savory notes of sea salt. This combination not only enhances the overall taste but also adds a sophisticated twist to a classic dessert. Imagine biting into a soft, chewy cookie, followed by the richness of caramel, and finishing with that delightful pop of salt. It’s a flavor experience that leaves you wanting more.
In this recipe, we’ll guide you through the process of creating these scrumptious Salted Caramel Chocolate Sugar Cookie Bars from scratch. Whether you’re an experienced baker or a novice in the kitchen, this recipe is designed to be straightforward and enjoyable. So, roll up your sleeves and get ready to impress your friends and family with these irresistible treats.
Understanding the Ingredients
Before we dive into the baking process, let’s take a closer look at the key components that make these cookie bars so delightful. Understanding the role of each ingredient can help you appreciate the recipe even more and ensure you achieve the best possible results.
All-Purpose Flour
All-purpose flour serves as the foundation for the texture of our cookie bars. It provides the necessary structure and stability, allowing the bars to hold their shape while still being soft and chewy. When measuring your flour, be sure to spoon it into your measuring cup and level it off with a knife for the most accurate amount. This prevents compacting the flour, which can lead to denser cookie bars that lack the desired tenderness.
Unsalted Butter
Using unsalted butter is crucial for controlling the flavor of your cookie bars. It’s important that the butter is at room temperature before you begin mixing. Room temperature butter creams more easily with the sugars, resulting in a light and fluffy texture. If you forget to take the butter out of the refrigerator ahead of time, you can cut it into small cubes and let it sit at room temperature for about 15-20 minutes. Alternatively, you can gently microwave it for about 10 seconds, ensuring it remains cool but soft.
Sugars
In this recipe, we use both granulated sugar and brown sugar. Each type of sugar plays a unique role; granulated sugar contributes to the cookie’s structure, while brown sugar adds moisture and a hint of caramel flavor due to its molasses content. The combination of these sugars creates a well-balanced sweetness that enhances the overall taste of the cookie bars.
Caramel
When it comes to caramel, you have options. You can either make your own homemade caramel sauce or use a store-bought version. Homemade caramel provides a fresh, rich flavor that elevates your dessert, but it does require some additional time and skill. On the other hand, store-bought caramel offers convenience without compromising too much on taste. If you’re short on time or prefer simplicity, opting for a high-quality store-bought caramel can yield delicious results.
Sea Salt
Finally, sea salt is the finishing touch that elevates these cookie bars from good to extraordinary. It enhances the flavors of both the chocolate and caramel, creating an unforgettable taste experience. When sprinkling sea salt on top of the bars before serving, aim for a light, even layer. This will ensure that every bite delivers that perfect salty-sweet balance.
Step-by-Step Guide to Making Salted Caramel Chocolate Sugar Cookie Bars
Now that we have a solid understanding of the ingredients, let’s move on to the exciting part: baking the Salted Caramel Chocolate Sugar Cookie Bars! Below is a step-by-step guide to help you create these delicious treats with ease.
Prepping Your Kitchen: Essential Tools and Equipment
Before we start, it’s essential to gather all the necessary tools and equipment to ensure a smooth baking process. Here’s what you’ll need:
– Baking Pan: A 9×13 inch baking pan is ideal for this recipe. You can choose a metal or glass pan; just keep in mind that baking times may vary slightly depending on the material.
– Mixing Bowls: Have a couple of mixing bowls on hand — one for the dry ingredients and another for the wet ingredients.
– Measuring Cups and Spoons: Accurate measurements are key to successful baking, so ensure you have a set of measuring cups and spoons.
– Utensils: A spatula, wooden spoon, and whisk will be helpful for mixing the ingredients together.
– Parchment Paper: Lining your baking pan with parchment paper will make it easier to remove the bars once they’re baked.
Preheat the Oven: Importance of Temperature Control
Before you begin mixing your ingredients, it’s crucial to preheat your oven to 350°F (175°C). Preheating ensures that the cookie bars bake evenly and achieve the perfect texture. An oven thermometer can be a handy tool to verify that your oven is at the correct temperature, as baking is a science that requires precision.
Creating the Cookie Base
Now that your kitchen is prepped and your oven is preheating, it’s time to create the cookie base for our delicious bars. Follow these steps:
Mixing the Dry Ingredients: Achieving the Right Consistency
In a medium mixing bowl, whisk together the all-purpose flour, baking powder, and a pinch of salt. This step is essential for evenly distributing the leavening agent (baking powder) throughout the flour, ensuring that your cookie bars rise properly. Set this bowl aside while you prepare the wet ingredients.
Creaming the Butter and Sugars: Techniques for Success
In a large mixing bowl, add the room temperature unsalted butter and both the granulated and brown sugars. Using an electric mixer, cream the butter and sugars together on medium speed until the mixture is light and fluffy, usually about 2-3 minutes. This process incorporates air into the butter, which will help your cookie bars rise and achieve a tender texture.
Tips for Achieving a Light and Fluffy Texture
– Scrape the Bowl: Don’t forget to stop and scrape down the sides of the bowl with a spatula to ensure all ingredients are well incorporated.
– Add Sugar Gradually: If you’re having trouble achieving that light texture, try adding the sugars gradually instead of all at once.
Incorporating the Egg and Vanilla: Flavor Infusion
Once your butter and sugars are creamed, it’s time to add the egg and vanilla extract. Mix on low speed until just combined, being careful not to overmix. The egg adds moisture and richness, while the vanilla enhances the overall flavor of the cookie bars.
Baking the Cookie Base
With your dough ready, it’s important to spread it evenly in the prepared baking pan to ensure uniform baking.
Properly Spreading the Dough: Techniques for Even Baking
Using a spatula, scoop the cookie dough into the lined baking pan and spread it out evenly. You can also use your hands to gently press the dough into the corners and all over the pan. Make sure the layer of dough is of uniform thickness to avoid uneven baking.
Now you’re ready to bake! Place the pan in the preheated oven and let the bars bake for about 20-25 minutes or until the edges are lightly golden and a toothpick inserted into the center comes out with a few moist crumbs.
As the bars bake, the tantalizing aroma of chocolate and caramel will fill your kitchen, setting the stage for the delicious treat that awaits.
Stay tuned for the next part, where we’ll dive into how to add the luscious caramel layer and finish off these Salted Caramel Chocolate Sugar Cookie Bars to perfection!
Baking Time and Indicators for Doneness
To achieve the perfect Salted Caramel Chocolate Sugar Cookie Bars, understanding the baking time and indicators for doneness is crucial. Typically, these bars will bake in a preheated oven at 350°F (175°C) for about 25 to 30 minutes. However, baking times can vary depending on your oven’s performance and the thickness of your cookie layer.
Recognizing the perfect bake is essential: underbaked bars will be soft and gooey in the center, while overbaked ones will dry out and lose that delightful chewiness. A good rule of thumb is to start checking for doneness around the 25-minute mark. Insert a toothpick into the center; it should come out with a few moist crumbs clinging to it, indicating that the bars are perfectly baked. If the toothpick comes out clean, you may have overbaked them, so keep an eye on the time!
Crafting the Caramel Layer
Choosing Between Store-Bought and Homemade Caramel
When it comes to the caramel layer, you have two primary options: store-bought or homemade. Both choices have their merits, but knowing the pros and cons can help you decide which route to take.
Store-Bought Caramel: This is a time-saver and is readily available in most grocery stores. It saves you the hassle of making caramel from scratch, ensuring a consistent taste and texture. However, store-bought caramel can sometimes contain preservatives and additives that may affect flavor.
Homemade Caramel: Making your caramel from scratch allows you to control the ingredients and customize the flavor. Homemade caramel tends to have a richer, more complex taste compared to its store-bought counterpart. The downside is that it requires a bit more time and attention to make, as sugar can easily burn if not monitored closely.
Melting Caramel with Heavy Cream: Creating the Perfect Consistency
If you opt to create a homemade caramel, the process involves melting sugar until it reaches a deep amber color and then carefully incorporating heavy cream. The addition of cream not only helps to cool down the caramel but also contributes to a creamy texture.
Tips for Avoiding Burning the Caramel:
1. Use a heavy-bottomed saucepan to distribute heat evenly.
2. Stir the sugar constantly as it melts to prevent hot spots.
3. Once the sugar turns amber, remove it from heat immediately to avoid burning.
4. Always add the cream slowly, as the mixture will bubble vigorously.
Assembling the Cookie Bars
Pouring the Caramel: Techniques for Even Distribution
Once your caramel is ready, it’s time to pour it over the baked cookie base. To achieve an even distribution, start by pouring the caramel in the center of the cookie layer and gently spread it to the edges using a spatula. This technique helps prevent the caramel from pooling in one area, ensuring every bite is deliciously gooey.
The Role of Sea Salt: Balancing Sweetness and Enhancing Flavor
To elevate your Salted Caramel Chocolate Sugar Cookie Bars, don’t forget to sprinkle sea salt over the caramel layer. The salt brings out the sweetness of the caramel and chocolate while adding a textural contrast. Use flaky sea salt for a sophisticated touch; it melts slightly into the warm caramel, creating a delightful flavor balance.
Making the Chocolate Topping
Melting Chocolate: Best Practices for Smoothness
For the chocolate topping, you can use semi-sweet or dark chocolate, depending on your preference. To melt the chocolate smoothly, chop it into small, uniform pieces. You can melt chocolate using a double boiler or in the microwave. If using the microwave, heat in short bursts of 20 seconds, stirring in between to prevent overheating.
The Role of Coconut Oil for Shine
To enhance the shine and smoothness of your chocolate topping, consider adding a tablespoon of coconut oil while melting the chocolate. This not only gives a glossy finish but also helps the chocolate spread more easily over the caramel layer.
Pouring and Spreading the Chocolate: Ensuring a Beautiful Finish
Once melted, pour the chocolate over the caramel layer, allowing it to flow to the edges naturally. Use a spatula to spread it evenly across the surface, ensuring that every corner is covered. The glossy chocolate layer will create an appealing contrast against the caramel and cookie base.
Chilling and Cutting the Bars
Importance of Cooling: Setting the Layers Properly
After assembling the layers, it’s essential to let the bars cool completely before cutting. Allow them to chill in the refrigerator for at least 1-2 hours. This cooling period lets the caramel and chocolate set, making it easier to cut into neat squares without compromising the layers.
Tips for Cutting Even Squares: Achieving a Professional Look
To cut your cookie bars into perfect squares, use a sharp knife that has been warmed under hot water. Wipe the knife clean between cuts to maintain clean edges. For an even more polished look, you can use a ruler to measure and mark the cutting lines before slicing.
Serving Suggestions and Pairings
Ideal Occasions for Serving the Cookie Bars
These Salted Caramel Chocolate Sugar Cookie Bars are perfect for various occasions, from casual gatherings to formal events. They make an excellent addition to dessert tables at birthday parties, holiday celebrations, or simply as a weekend treat for friends and family. Their rich flavors are sure to impress anyone who tries them!
Beverage Pairings: Coffee, Milk, or Dessert Wines
To elevate your dessert experience, consider pairing these cookie bars with beverages that complement their rich flavors. A cup of freshly brewed coffee or espresso can balance the sweetness, while a glass of cold milk offers a nostalgic touch. For a more sophisticated pairing, try serving them with dessert wines like Port or a sweet Riesling, which harmonizes beautifully with the caramel and chocolate.
Presentation Ideas to Impress Guests
Presentation can elevate the experience of enjoying these cookie bars. Consider serving them on a rustic wooden board or a colorful platter. Drizzle some extra melted chocolate or caramel over the top for a decorative touch. Topping each square with a sprinkle of sea salt will not only enhance the flavor but also add visual appeal.
Nutritional Information and Serving Size
Breakdown of Serving Size and Calories per Bar
These indulgent treats, while delicious, are best enjoyed in moderation. Each bar typically contains around 250 calories, depending on the size and specific ingredients used. A standard serving size is one square, but you may find yourself reaching for a second or third!
Overview of Nutritional Content: Balancing Indulgence with Enjoyment
In terms of nutritional content, these cookie bars are a delightful combination of sugar, fat, and carbohydrates, delivering a rich flavor and satisfying texture. While they are a dessert, incorporating quality ingredients such as dark chocolate and sea salt provides some balance. Remember, it’s all about enjoying these treats occasionally rather than making them a daily indulgence.
Conclusion
Recap the Delightful Experience of Making and Enjoying Salted Caramel Chocolate Sugar Cookie Bars
Creating Salted Caramel Chocolate Sugar Cookie Bars is not just about following a recipe; it’s about the joy of baking and the delight of sharing. The combination of a soft, chewy cookie base, a layer of rich caramel, and a glossy chocolate topping makes for an unforgettable treat that can satisfy any sweet tooth.
Encourage Readers to Try the Recipe and Share Their Experiences
We encourage you to try making these cookie bars in your own kitchen. Share your baking adventures and any personal twists you put on the recipe with friends and family. Each batch can be unique, reflecting your own creativity and tastes.
Emphasize the Joy of Baking and Sharing These Delicious Treats with Loved Ones
Remember, baking is a wonderful way to connect with loved ones. Whether you’re preparing these bars for a celebration or just to enjoy at home, the act of sharing delicious treats can bring people together. So preheat your oven, gather your ingredients, and get ready to create a memorable dessert experience with these delectable Salted Caramel Chocolate Sugar Cookie Bars. Enjoy every bite, and happy baking!