Introduction
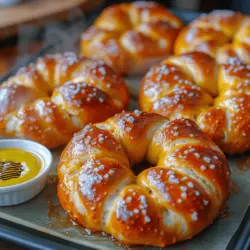
The aroma of freshly baked pretzels wafting through the kitchen is an irresistible call to anyone with a love for warm, soft bread. Homemade pretzels bring an undeniable charm, an inviting warmth that store-bought varieties simply cannot replicate. A perfect pretzel is not just about flavor; it’s about texture, and nothing beats the delightful fluffiness of a well-made pretzel. With their iconic twisted shape and the ability to be topped with your choice of flavorings, pretzels can be a fun and rewarding baking adventure.
In this recipe, we will explore how to make Fluffy Twisted Delight Pretzels that boast an airy interior and a chewy exterior, all enhanced by your choice of tantalizing toppings. These pretzels are designed to be a culinary delight, perfect for a snack, party food, or even just an indulgent treat for yourself. To achieve the best results, it is crucial to use quality ingredients and follow each step carefully. Whether you are a seasoned baker or a novice in the kitchen, you will find that the process of making your own pretzels is both enjoyable and satisfying.
Understanding Pretzels: A Cultural and Culinary Overview
Pretzels have a rich history that spans centuries and continents. Originating from ancient times, the exact beginnings of pretzels are somewhat obscure, but they are believed to have first appeared in Europe, particularly in Germany and Italy. The twisted shape of pretzels is said to symbolize arms crossed in prayer, and they were often associated with religious observances. Over time, pretzels evolved, spreading across Europe and becoming a staple in various forms.
Today, pretzels can be found in many different cultures, each with its own unique twist. In Germany, soft pretzels are a beloved street food, often served with mustard or cheese. In the United States, pretzels have become synonymous with sporting events and snack stands, often enjoyed with a side of warm cheese dip. The appeal of soft pretzels has surged in modern culinary trends, with artisan bakeries and food trucks offering gourmet variations topped with everything from cinnamon sugar to garlic and herbs.
This Fluffy Twisted Delight Pretzel recipe embraces the classic elements of traditional pretzels while allowing for creativity and personalization. With a perfect balance of chewiness and softness, these pretzels are a delightful treat that can cater to a variety of palates.
Ingredients Breakdown
To create the perfect Fluffy Twisted Delight Pretzels, it is important to understand the role of each ingredient in the recipe. Here’s a comprehensive breakdown:
– All-Purpose Flour: The backbone of the pretzel, all-purpose flour provides structure and texture. It contains a moderate amount of protein, which helps develop gluten, giving the pretzel its chewy characteristic. For the best results, use high-quality flour that will yield a nice, elastic dough.
– Active Dry Yeast: Yeast is the leavening agent that causes the dough to rise. Active dry yeast works by fermenting the sugars present in the dough, producing carbon dioxide and alcohol, which makes the dough expand and become light and fluffy. It is essential to activate the yeast properly to ensure a good rise.
– Warm Water: The temperature of the water is crucial for yeast activation. It should be warm, approximately 110°F (43°C), to help the yeast bloom without killing it. Water is also the medium that brings the dry ingredients together, forming the dough.
– Granulated Sugar: A small amount of sugar is added to the dough not only to enhance flavor but also to feed the yeast, promoting better fermentation and rising. This slight sweetness complements the salty exterior of the pretzel beautifully.
– Salt: Salt serves multiple purposes in this recipe. It enhances the overall flavor and helps to strengthen the dough by regulating yeast activity, ensuring that the pretzels rise properly without becoming overly sticky.
– Baking Soda: This ingredient is essential for the unique pretzel color and texture. When the pretzels are boiled in a baking soda solution before baking, it creates a chemical reaction that gives them their characteristic deep brown crust and distinctive flavor.
– Egg Wash: An egg wash applied before baking gives the pretzels a shiny, golden-brown finish. It contributes to the visual appeal and adds richness to the flavor.
– Coarse Sea Salt: This is the classic topping for pretzels, providing a burst of salty flavor that contrasts beautifully with the soft bread. It also enhances the presentation, making the pretzels visually enticing.
– Optional Melted Butter: After baking, you may choose to brush the pretzels with melted butter for added richness and flavor. This step is optional but highly recommended for those who enjoy a buttery finish.
Step-by-Step Instructions for Fluffy Twisted Delight Pretzels
Activating the Yeast
The first step in creating your Fluffy Twisted Delight Pretzels is to activate the yeast. Begin by measuring out the warm water in a small bowl. Sprinkle the active dry yeast and a pinch of sugar over the water, stirring gently to combine. Allow this mixture to sit for about 5 to 10 minutes. During this time, the yeast will froth and bubble, indicating that it is alive and ready to use. This initial activation is crucial as it ensures that your pretzel dough will rise properly, resulting in that light and fluffy texture we all adore.
Mixing the Dough
Once the yeast is activated, it’s time to combine the ingredients to form the dough. In a large mixing bowl, combine the all-purpose flour, granulated sugar, and salt. Make a well in the center of the dry ingredients and pour in the activated yeast mixture along with the warm water. Using a wooden spoon or a dough mixer, start mixing the ingredients until they come together to form a shaggy dough. The dough should be slightly sticky but manageable. If it is too dry, you can add a little extra warm water, one tablespoon at a time, until the desired consistency is achieved.
Kneading the Dough
After mixing, turn the dough out onto a floured surface. Begin kneading the dough by folding it over onto itself and pressing it down with the heels of your hands. Rotate the dough a quarter turn and repeat the process. Knead the dough for about 8 to 10 minutes until it is smooth and elastic. You can tell it’s ready when it springs back when poked lightly. Kneading is essential for developing the gluten, which will give your pretzels their characteristic chewiness.
Proofing the Dough
Once the dough has been kneaded to perfection, place it in a lightly oiled bowl, turning it once to coat the surface with oil. Cover the bowl with a clean kitchen towel or plastic wrap and let it rise in a warm, draft-free area until it has doubled in size. This typically takes about 1 to 1.5 hours. The proofing stage is crucial; it allows the yeast to ferment, creating air pockets within the dough that will lead to a fluffy pretzel.
Shaping the Pretzels
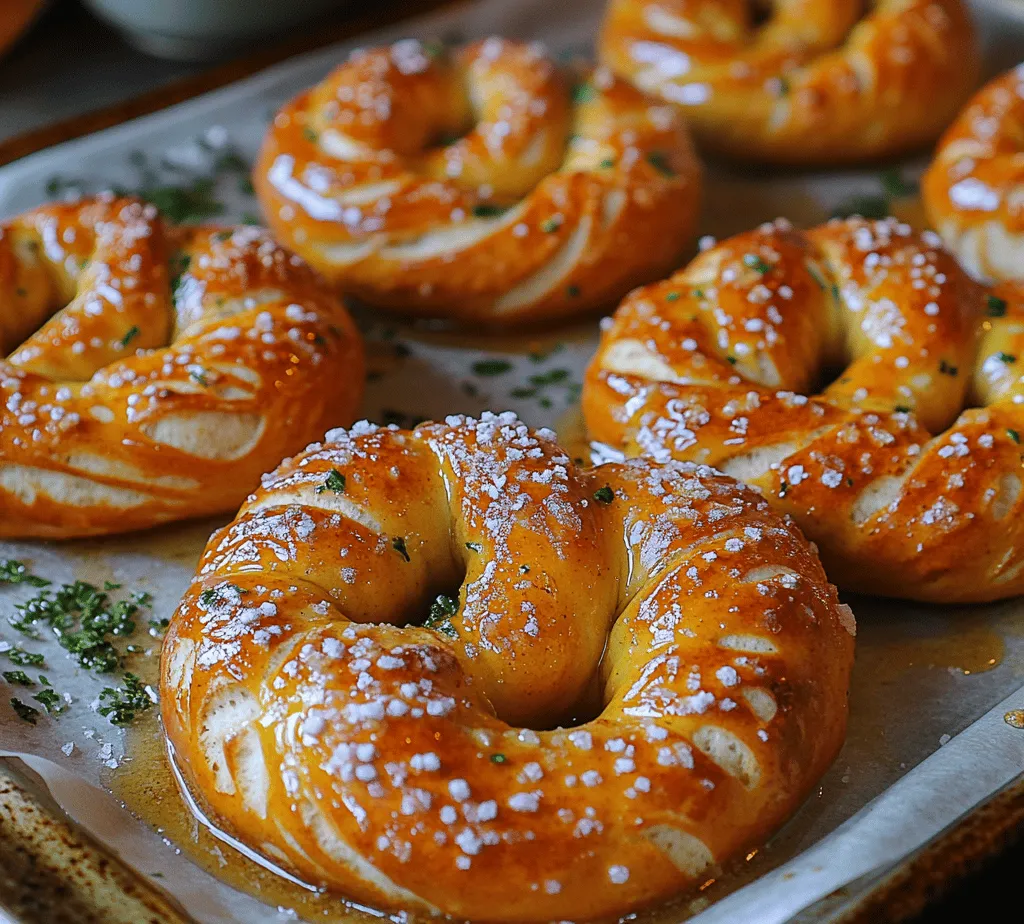
After the dough has risen, punch it down gently to release the air. Turn it out onto a clean surface and divide it into equal pieces, typically about 8 to 10, depending on your preferred size. Roll each piece into a long rope, about 24 inches in length. To shape the pretzel, form the rope into a ‘U’ shape, twist the ends together twice, and then fold them down towards the bottom of the ‘U,’ pressing them to secure the shape. Repeat this process for each piece of dough, ensuring each pretzel maintains its signature twisted form.
Boiling the Pretzels
Once shaped, it’s time to boil the pretzels, which is a key step in achieving that iconic pretzel color and texture. In a large pot, bring about 4 cups of water to a gentle boil and add 1/4 cup of baking soda. This creates an alkaline solution that will give the pretzels their distinctive flavor and golden-brown color. Carefully lower each pretzel into the boiling water, cooking them for about 30 seconds on each side. Use a slotted spoon to remove them and place them on a baking sheet lined with parchment paper.
Egg Washing and Topping
After boiling, it’s time to add the finishing touches. Preheat your oven to 450°F (232°C). While the oven is heating, prepare the egg wash by beating an egg in a small bowl. Brush the egg wash generously over each pretzel, ensuring even coverage for that beautiful shine. Then, sprinkle coarse sea salt over the top of each pretzel, allowing it to adhere to the egg wash.
With the pretzels prepped and ready, they will soon be transformed into golden, fluffy delights that are sure to impress anyone who tries them.
The next steps of baking and enjoying your Fluffy Twisted Delight Pretzels will be covered in the continuation of this recipe article, where we will delve into the baking process, additional topping options, and tips for the best results. Stay tuned for the final touches that will elevate these pretzels to their ultimate deliciousness.
Kneading the Dough: Tips for Achieving Smooth and Elastic Dough
Kneading is a crucial step in pretzel-making that transforms your ingredients into a cohesive and elastic dough. To achieve that perfect consistency, begin by dusting your work surface with a light sprinkle of flour. Transfer the dough from the mixing bowl onto the floured surface and start kneading with the heel of your hand. Push the dough away from you, fold it over itself, and rotate it a quarter turn. Repeat this process for about 8 to 10 minutes.
The key to a smooth dough is to add flour gradually; if the dough feels sticky, sprinkle a bit more flour as you knead. However, be careful not to add too much flour, as this can lead to dry pretzels. The dough should be soft and slightly tacky without being overly sticky. A well-kneaded dough will spring back when poked and have a silky texture, indicating adequate gluten development, which is essential for that fluffy pretzel bite.
First Rise: Understanding the Fermentation Process and Its Significance
After kneading, place your dough in a lightly oiled bowl and cover it with a clean kitchen towel or plastic wrap. This initial rise, known as fermentation, is vital for flavor and texture development. During this time, the yeast feeds on the sugars present in the dough, producing carbon dioxide gas that causes the dough to expand.
Let the dough rise in a warm, draft-free area for about 1 hour, or until it has doubled in size. This rise not only contributes to the lightness of the final product but also enhances the flavors developed during fermentation. Patience is key; the longer you allow the dough to rise (up to 2 hours if you prefer deeper flavor), the more complex the taste will become.
Shaping the Pretzels: Techniques for Creating the Perfect Twisted Shape
Once your dough has completed its first rise, it’s time to shape the pretzels. Start by gently punching down the dough to release excess gas, then divide it into equal portions (typically, this recipe yields about 8 pretzels). Roll each piece into a long rope, about 24 inches in length.
To create the twisted shape, form a U shape with the rope, cross the ends over each other, and then twist them around each other twice before bringing the ends down to the bottom of the U, pressing them gently to seal.
For visual guidance, you can find numerous videos online that showcase the twisting technique. Remember, practice makes perfect, and even if your first pretzels aren’t flawless, they will still taste delicious!
Boiling the Pretzels: The Science Behind the Baking Soda Bath
One of the defining characteristics of pretzels is their unique chewy texture, which is achieved through boiling before baking. Prepare a large pot of water and bring it to a gentle boil. Add about 1/2 cup of baking soda to the boiling water; this alkaline solution is what gives pretzels their characteristic flavor and color.
Carefully lower each shaped pretzel into the boiling water using a slotted spoon, boiling for about 30 seconds on each side. This step helps to set the crust and enhances the golden-brown color. Remove the pretzels from the water, allowing any excess water to drip off before placing them on a parchment-lined baking sheet.
Egg Washing: How It Contributes to the Final Look and Texture
Before baking, brushing the pretzels with an egg wash is essential. To create an egg wash, whisk together one egg with a tablespoon of water until well combined. The egg wash not only gives the pretzels a beautiful glossy finish but also helps the toppings adhere better.
Using a pastry brush, generously coat each pretzel with the egg wash. This step is crucial for achieving that signature pretzel sheen and enhances the overall visual appeal. If you wish, sprinkle coarse sea salt or your favorite seasoning on top before baking.
Baking Process: Optimal Temperatures and Timing for Perfect Pretzels
Preheat your oven to 450°F (232°C) while preparing the pretzels. Baking at a high temperature is essential for achieving that perfect balance of a crispy exterior and a soft, fluffy interior. Once your pretzels are egg-washed and topped, place them in the preheated oven and bake for 12 to 15 minutes or until they turn a deep golden brown.
Rotate the baking sheet halfway through the baking time to ensure even cooking. Keep an eye on the pretzels, as oven temperatures can vary, and you want to avoid over-baking them. A well-baked pretzel will be firm to the touch yet soft when bitten into.
Serving Suggestions: Ideas for Dips and Pairings to Enhance Flavor
Your homemade pretzels are now ready to be enjoyed! While they are delicious on their own, serving them with dips can elevate the experience. Here are some mouthwatering pairing ideas:
– Cheese Sauce: A warm, gooey cheese dip made with cheddar or a blend of your favorite cheeses is a classic choice.
– Mustard: A tangy mustard, whether yellow, spicy brown, or honey mustard, complements the salty pretzel perfectly.
– Hummus: For a healthier option, serve them with a creamy hummus, adding an exciting twist to the traditional pretzel experience.
– Chocolate Sauce: If you are feeling indulgent, consider drizzling some melted chocolate over sweet pretzel variations or serving chocolate sauce on the side.
Troubleshooting Common Pretzel-Making Issues
Even the most seasoned bakers can encounter challenges in the kitchen. Here are some common issues and how to solve them:
Addressing Sticky Dough: Solutions and Adjustments
If your dough remains sticky even after kneading, it may need more flour. Gradually incorporate additional flour until the dough reaches the right consistency. Alternatively, if the dough feels too dry, a small amount of water can be added to restore moisture.
What to Do if Pretzels Don’t Rise Properly
If your pretzels fail to rise adequately, ensure your yeast is fresh and actively bubbling before mixing it with the dough. Additionally, check the temperature of your rising area—if it’s too cold, the yeast may not activate properly. If all else fails, allow for a longer rising time.
Ensuring a Golden Brown Finish: Adjusting Baking Time and Temperature
If your pretzels are not achieving that beautiful golden-brown finish, consider increasing the oven temperature slightly or extending the baking time by a few minutes. Always keep an eye on them to prevent burning.
The Science Behind Pretzel Making
Understanding the science behind pretzel-making can enhance your baking skills and improve the quality of your pretzels.
The Role of Yeast Fermentation in Pretzel Texture
Yeast plays a crucial role in creating the light, airy texture of pretzels. As yeast ferments, it produces carbon dioxide gas, which expands the dough and creates those delightful air pockets. The fermentation process also contributes to the pretzel’s flavor profile, as the yeast develops more complex flavors over time.
Understanding the Maillard Reaction in Baking
The Maillard reaction is responsible for the browning of baked goods, including pretzels. This chemical reaction occurs between amino acids and reducing sugars when exposed to heat, creating a rich flavor and appealing color. The high baking temperature of pretzels initiates this reaction, resulting in that signature golden-brown crust.
How Baking Soda Affects the Final Product
Baking soda serves two primary functions in pretzel-making. First, it changes the pH of the water during the boiling process, resulting in a darker color and chewier texture. Second, it contributes to the unique flavor characteristic of pretzels. The alkaline environment created by baking soda also helps create that desirable crust during baking.
Creative Variations on the Classic Pretzel Recipe
Once you’ve mastered the classic pretzel, you can experiment with various flavors and styles to suit your taste.
Incorporating Flavors: Garlic, Cheese, or Herbs into the Dough
Enhancing your pretzel dough with additional flavors can create a delightful twist. Consider adding minced garlic, grated cheese, or fresh herbs like rosemary or thyme directly into the dough before kneading for a unique flavor profile.
Sweet Pretzel Options: Cinnamon Sugar or Chocolate-Covered Variations
For a sweet treat, roll your pretzels in a mixture of cinnamon and sugar after boiling and before baking. Alternatively, dip your baked pretzels in melted chocolate for a decadent dessert option.
Gluten-Free Alternatives: Suggested Flour Substitutes for Dietary Needs
For those with gluten sensitivities, gluten-free pretzel recipes can be developed using gluten-free flour blends. Look for blends that contain xanthan gum, which helps mimic the elasticity of traditional wheat flour.
Conclusion
Making homemade pretzels is not just about the end product; it’s about the joy and satisfaction that comes from the process. There’s something truly special about crafting these delightful treats from scratch, whether you’re enjoying them solo or sharing them with friends and family.
As you gain confidence in your pretzel-making skills, don’t shy away from experimenting with different flavors, shapes, and toppings. Each batch can be a new opportunity to explore and create something unique. The communal nature of baking brings people together, and sharing your homemade pretzels can be a celebratory experience that fosters connection and joy. So roll up your sleeves, unleash your creativity, and dive into the wonderful world of pretzel-making!