Decadent Red Velvet Strawberry Cheesecake: A Delightful Dessert Recipe
 Save
Save
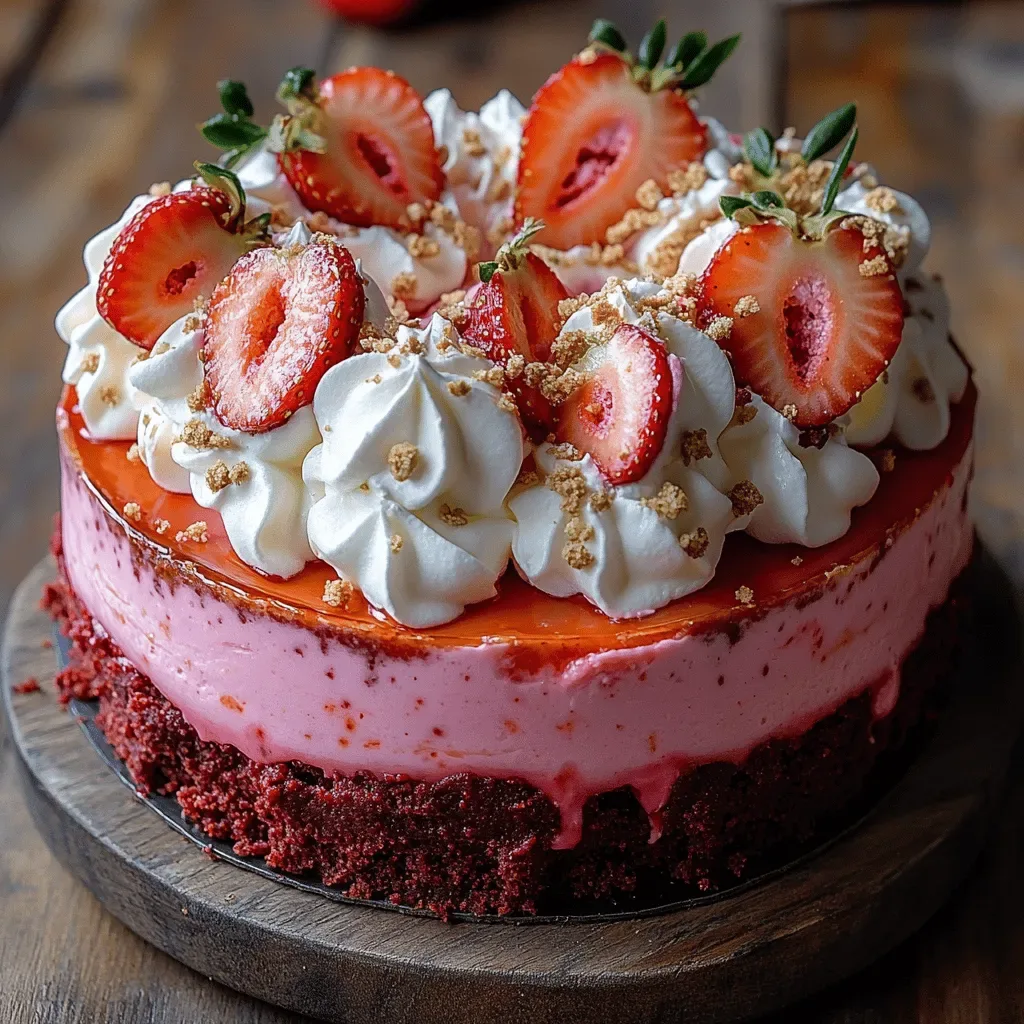
Imagine a dessert that looks as stunning as it tastes—layers of velvety red cake, creamy strawberry‑kissed cheesecake, and a glossy strawberry swirl that glisten like sunrise on a summer morning. This Decadent Red Velvet Strawberry Cheesecake brings that vision to life, perfect for a leisurely brunch or a celebratory breakfast.
What sets this recipe apart is the marriage of two classic favorites: the iconic red‑velvet cake and the rich, tangy cheesecake. A fresh strawberry puree is folded into the filling, creating a natural pink ribbon that weaves through every bite, while a buttery graham‑cracker crust adds a subtle crunch.
Anyone who loves a touch of elegance on their plate will adore this treat—whether you’re feeding a family gathering, impressing brunch guests, or simply indulging in a weekend treat. It shines at birthday brunches, Mother’s Day celebrations, or any occasion that calls for a show‑stopping dessert.
The process is straightforward: start with a quick crust, bake a thin red‑velvet layer, swirl strawberry puree into a silky cheesecake filling, and finish with a light topping. With clear steps and a few essential tips, you’ll have a bakery‑quality masterpiece without leaving your kitchen.
Why You'll Love This Recipe
Show‑Stopping Visuals: The vibrant red‑velvet base contrasted with the pink strawberry swirl creates a dessert that looks as impressive as it tastes, making it perfect for photo‑ready brunch tables.
Layered Flavor Complexity: Each bite delivers buttery crust, cocoa‑kissed cake, tangy cheesecake, and fresh strawberry notes, offering a symphony of textures and flavors that keep guests coming back for more.
Make‑Ahead Friendly: The cheesecake can be assembled the night before, allowing the flavors to meld while you enjoy a stress‑free morning serving a perfectly set dessert.
Customizable Toppings: From whipped cream to fresh berries or a drizzle of chocolate, the topping options let you tailor the final look and taste to suit any palate or occasion.
Tips & Tricks
Perfecting the Recipe
Room‑Temperature Ingredients: Soften cream cheese, eggs, and butter before mixing. This creates a smoother batter and prevents unsightly lumps that can cause cracks.
Water Bath Importance: The gentle steam from a water bath keeps the cheesecake’s surface moist, ensuring an even bake and minimizing cracks.
Don’t Over‑Bake: Look for a slight wobble in the center; the residual heat will finish setting the filling while keeping it creamy.
Cool Slowly: An hour in the turned‑off oven followed by a room‑temperature rest prevents sudden temperature shocks that cause cracks.
Flavor Enhancements
Add a splash of vanilla‑bean paste to the cheesecake filling for a deeper vanilla note, or fold in a tablespoon of finely chopped pistachios for subtle crunch. A drizzle of white chocolate ganache over the top adds luxurious richness without overpowering the strawberry swirl.
Common Mistakes to Avoid
Avoid opening the oven door during the water‑bath bake; the sudden temperature drop can cause the surface to crack. Also, don’t over‑mix the batter—excess air will expand in the oven and create cracks once cooled.
Pro Tips
Use a Light‑Colored Springform Pan: Dark pans absorb more heat, potentially over‑baking the edges while the center stays soft.
Seal the Pan with Foil: Wrapping the pan in foil prevents water from seeping into the crust, keeping it crisp.
Chill the Topping: Keep whipped cream and fresh berries chilled until serving to maintain texture and prevent sogginess.
Use a Sharp Knife for Swirls: A thin, flexible knife creates clean, elegant marble patterns without tearing the batter.
Variations
Ingredient Swaps
Swap the graham‑cracker crust for a chocolate cookie base for an extra cocoa kick. Use frozen raspberries instead of strawberries for a tart contrast, or blend a mix of berries for a rainbow swirl. For a dairy‑free version, replace cream cheese with a high‑fat coconut cream cheese and use coconut oil in the crust.
Dietary Adjustments
To make the dessert gluten‑free, ensure the graham crackers are certified gluten‑free or substitute with almond flour and coconut sugar. For a lower‑sugar option, halve the granulated sugar in the filling and use a sugar‑free sweetener in the strawberry puree. Keto‑friendly bakers can replace the flour with almond flour and use erythritol in place of sugar.
Serving Suggestions
Serve each slice with a dollop of lightly sweetened Greek yogurt for a tangy balance, or pair with a glass of chilled rosé or sparkling water infused with fresh mint. For a brunch spread, accompany the cheesecake with a light citrus salad to cut through the richness.
Storage Info
Leftover Storage
Allow the cheesecake to cool completely, then cover the springform pan tightly with plastic wrap. Store in an airtight container in the refrigerator for up to 4 days. For longer keeping, slice and wrap individual portions in parchment, then freeze in a zip‑top bag for up to 2 months.
Reheating Instructions
To enjoy leftovers, thaw frozen slices in the refrigerator overnight. Warm gently in a 300°F oven for 10‑12 minutes, covered with foil to prevent drying. Alternatively, microwave a single slice on low power for 30‑45 seconds, adding a splash of milk or cream to restore silkiness.
Frequently Asked Questions
Can I make this cheesecake ahead of time?
What if I don’t have fresh strawberries?
How do I prevent cracks in the cheesecake?
This Decadent Red Velvet Strawberry Cheesecake blends striking color, layered texture, and fresh fruit flavor into a brunch‑worthy centerpiece. By following the step‑by‑step guide, using the tips for flawless baking, and experimenting with suggested variations, you’ll create a dessert that feels both indulgent and approachable. Feel free to add your own twists—perhaps a drizzle of chocolate or a sprinkle of toasted nuts—and enjoy every elegant slice with friends and family.
Decadent Red Velvet Strawberry Cheesecake: A Delightful Dessert Recipe
Delicious Decadent Red Velvet Strawberry Cheesecake: A Delightful Dessert Recipe
Ingredients
Crust
- 1 1/2 cups graham cracker crumbs
- 3 tbsp granulated sugar
- 6 tbsp unsalted butter, melted
Red Velvet Cake Layer
- 1 cup all‑purpose flour
- 1/4 cup unsweetened cocoa powder
- 1 tsp baking powder
- 1/2 tsp baking soda
- 1/4 tsp salt
- 3/4 cup granulated sugar
- 1/2 cup vegetable oil
- 2 large eggs
- 1 tbsp red food coloring
- 1 tsp vanilla extract
- 1 tbsp buttermilk
- 1 tsp white vinegar
Strawberry Swirl
- 1 cup fresh strawberries, hulled and diced
- 2 tbsp granulated sugar
- 1 tsp lemon juice
Cheesecake Filling
- 16 oz cream cheese, softened
- 1/2 cup granulated sugar
- 2 large eggs
- 1 tsp vanilla extract
- 1/2 cup sour cream
- 2 tbsp heavy cream
Optional Topping
- Whipped cream
- Fresh strawberry slices
- Red‑velvet cake crumbs
Instructions
Making the Red Velvet Cake Layer
- Preheat Oven. Set the oven to 325°F (163°C) and place a rack in the middle. A lower temperature ensures the cake stays moist and doesn’t over‑bake while the cheesecake sets.
- Mix Dry Ingredients. In a large bowl whisk together flour, cocoa powder, baking powder, baking soda, and salt. This guarantees an even distribution of leaveners and prevents clumps.
- Combine Wet Ingredients. In a separate bowl beat sugar and oil, then add eggs one at a time. Stir in food coloring, vanilla, buttermilk, and vinegar; the acidity reacts with the soda for a tender crumb.
- Blend Together. Gradually add the dry mixture to the wet, mixing just until smooth. Over‑mixing would develop gluten and make the cake dense.
- Pour Over Crust. Spread the batter over the chilled crust, smoothing the top with a spatula. Bake for 20‑25 minutes, or until a toothpick inserted near the center comes out clean. Let cool completely before adding the cheesecake layer.
Baking the Cheesecake
- Beat Cream Cheese. In a stand mixer, beat softened cream cheese on medium speed until fluffy, about 2 minutes. This eliminates lumps that could cause cracks.
- Add Sugar and Eggs. Gradually add sugar, then eggs one at a time, mixing on low. Over‑mixing at this stage can incorporate too much air, leading to cracks during baking.
- Incorporate Flavorings. Stir in vanilla, sour cream, and heavy cream until the batter is silky and glossy.
- Swirl Strawberry. Pour half of the cheesecake batter over the cooled cake layer, then dollop spoonfuls of strawberry puree across the surface. Use a thin knife to gently swirl, creating a marbled effect. Finish with the remaining batter, spreading evenly.
- Bake in Water Bath. Wrap the springform pan in foil, place it in a larger roasting pan, and fill the outer pan with hot water halfway up the sides. Bake at 325°F for 45‑55 minutes, until the edges are set but the center still has a slight jiggle.
- Cool Gradually. Turn off the oven, crack the door, and let the cheesecake cool inside for 1 hour. This gradual temperature change reduces the risk of cracking.
Similar Recipes
 Desserts
Cheesecake Bliss Cookies: A Delightful Treat
Delicious Cheesecake Bliss Cookies: A Delightful Treat
 Desserts
Berry-Banana Freeze Delight: The Ultimate Frozen Treat
Delicious Berry-Banana Freeze Delight: The Ultimate Frozen Treat
 Desserts
Fudgy Brownies Using Cocoa Powder from Your Pantry
Learn how to make delicious Fudgy Brownies Using Cocoa Powder from Your Pantry. Easy recipe with…
 Desserts
Cozy Autumn Apple Butter Recipe
Delicious Cozy Autumn Apple Butter Recipe
 Desserts
Banana Berry Oat Bites
Delicious Banana Berry Oat Bites
 Desserts
Hearty Neapolitan Cake Bowls: Techniques, Assembly, and Serving Suggestions
Delicious Hearty Neapolitan Cake Bowls: Techniques, Assembly, and Serving Suggestions
 Desserts
Crispy Crave-Worthy Caramel Popcorn: A Delicious Treat for Any Occasion
Delicious Crispy Crave-Worthy Caramel Popcorn: A Delicious Treat for Any Occasion
 Desserts
Pumpkin Better Than Cheesecake: A Fall Favorite
Delicious Pumpkin Better Than Cheesecake: A Fall Favorite

Caroline
I cook these recipes at home before they ever land here — simple ingredients, clear steps.