Cheesy Spinach & Ricotta Stuffed Shells: A Comforting Delight
 Save
Save
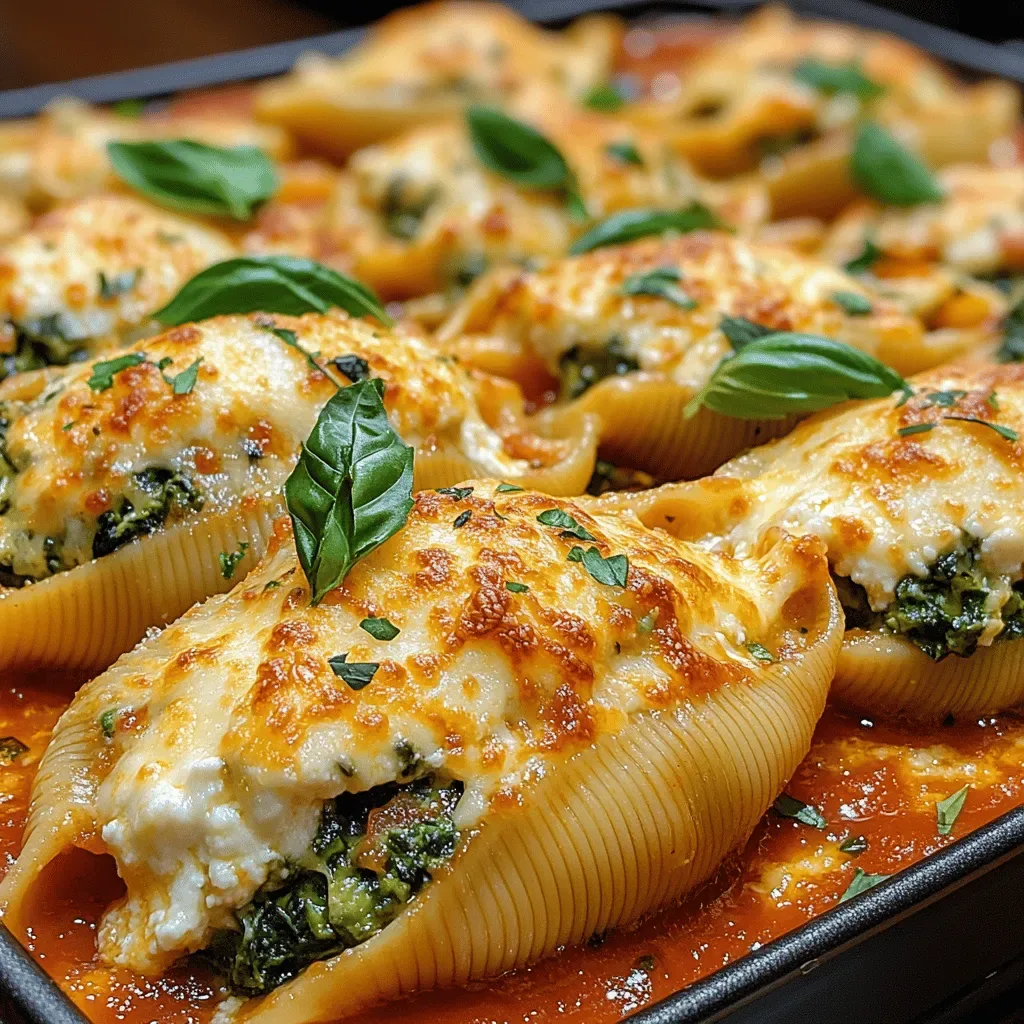
Imagine a warm, cheesy pillow of pasta that melts in your mouth with every bite. Cheesy Spinach & Ricotta Stuffed Shells deliver that comforting feeling, making them the perfect centerpiece for a leisurely brunch or a relaxed weekend breakfast.
What sets this dish apart is the harmonious blend of creamy ricotta, vibrant spinach, and a hint of nutmeg that elevates the classic Italian staple into a brunch‑worthy masterpiece.
Family members, friends, or anyone who craves a hearty yet elegant start to the day will adore these shells. Serve them alongside fresh fruit or a crisp salad for a complete morning feast.
The process is straightforward: cook the pasta shells, whip up a luscious ricotta‑spinach filling, stuff each shell, then bake under a bubbling marinara until golden and irresistible.
Why You'll Love This Recipe
Comfort in Every Bite: The creamy ricotta and melted mozzarella create a velvety texture that feels like a warm hug on a plate, perfect for cozy mornings.
Make‑Ahead Friendly: You can assemble the shells ahead of time and simply pop them in the oven when you’re ready to eat, saving valuable brunch prep time.
Balanced Nutrition: Spinach adds iron and vitamins, while ricotta provides protein and calcium, delivering a satisfying, nutrient‑dense start to the day.
Visually Stunning: The deep green of spinach peeking through the golden cheese makes each serving look as delightful as it tastes.
Tips & Tricks
Perfecting the Recipe
Dry the Spinach Thoroughly: Excess water makes the filling runny. After wilting, squeeze the spinach in a clean kitchen towel to remove moisture.
Don’t Over‑Stuff: Fill each shell just enough to avoid spillage during baking; a slight overfill can cause the sauce to become watery.
Use Fresh Mozzarella: Freshly shredded mozzarella melts more smoothly, giving a silkier cheese layer on top.
Flavor Enhancements
A splash of good‑quality extra‑virgin olive oil drizzled over the sauce before baking adds richness. For a subtle heat, stir in a pinch of red‑pepper flakes into the filling. Finish with a light grate of lemon zest just before serving to brighten the palate.
Common Mistakes to Avoid
Skipping the resting time after baking lets the filling slide out, making plating messy. Also, avoid using frozen spinach without thawing and draining—it releases too much water, turning the filling soggy.
Pro Tips
Pre‑Make the Filling: Assemble the ricotta mixture a day ahead and refrigerate; flavors meld and the texture firms up, making stuffing easier.
Use a Light Hand with Salt: Both the cheese and the marinara contain salt; taste before adding extra to keep the dish balanced.
Cover with Foil First: This traps steam, ensuring the shells stay moist before the final cheese‑browning stage.
Variations
Ingredient Swaps
Swap ricotta for cottage cheese for a lighter texture, or use goat cheese for a tangier profile. Replace spinach with kale or arugula for a peppery bite. For a richer sauce, stir a tablespoon of butter into the marinara just before baking.
Dietary Adjustments
Choose gluten‑free pasta shells to accommodate gluten sensitivities. For a dairy‑free version, substitute ricotta with a silken tofu blend and use dairy‑free mozzarella. To keep it low‑carb, serve the shells over a bed of roasted cauliflower “rice.”
Serving Suggestions
Pair the stuffed shells with a light arugula salad dressed in lemon vinaigrette, or a bowl of fresh berries for a sweet contrast. For a heartier brunch, add a side of crispy bacon or a poached egg on top of each shell.
Storage Info
Leftover Storage
Let the baked shells cool to room temperature, then transfer them to an airtight container. Store in the refrigerator for up to 4 days. For longer keeping, portion the shells into freezer‑safe bags, wrap tightly with foil, and freeze for up to 3 months.
Reheating Instructions
Reheat refrigerated leftovers in a 350°F (175°C) oven, covered with foil, for 15–20 minutes until warmed through. For frozen portions, bake covered for 25 minutes, then uncover and bake an additional 10 minutes. Microwaving works in a pinch—heat on medium power for 2 minutes, then stir in a splash of marinara.
Frequently Asked Questions
Can I prepare the stuffed shells ahead of time?
What if I don’t have jumbo shells?
Can I use a different cheese blend?
What side dishes work best with this brunch dish?
Cheesy Spinach & Ricotta Stuffed Shells bring together classic Italian comfort with brunch‑friendly elegance. By following the detailed steps, using fresh ingredients, and applying the handy tips, you’ll create a dish that’s both satisfying and impressive. Feel free to experiment with the suggested swaps and make the recipe truly yours. Enjoy the warm, cheesy goodness with family and friends!
Cheesy Spinach & Ricotta Stuffed Shells: A Comforting Delight
Delicious Cheesy Spinach & Ricotta Stuffed Shells: A Comforting Delight
Ingredients
Pasta & Sauce
- 12 jumbo pasta shells
- 2 cups marinara sauce (store‑bought or homemade)
Filling
- 1½ cups ricotta cheese
- 1 cup shredded mozzarella cheese, divided
- ½ cup grated Parmesan cheese
- 2 cups fresh spinach, chopped
- 1 large egg, lightly beaten
Seasonings & Garnish
- ¼ teaspoon freshly grated nutmeg
- ½ teaspoon garlic powder
- Salt and freshly cracked black pepper, to taste
- Fresh basil leaves, torn (for garnish)
Instructions
Assembling & Baking
- Preheat the Oven. Set your oven to 375°F (190°C) and position a rack in the middle. This temperature ensures the cheese melts evenly while the sauce bubbles without drying out.
- Fill the Shells. Spoon about 2 tablespoons of the ricotta‑spinach mixture into each cooked shell, pressing gently to pack the filling. A generous amount guarantees a creamy center after baking.
- Layer the Pan. Spread a thin layer of marinara on the bottom of a 9‑x‑13‑inch baking dish. Arrange the stuffed shells in a single layer, seam side up, then pour the remaining sauce over the top, ensuring every shell is coated.
- Add the Final Cheese. Sprinkle the remaining ½ cup mozzarella evenly over the dish. This creates a bubbling, golden crust that signals the dish is ready to come out of the oven.
- Bake to Perfection. Cover the dish with foil and bake for 20 minutes. Remove the foil and continue baking for another 10 minutes, or until the cheese is melted, lightly browned, and the sauce is hot throughout.
Similar Recipes
 Dinner
Sizzling Summer Chicken Skillet
Delicious Sizzling Summer Chicken Skillet
 Dinner
Creamy Roasted Red Pepper Orzo: A Culinary Delight
Delicious Creamy Roasted Red Pepper Orzo: A Culinary Delight
 Dinner
Rustic Cowboy Soup Recipe: A Hearty and Comforting Dish
Delicious Rustic Cowboy Soup Recipe: A Hearty and Comforting Dish
 Dinner
Savory Salisbury Steak with Rich Brown Gravy: A Comfort Food Classic
Delicious Savory Salisbury Steak with Rich Brown Gravy: A Comfort Food Classic
 Dinner
Healthy and Delicious Street Corn Chicken Rice Bowl Recipe
Learn how to make delicious Healthy and Delicious Street Corn Chicken Rice Bowl Recipe. Easy recipe…
 Dinner
Create Mouthwatering Easy Cheesy Meatball Subs in Minutes!
Learn how to make delicious Create Mouthwatering Easy Cheesy Meatball Subs in Minutes!. Easy recipe with…
 Dinner
Sweet Potato & Turkey Enchilada Skillet: Cooking and Serving Guide
Delicious Sweet Potato & Turkey Enchilada Skillet: Cooking and Serving Guide
 Dinner
creamy garlic potato gratin with rosemary for cozy family suppers
Make cozy family suppers unforgettable with this creamy garlic potato gratin kissed with fresh rosemary. Easy,…

Caroline
I cook these recipes at home before they ever land here — simple ingredients, clear steps.