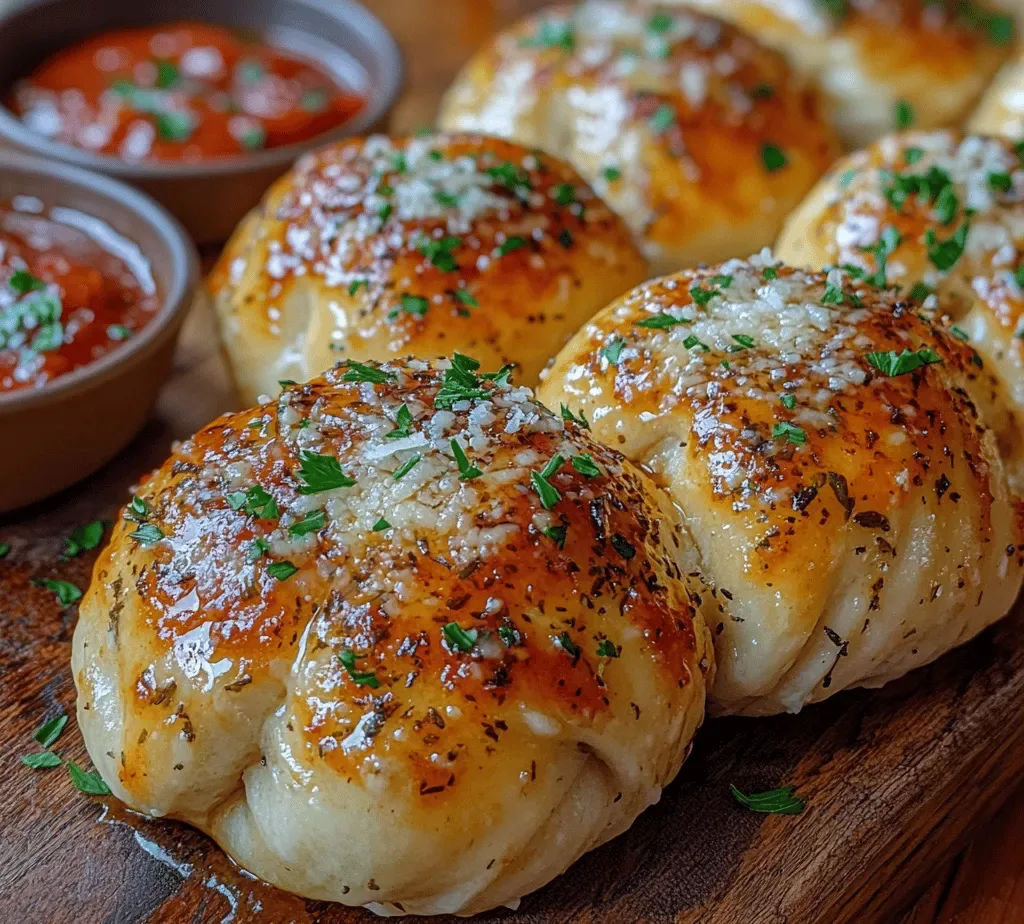
Extra Soft & Buttery Italian Herb Garlic Knots

WANT TO SAVE THIS RECIPE?

Introduction

Italian cuisine is revered worldwide for its rich flavors, enticing aromas, and comforting dishes that evoke a sense of warmth and family. Among the many delectable offerings of this culinary tradition, garlic knots hold a special place, often served as an appetizer or side dish at Italian restaurants. These delightful, doughy bites are not just a treat for the palate but also a nostalgic reminder of family gatherings and celebratory meals. Their appeal lies in the perfect balance of soft, chewy texture and robust garlic flavor, making them a beloved comfort food for many.

Garlic knots are essentially the charming offspring of pizza dough, twisted and baked to golden perfection, then generously brushed with a buttery garlic herb mixture. They can be enjoyed on their own or paired with marinara sauce for dipping, making them incredibly versatile. The purpose of this article is to guide you through a detailed recipe for crafting extra soft and buttery Italian herb garlic knots from scratch. We will explore the ingredients that contribute to their unique flavor profile and texture, as well as provide step-by-step instructions to ensure your garlic knots come out perfect every time.

Understanding the Ingredients

Before diving into the recipe, it’s important to understand the role of each ingredient in achieving the ideal garlic knot. Each component works harmoniously to deliver that signature soft and buttery texture, along with a burst of flavor.

All-Purpose Flour

All-purpose flour is the backbone of our garlic knots, providing the necessary structure and elasticity. Its moderate protein content allows the dough to rise beautifully while maintaining a soft, chewy texture. For the best results, opt for a finely milled all-purpose flour, which will yield a more tender knot. If you desire a slightly different texture, you can experiment with bread flour, which has a higher protein content, leading to a chewier finish.

Active Dry Yeast

Active dry yeast is the leavening agent that gives our garlic knots their delightful rise. It works by fermenting the sugars in the dough, producing carbon dioxide that causes the dough to expand. To ensure proper activation, it’s crucial to proof the yeast in warm water. The ideal temperature for activation is between 100°F to 110°F (37°C to 43°C). If it’s too hot, it may kill the yeast, while too cold will not activate it. Look for bubbly, frothy yeast after a few minutes, indicating it’s ready to be mixed into the dough.

Warm Water

Warm water plays a pivotal role in yeast activation. When combined with sugar and yeast, it creates the perfect environment for fermentation. Always use water that is comfortably warm to the touch, as this ensures the yeast will spring to life and produce the carbon dioxide necessary for our knots to rise.

Granulated Sugar

Granulated sugar serves two purposes in our garlic knot recipe. First, it feeds the yeast, providing the essential nutrients it needs to grow and produce gas. This not only aids in the rising process but also enhances the overall flavor of the knots. A small amount of sugar contributes to a subtle sweetness that balances the savory elements of the garlic and herbs.

Unsalted Butter

Butter is a key player when it comes to flavor and texture in our garlic knots. Using unsalted butter allows you to control the saltiness of the finished product better, ensuring a balanced flavor profile. The butter adds richness, contributing to the soft, tender texture of the knots. Additionally, brushing melted butter on top before and after baking elevates the garlic flavor while creating a beautiful golden finish.

Fresh and Dried Herbs

Herbs are essential for infusing our garlic knots with their signature Italian flavor. A combination of fresh and dried herbs can be used to achieve a complex taste.

Oregano: This herb offers a warm, slightly bitter flavor that is characteristic of Italian cuisine.

Basil: With its sweet and peppery notes, basil adds a fresh brightness to the knots.

Thyme: Thyme brings an earthy, aromatic quality that complements the garlic beautifully.

Using a mix of both fresh and dried herbs will provide depth to the flavor profile, ensuring that each bite is aromatic and satisfying.

Minced Garlic and Garlic Powder

Garlic is the star ingredient in our garlic knots, and using both minced garlic and garlic powder amplifies the garlic flavor. Minced garlic adds a sharp, fresh taste, while garlic powder contributes a more subtle, concentrated flavor that permeates the dough. This combination ensures a robust garlic experience in every bite.

Parmesan Cheese

Adding grated Parmesan cheese to the dough not only enhances the savory profile but also contributes to the overall texture. The cheese melts into the knots as they bake, creating a delightful, cheesy essence that pairs perfectly with the garlic and herbs. For the best results, use freshly grated Parmesan, as pre-packaged varieties often contain anti-caking agents that can affect the melt.

Fresh Parsley

Fresh parsley serves as both a flavor enhancer and a garnish for our garlic knots. Its bright, slightly peppery flavor contrasts beautifully with the richness of the butter and garlic, adding a refreshing touch. Chopped parsley sprinkled on top after baking not only adds a pop of color but also elevates the overall presentation of your garlic knots.

Step-by-Step Recipe for Garlic Knots

Now that we have a thorough understanding of our ingredients, let’s dive into the step-by-step process for making these extra soft and buttery Italian herb garlic knots.

Activating the Yeast

To begin, we need to activate our yeast. Start by measuring 1 cup of warm water (between 100°F to 110°F) and pour it into a mixing bowl. Add 2 teaspoons of granulated sugar to the water, stirring gently to dissolve. Then, sprinkle 2 ¼ teaspoons of active dry yeast over the top of the water. Allow this mixture to sit for about 5-10 minutes. During this time, you should see the yeast begin to foam and bubble, indicating that it is alive and ready to work its magic in our dough.

Making the Dough

Once the yeast is activated, it’s time to make the dough. To the bowl with the activated yeast, add 3 cups of all-purpose flour, ½ cup of unsalted butter (melted and slightly cooled), 1 teaspoon of salt, and 1 ½ teaspoons each of dried oregano and dried basil. If you’re using fresh herbs, you can adjust the quantities accordingly, generally using three times the amount of fresh herbs compared to dried.

Using a wooden spoon or a spatula, mix the ingredients together until a shaggy dough begins to form. At this point, you can add in ¼ cup of grated Parmesan cheese and 2-3 cloves of minced garlic. Continue to mix until everything is well combined.

Kneading the Dough

Now it’s time to knead the dough. Transfer the shaggy mixture to a lightly floured surface. Using your hands, begin to knead the dough by folding it over itself and pressing down with the palms of your hands. Rotate the dough a quarter turn after each fold, continuing this process for about 8-10 minutes. The goal is to develop the gluten, resulting in a smooth and elastic dough. You’ll know your dough is ready when it is soft and springs back when gently pressed with a finger.

If your dough feels too sticky, sprinkle a little more flour as needed. Conversely, if it seems too dry, you can add a splash of warm water to achieve the desired consistency.

After kneading, form the dough into a ball and place it in a lightly greased bowl, turning it once to coat the surface. Cover the bowl with a clean kitchen towel or plastic wrap, and let it rise in a warm, draft-free place for about 1 hour, or until it has doubled in size.

As you wait for your dough to rise, the enticing aroma of garlic and herbs will start to fill your kitchen, setting the stage for the delicious garlic knots to come. Stay tuned for the next part, where we will shape the knots and finish them off with a buttery garlic herb glaze, making them irresistible!

Italian cuisine is revered worldwide for its rich flavors, enticing aromas, and comforting dishes that evoke a sense of warmth and family. Among the many delectable offerings of this culinary tradition, garlic knots hold a special place, often served as an appetizer or side dish at Italian restaurants. These delightful, doughy bites are not just a treat for the palate but also a nostalgic reminder of family gatherings and celebratory meals. Their appeal lies in the perfect balance of soft, chewy texture and robust garlic flavor, making them a beloved comfort food for many.

Preparing the Garlic Butter

To elevate your Extra Soft & Buttery Italian Herb Garlic Knots, preparing the garlic butter is a crucial step. Start by softening one cup of unsalted butter at room temperature. This process will make it easier to incorporate the flavors. In a small saucepan, melt the butter over low heat, being careful not to let it brown. Once melted, add four cloves of minced garlic. Cooking the garlic gently allows it to infuse the butter with its aromatic flavor without burning, which can lead to bitterness.

Next, add a blend of fresh herbs to your garlic butter. A mixture of finely chopped parsley, oregano, and thyme will provide a balanced flavor profile that complements the knots beautifully. If you prefer a stronger herbaceous taste, feel free to increase the quantity of herbs. Stir the mixture occasionally as it simmers for about 5 minutes, allowing the garlic and herbs to meld with the butter. After simmering, remove the saucepan from the heat and let it cool slightly. This garlic butter will be the finishing touch that brings your garlic knots to life.

Shaping the Knots

Once your dough has risen and doubled in size, it’s time to shape the knots. Begin by lightly flouring your work surface to prevent sticking. Divide the dough into 12 equal portions for uniformity. Each piece should weigh approximately 60 grams. Roll each piece into a rope about 8 inches long. The key to shaping the knots is to ensure they are not too thick; a thinner rope will bake more evenly and give you that delightful soft texture.

To form the knot, take one end of the rope and loop it over the other. Then, tuck the end beneath the knot to secure it. This simple technique ensures that the knots hold their shape during baking. Place each knot on a parchment-lined baking sheet, allowing a little space between each one for expansion during the second rise.

Second Rise

The second rise is an essential step that should not be overlooked. After shaping the knots, cover them loosely with a clean kitchen towel or plastic wrap to prevent drying out. Allow the knots to rise in a warm place for about 30 minutes. This final rise helps the dough develop its texture and flavor, resulting in soft and fluffy garlic knots. The added time allows the gluten to relax, which contributes to the overall tenderness of each knot.

Preheating the Oven

While your knots are rising, it’s essential to preheat your oven to 375°F (190°C). This temperature is optimal for baking the garlic knots, ensuring they cook evenly while achieving that perfect golden-brown crust. Preheating your oven ensures that as soon as the knots are placed inside, they begin baking immediately, which helps create that coveted soft interior and crispy exterior.

Baking and Finishing Touches

After your garlic knots have completed the second rise, it’s time to bake them. Place your baking sheet in the preheated oven and bake for 15 to 20 minutes or until the knots are golden brown. Keep an eye on them during the last few minutes to prevent over-browning. The aroma of baking garlic knots will fill your kitchen, making it hard to resist.

Once baked, remove them from the oven and immediately brush them with the prepared garlic butter. This is where the knots truly shine, as the warm butter seeps into every crevice, enhancing the flavor and adding a glossy finish. For an additional touch, sprinkle some grated Parmesan cheese or a dash of sea salt over the top for an extra burst of flavor.

Garnishing and Serving

Presentation plays a significant role in enjoying your garlic knots. Arrange the warm knots on a serving platter or a large wooden board. For an appealing touch, serve them alongside a small bowl of marinara sauce for dipping. The vibrant red of the sauce contrasts beautifully with the golden knots, making it visually inviting. You can also sprinkle some fresh herbs on top for an added pop of color.

Nutritional Information

Each serving of these Extra Soft & Buttery Italian Herb Garlic Knots (approximately 2 knots) contains about 220 calories, with 6 grams of protein, 10 grams of fat, and 30 grams of carbohydrates. While these knots are undeniably indulgent, the balance of flavors and textures makes them a delightful treat. When enjoying them, consider the nutritional trade-offs—like the richness of the butter and garlic versus the comfort and joy they bring. Moderation is key, and these knots are best savored as a part of a balanced meal.

Culinary Variations

There are numerous ways to customize your garlic knots beyond the classic recipe. For cheese lovers, consider adding shredded mozzarella or provolone cheese into the dough before shaping. This adds a gooey, cheesy center that is utterly irresistible. You can also experiment with spices; adding red pepper flakes will provide a delightful kick, while smoked paprika can impart a unique flavor.

If you’re looking for alternative dipping sauces, try serving the garlic knots with a homemade pesto or a creamy garlic aioli. Both options will complement the flavors of the knots while introducing a new dimension to your appetizer spread.

Pairing Suggestions

Garlic knots make an excellent accompaniment to various main dishes. They pair beautifully with a classic spaghetti marinara or a rich fettuccine Alfredo. They can also complement a fresh garden salad or a hearty minestrone soup, making them a versatile addition to any meal.

For beverage pairings, consider serving your garlic knots with a crisp Italian white wine like Pinot Grigio or a light red such as Chianti. The acidity in these wines balances the richness of the knots, enhancing the overall dining experience.

Conclusion

Making Extra Soft & Buttery Italian Herb Garlic Knots is not just about satisfying hunger; it’s about the joy of creating something delicious from scratch. The process of kneading, shaping, and baking these knots brings a sense of accomplishment and warmth to any kitchen. As you gather around the table to share these delightful garlic knots, you’ll appreciate their rich cultural significance in Italian dining and their universal appeal as a beloved appetizer.

So, gather your ingredients, roll up your sleeves, and dive into this delightful baking adventure. Enjoy the process, share the fruits of your labor with loved ones, and relish each soft, buttery bite. Whether served as a starter or a side dish, these garlic knots are sure to become a cherished favorite in your home.

Italian cuisine is revered worldwide for its rich flavors, enticing aromas, and comforting dishes that evoke a sense of warmth and family. Among the many delectable offerings of this culinary tradition, garlic knots hold a special place, often served as an appetizer or side dish at Italian restaurants. These delightful, doughy bites are not just a treat for the palate but also a nostalgic reminder of family gatherings and celebratory meals. Their appeal lies in the perfect balance of soft, chewy texture and robust garlic flavor, making them a beloved comfort food for many.

Italian Herb Garlic Knots – Extra Soft & Buttery!

Indulge in the delightful world of Italian cuisine with these Extra Soft & Buttery Italian Herb Garlic Knots. Perfectly chewy and bursting with garlic flavor, these knots are a comforting appetizer that will remind you of family gatherings. Learn how to craft these mouthwatering bites from scratch, using a blend of fresh herbs and garlic, topped off with a rich buttery glaze. Serve them warm alongside marinara sauce for a truly irresistible treat that everyone will love!

Ingredients
  

4 cups all-purpose flour

1 packet (2 1/4 tsp) active dry yeast

1 cup warm water (110°F/43°C)

1/4 cup granulated sugar

1 tsp salt

1/4 cup unsalted butter, melted (plus extra for brushing)

3 cloves garlic, minced

1 tsp dried oregano

1 tsp dried basil

1/2 tsp dried thyme

1/2 tsp garlic powder

1/4 cup grated Parmesan cheese

Fresh parsley, chopped (for garnish)

Instructions
 

Activate the Yeast: In a small bowl, combine the warm water and sugar. Sprinkle the active dry yeast over the top, stir gently, and let it sit for about 5–10 minutes until frothy.

    Make the Dough: In a large mixing bowl, combine the flour and salt. Create a well in the center and pour in the yeast mixture and melted butter. Mix until a dough begins to form.

      Knead the Dough: Turn the dough onto a lightly floured surface and knead for about 8–10 minutes, until it's smooth and elastic. Place the dough in a greased bowl, cover with a clean kitchen towel, and let it rise in a warm place for 1 hour or until doubled in size.

        Prepare the Garlic Butter: In a small saucepan over low heat, melt 1/4 cup of butter and add minced garlic, oregano, basil, thyme, and garlic powder. Stir for about 2 minutes until aromatic. Remove from heat and let it cool slightly.

          Shape the Knots: After the dough has risen, punch it down and turn it out onto a floured surface. Divide it into 12 equal pieces. Roll each piece into a rope about 8 inches long and tie it into a knot. Place the knots on a baking sheet lined with parchment paper.

            Second Rise: Cover the shaped knots with a kitchen towel and let them rest for another 30 minutes to rise a little.

              Preheat the Oven: Preheat your oven to 375°F (190°C).

                Brush and Bake: Once the knots have risen, brush them generously with the garlic butter mixture, making sure to get garlic bits on each knot. Sprinkle with grated Parmesan cheese. Bake for 15–20 minutes or until golden brown.

                  Garnish and Serve: Remove from the oven, let cool slightly, and give them a final brush with leftover garlic butter. Garnish with fresh parsley. Serve warm alongside marinara sauce for dipping!

                    Prep Time, Total Time, Servings: 20 minutes | 1 hour 30 minutes | 12 servings

                      WANT TO SAVE THIS RECIPE?

                      Leave a Comment

                      Recipe Rating