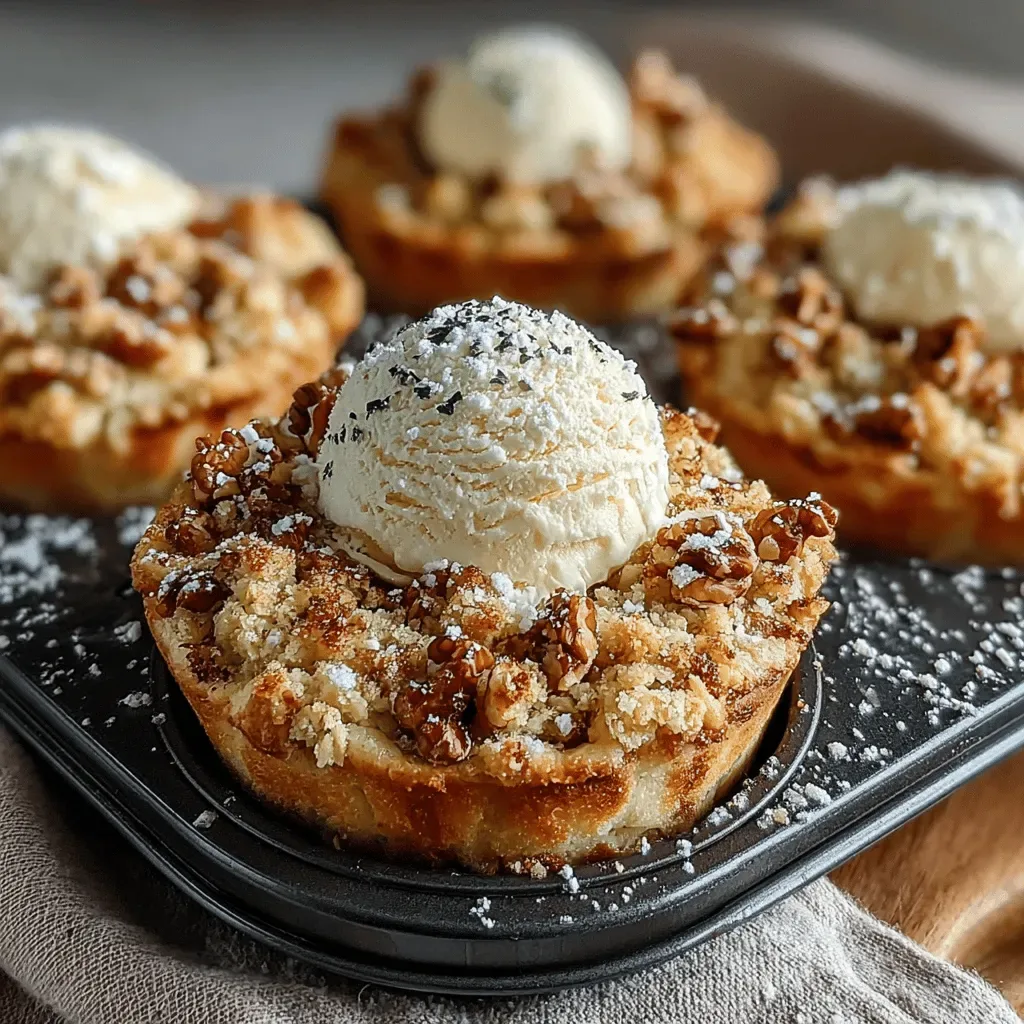
Imagine the first bite of a silky, vanilla‑kissed ice cream swirled with generous chunks of chocolate cookies, all perched on a buttery graham‑cracker crust. That moment of creamy‑crunch harmony is what makes the Ultimate Cookies and Cream Delight Ice Cream Cake a true brunch show‑stopper.
What sets this cake apart is the layered texture: a crisp crust, a fluffy ice‑cream middle, and a cloud‑like whipped topping, each infused with the unmistakable flavor of cookies and cream. The balance of sweet, buttery, and chocolatey notes keeps every forkful exciting.
This dessert‑meets‑breakfast masterpiece is perfect for weekend brunches, celebratory mornings, or any time you crave a sweet start without sacrificing indulgence. Kids, adults, and even the pickiest eaters will be drawn to its playful appearance and irresistible taste.
The process is straightforward: prepare a no‑bake crust, whip up a quick vanilla ice‑cream base, fold in crushed cookies, freeze, then crown with a light whipped topping and extra cookie crumbs. In under an hour you’ll have a frozen cake that looks as good as it tastes.
Why You'll Love This Recipe
All‑Day Brunch Appeal: The cake feels like a dessert but works beautifully as a sweet breakfast, giving you a luxurious start without the need for a hot oven.
Minimal Equipment: No special ice‑cream maker is required—just a sturdy mixing bowl, a freezer, and a few basic kitchen tools.
Customizable Layers: You can swap cookie flavors, add caramel swirls, or even incorporate fresh berries for a personal touch.
Make‑Ahead Friendly: Assemble the night before, freeze, and simply slice and serve the next morning—perfect for busy households.
Ingredients
The magic of this cake lies in a handful of pantry staples and a few specialty items. A buttery graham‑cracker crust provides a sturdy foundation, while heavy cream, sweetened condensed milk, and vanilla extract create a rich ice‑cream base. Crushed chocolate sandwich cookies deliver the iconic flavor and texture. Finally, a light whipped topping adds height and a cloud‑like finish, and a sprinkle of extra cookie crumbs gives a polished look.
Crust
- 1 ½ cups graham‑cracker crumbs
- ¼ cup unsalted butter, melted
- 2 tablespoons granulated sugar
Ice Cream Base
- 2 cups heavy whipping cream
- 1 cup sweetened condensed milk
- 2 teaspoons pure vanilla extract
Cookies & Cream Filling
- 1 ½ cups chocolate sandwich cookies, coarsely crushed
Whipped Topping
- 1 cup heavy whipping cream
- 2 tablespoons powdered sugar
- ½ teaspoon vanilla extract
Garnish
- Extra crushed cookies for sprinkling
The graham‑cracker crust offers a buttery crunch that holds up to the weight of the frozen layers. The cream‑based ice‑cream mixture is naturally smooth, eliminating the need for an ice‑cream maker while still achieving a custardy texture. Crushed cookies are folded in just before freezing, ensuring each bite delivers that signature cookie crunch. The light whipped topping adds height and a delicate finish, while the final dusting of cookie crumbs ties the whole cake together visually and flavor‑wise.
Step-by-Step Instructions
Preparing the Crust
In a medium bowl, combine the graham‑cracker crumbs, melted butter, and sugar. Stir until the mixture resembles wet sand. Press the crumb mixture firmly into the bottom of a 9‑inch springform pan, creating an even layer about ½ inch thick. Chill the crust in the freezer for 10 minutes while you work on the filling; this helps it set quickly.
Making the Ice‑Cream Base & Folding Cookies
- Whip the Cream. In a chilled mixing bowl, beat the 2 cups of heavy whipping cream on medium‑high speed until soft peaks form (about 2 minutes). This creates a light, airy structure that will freeze into a smooth ice cream.
- Combine Sweetened Milk. Gently fold the sweetened condensed milk and vanilla extract into the whipped cream until just incorporated. Over‑mixing can deflate the air you just incorporated, so use a spatula and a gentle motion.
- Add Crushed Cookies. Sprinkle the coarsely crushed chocolate sandwich cookies over the cream mixture and fold them in, reserving a handful for the top garnish. The cookies should be visible throughout the mixture for that classic texture.
- Freeze the Layer. Pour the cookie‑infused ice‑cream base over the chilled crust, smoothing the top with an offset spatula. Cover the pan tightly with plastic wrap and place it in the freezer for at least 2 hours, or until firm.
Whipped Topping & Final Assembly
- Whip the Topping. In a clean bowl, beat 1 cup of heavy whipping cream with powdered sugar and vanilla until stiff peaks form. This will stay stable for a few hours at refrigerator temperature.
- Spread Over Ice Cream. Remove the cake from the freezer and immediately spread the whipped topping evenly over the frozen surface. The topping acts as an insulating layer, preventing ice crystals from forming on the surface.
- Garnish. Sprinkle the reserved crushed cookies over the whipped topping for a decorative finish. Optionally, add a few whole cookies on the side for visual impact.
- Final Freeze. Return the assembled cake to the freezer for another 30 minutes to set the topping. When ready to serve, run a thin knife under hot water, wipe dry, and slice cleanly.
Tips & Tricks
Perfecting the Recipe
Chill Your Tools. Keep bowls and beaters in the freezer for 10 minutes before whipping cream; this speeds up aeration and yields firmer peaks.
Do Not Over‑Mix. When folding the condensed milk and cookies, use gentle strokes to preserve the airy structure of the whipped cream.
Flavor Enhancements
For a deeper chocolate note, melt 2 tablespoons of dark chocolate and drizzle it over the whipped topping before the final freeze. A pinch of sea salt sprinkled on top amplifies the sweetness and adds a sophisticated finish.
Common Mistakes to Avoid
Avoid letting the ice‑cream base sit at room temperature for more than a few minutes; it can melt and create icy crystals. Also, do not use overly fine cookie crumbs—they can turn the mixture into a paste rather than distinct crunchy pockets.
Pro Tips
Layer Thickness. Keep the ice‑cream layer about 1‑inch thick; this ensures even freezing and easy slicing.
Use a Springform Pan. The removable sides make unmolding the cake effortless and preserve its shape.
Quick Slice Technique. Warm the knife blade under hot water, wipe dry, and slice; this prevents the knife from sticking to the frozen surface.
Serve Slightly Softened. Let the cake sit at room temperature for 5‑7 minutes before serving for a creamier bite.
Variations
Ingredient Swaps
Replace graham‑cracker crumbs with chocolate cookie crumbs for a richer base, or use Oreo crumbs for a double‑cookie experience. Swap vanilla extract for almond or peppermint for a seasonal twist. For a dairy‑free version, use coconut cream in place of heavy cream and a plant‑based sweetened condensed milk.
Dietary Adjustments
Gluten‑free diners can use gluten‑free graham crackers or crushed gluten‑free cookies. To keep it low‑sugar, substitute the condensed milk with a sugar‑free sweetened condensed alternative and use a sugar‑free powdered sweetener in the whipped topping. All swaps retain the creamy texture while meeting dietary needs.
Serving Suggestions
Serve each slice with a drizzle of chocolate ganache or a dollop of fresh whipped cream. Pair with fresh berries for a bright contrast, or accompany with a hot cup of espresso for a classic brunch combo.
Storage Info
Leftover Storage
Allow any leftover cake to soften slightly, then cover tightly with plastic wrap, pressing the wrap directly onto the surface to prevent freezer burn. Store in an airtight container in the freezer for up to 3 months. For short‑term storage, keep it refrigerated (covered) for up to 3 days.
Reheating Instructions
This cake is best enjoyed cold, but if you prefer a softer texture, let a slice sit at room temperature for 5‑7 minutes before serving. To warm the whipped topping slightly, place the slice on a warm plate for 1 minute; avoid microwaving as it can melt the ice‑cream layer.
Frequently Asked Questions
This Ultimate Cookies and Cream Delight Ice Cream Cake brings together crunchy, creamy, and airy textures in a single, unforgettable brunch centerpiece. You now have a complete guide—from ingredient selection and step‑by‑step assembly to storage, variations, and troubleshooting. Feel free to experiment with flavors, swap ingredients, or add your own decorative touches. Serve it chilled, slice generously, and enjoy every indulgent bite with family and friends.