Red Velvet Trifle Delight Recipe
 Save
Save
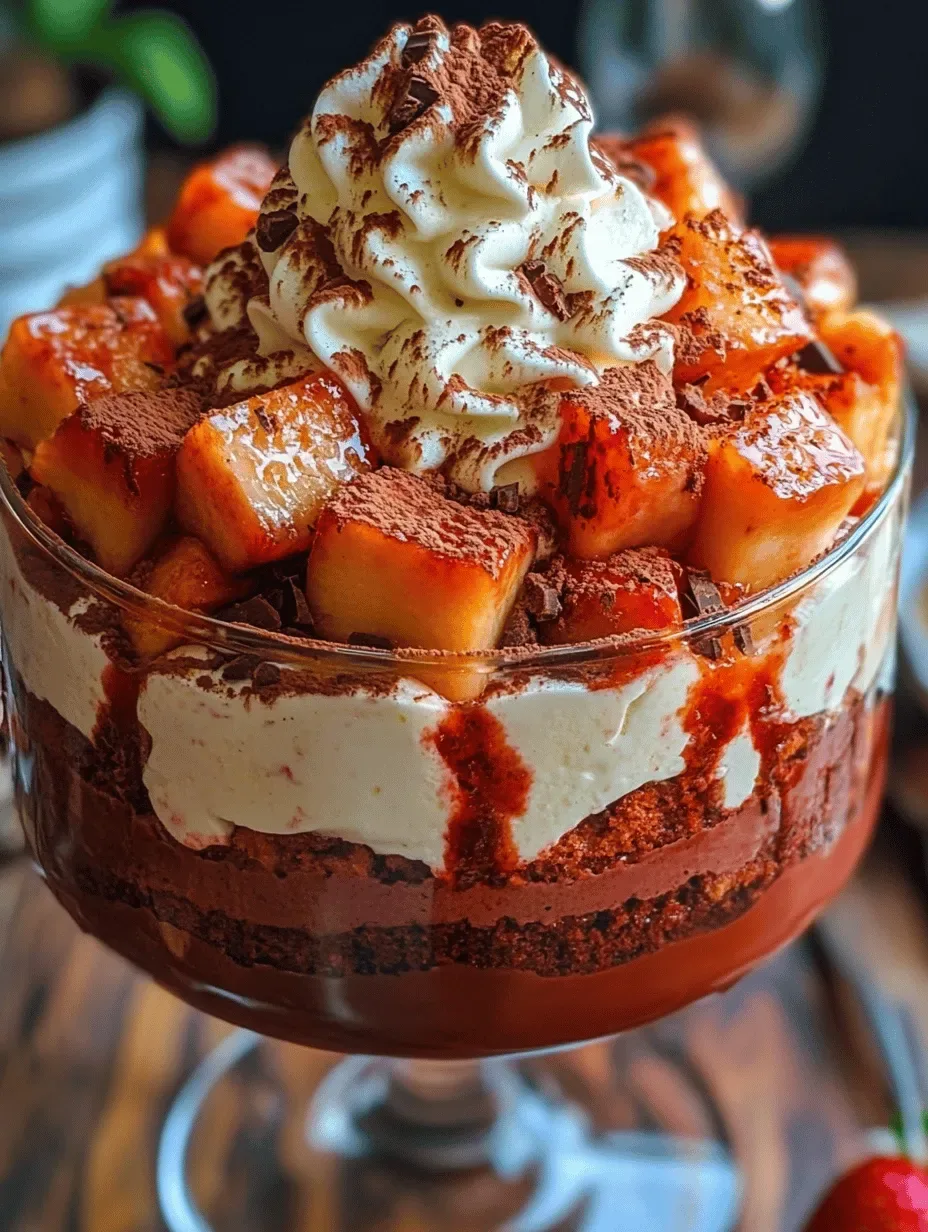
Imagine a breakfast table that looks as festive as a celebration and tastes as comforting as a Sunday brunch. The Red Velvet Trifle Delight brings together the classic allure of red‑velvet cake, airy whipped cream, and fresh berries in a single, elegant glass.
What makes this trifle special is the perfect balance of cocoa‑kissed cake, tangy cream‑cheese frosting, and a burst of fruit that keeps each bite bright and refreshing. The layers stay distinct, yet they mingle beautifully on the palate.
This dessert‑style breakfast will win over families, brunch‑loving friends, and anyone who enjoys a touch of indulgence at the start of the day. Serve it for a leisurely weekend brunch or as a show‑stopping centerpiece for a special occasion.
The process is straightforward: bake a moist red‑velvet cake, whip a light cream‑cheese topping, then layer everything with berries and a sprinkle of toasted almonds. A few minutes of assembly brings a restaurant‑quality trifle to your own kitchen.
Why You'll Love This Recipe
Eye‑Catching Presentation: Layered in clear glasses, the vivid red cake and jewel‑toned berries create a visual treat that makes every bite feel special.
Make‑Ahead Friendly: Each component can be prepared ahead of time, allowing you to assemble the trifle just before serving for stress‑free brunch hosting.
Balanced Sweetness: The subtle tang of cream cheese and the natural acidity of fresh berries keep the dessert from becoming cloyingly sweet.
Versatile Flavor Base: The classic red‑velvet flavor pairs effortlessly with seasonal fruit, nuts, or even a drizzle of caramel for endless customization.
Tips & Tricks
Perfecting the Recipe
Room‑Temperature Ingredients. Allow butter, eggs, and cream cheese to sit out for 20‑30 minutes before mixing. This creates a smoother batter and prevents lumps in the whip.
Don’t Over‑Mix. Once the dry ingredients are added, stir only until just combined. Over‑mixing develops gluten, resulting in a denser cake.
Use a Light‑Colored Bowl. The red food coloring can be hard to gauge in dark bowls; a pale bowl lets you see the true intensity.
Flavor Enhancements
Add a teaspoon of freshly grated orange zest to the cake batter for a citrus lift, or drizzle a thin ribbon of raspberry coulis over the top just before serving for an extra burst of fruitiness.
Common Mistakes to Avoid
Skipping the cooling step makes the cake crumble when you cut it into cubes. Also, avoid beating the whipped cream too long; over‑whipped cream turns grainy and can separate, ruining the light texture.
Pro Tips
Layer in Glass. Clear glasses showcase each layer, turning the dish into a visual centerpiece as well as a tasty treat.
Chill the Whip. Keep the cream‑cheese whip chilled until the moment you assemble; a cold whip holds its shape better between layers.
Toast Nuts Lightly. Toast almond slivers in a dry skillet for 2‑3 minutes until golden. This brings out their natural oils and adds a subtle crunch.
Variations
Ingredient Swaps
Replace the classic red‑velvet cake with chocolate sponge for a richer base, or swap strawberries for raspberries if you prefer a tart note. For a nut‑free version, omit almonds and sprinkle toasted pumpkin seeds instead.
Dietary Adjustments
Use gluten‑free flour blend and ensure the cocoa is processed in a gluten‑free facility for a gluten‑free trifle. Substitute dairy‑free butter and coconut‑based whipped topping for a vegan version, and choose agave nectar instead of sugar for a lower‑glycemic option.
Serving Suggestions
Serve the trifle alongside a light citrus salad or a cup of freshly brewed coffee for a balanced brunch. For a festive twist, add a splash of chilled champagne over the top just before serving.
Storage Info
Leftover Storage
Allow any remaining trifle to cool completely, then cover each glass with plastic wrap and place them in an airtight container. Store in the refrigerator for up to 3 days. For longer keeping, separate the cake cubes and whip, freeze them individually in freezer‑safe bags, and use within 2 months.
Reheating Instructions
When ready to enjoy, gently warm the cake cubes in a 300°F oven for 5‑7 minutes to soften them. Keep the whipped layer chilled; add a fresh dollop after reheating to retain its airy texture. Fresh berries are best added straight from the fridge.
Frequently Asked Questions
Can I prepare this trifle a day ahead?
What if I don’t have buttermilk?
Which berries work best for this trifle?
This Red Velvet Trifle Delight brings together the elegance of a layered dessert with the comfort of a brunch favorite. By following the step‑by‑step guide, using quality ingredients, and applying the tips provided, you’ll achieve a show‑stopping dish that’s both beautiful and delicious. Feel free to experiment with fruit, nuts, or even a splash of liqueur to make it truly yours. Enjoy every spoonful and share the joy with friends and family!
Red Velvet Trifle Delight Recipe
Delicious Red Velvet Trifle Delight Recipe
Ingredients
Red Velvet Cake
- 1 ½ cups all‑purpose flour
- ¼ cup unsweetened cocoa powder
- 1 tsp baking soda
- ¼ tsp salt
- ½ cup unsalted butter, softened
- 1 cup granulated sugar
- 2 large eggs, room temperature
- ¼ cup buttermilk
- 2 tbsp red food coloring
- 1 tsp vanilla extract
- ½ cup sour cream
Cream Cheese Whip
- 8 oz cream cheese, softened
- ¼ cup unsalted butter, softened
- 1 cup powdered sugar
- 1 tsp vanilla extract
- ½ cup heavy whipping cream
Fruit & Garnish
- 1 cup fresh strawberries, sliced
- ½ cup fresh blueberries
- ¼ cup toasted almond slivers
- Fresh mint leaves for garnish
Instructions
Baking the Red Velvet Cake
- Preheat Oven. Set the oven to 350°F (175°C) and place a rack in the middle. A consistent temperature ensures even rise and a tender crumb.
- Prepare Pan. Grease a 9‑inch round cake pan and line the bottom with parchment. This prevents sticking and makes removal effortless.
- Bake. Pour batter into the pan, smooth the top, and bake for 25‑30 minutes. The cake is done when a toothpick comes out with a few moist crumbs.
- Cool. Allow the cake to cool in the pan for 10 minutes, then turn onto a wire rack to cool completely before cutting into cubes.
Preparing the Cream Cheese Whip
- Beat Cream Cheese & Butter. Scrape the sides frequently to achieve a uniform, lump‑free base.
- Incorporate Sugar. Add powdered sugar slowly to avoid a cloud of dust and ensure smoothness.
- Whip in Cream. With the mixer on high, drizzle the heavy cream in a steady stream until peaks form.
- Chill. Transfer the whip to a covered bowl and refrigerate for at least 15 minutes; this stabilizes the texture for layering.
Assembling the Trifle
- First Cake Layer. Place 2‑3 cake cubes at the bottom of each glass, creating a solid foundation.
- Whip Layer. Spoon a thick layer of cream‑cheese whip over the cake, smoothing the surface.
- Fruit Layer. Add a mix of strawberries and blueberries, distributing evenly.
- Repeat. Add another cake‑whip‑fruit sequence for depth of flavor and height.
- Finish. Top with a final swirl of whip, a sprinkle of toasted almonds, and a mint leaf for garnish.
Similar Recipes
 Desserts
mothers day dessert ideas for a Memorable Celebration
Learn how to make delicious mothers day dessert ideas for a Memorable Celebration. Easy recipe with…
 Desserts
Cheesecake-Stuffed Pumpkin Bread: A Fall Favorite
Delicious Cheesecake-Stuffed Pumpkin Bread: A Fall Favorite
 Desserts
Baked Cinnamon Cream Cheese Roll-Ups Recipe
Delicious Baked Cinnamon Cream Cheese Roll-Ups Recipe
 Desserts
Strawberry Shortcake Cheesecake Rolls Recipe Article
Delicious Strawberry Shortcake Cheesecake Rolls Recipe Article
 Desserts
Ultimate Decadent Chocolate Chip Cookies
Delicious Ultimate Decadent Chocolate Chip Cookies
 Desserts
No Bake Pumpkin Cheesecake Balls: A Fall Favorite with Minimal Effort
Learn how to make delicious No Bake Pumpkin Cheesecake Balls: A Fall Favorite with Minimal Effort.…
 Desserts
Decadent Date Brownies: A Healthier Indulgence
Delicious Decadent Date Brownies: A Healthier Indulgence
 Desserts
No Bake Chocolate Oat Bars Recipe: A Healthy Snack Delight
Delicious No Bake Chocolate Oat Bars Recipe: A Healthy Snack Delight

Caroline
I cook these recipes at home before they ever land here — simple ingredients, clear steps.