Tater Tot Bliss: The Ultimate Guide to Crispy & Golden Homemade Tater Tots
 Save
Save
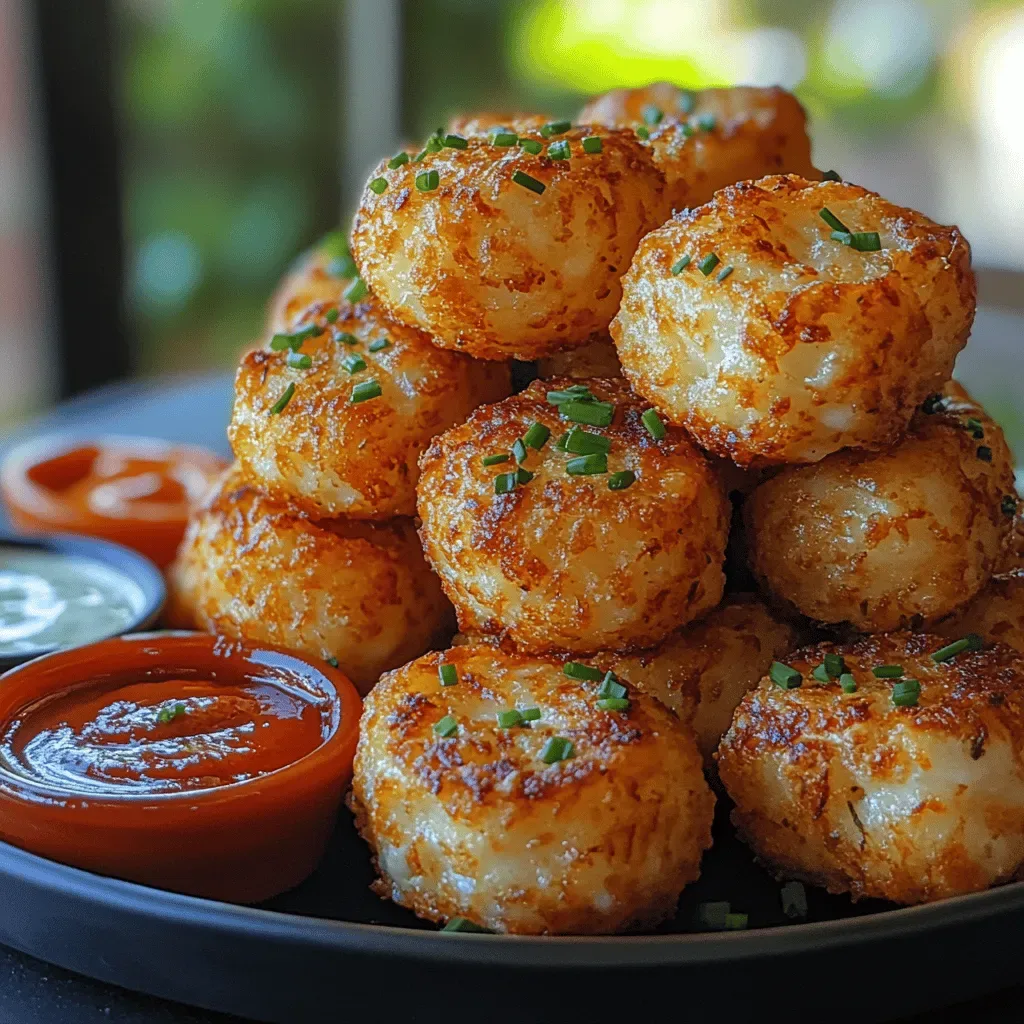
Imagine biting into a perfectly crisp, golden‑brown morsel that melts into a fluffy, buttery interior—welcome to Tater Tot Bliss, the ultimate homemade tater tot experience. This recipe elevates the classic comfort food by using fresh potatoes, a simple seasoning blend, and a fool‑proof technique that guarantees every tot is crunchy on the outside and cloud‑soft inside.
What makes this dish special is the balance between texture and flavor: a light coating of seasoned flour creates a delicate crust, while a drizzle of melted butter adds richness without weighing the tots down.
Breakfast lovers, brunch crowds, and even late‑night snack seekers will adore these tots. Serve them alongside eggs, as a side to a hearty brunch casserole, or simply with your favorite dipping sauce for a crowd‑pleasing treat.
The process is straightforward: grate potatoes, rinse and dry, coat, shape, and bake (or fry) to golden perfection. Follow each step, and you’ll have restaurant‑quality tots without ever leaving the kitchen.
Why You'll Love This Recipe
All‑Natural Goodness: Fresh potatoes give you a pure, potato‑forward flavor that frozen mixes can’t match, while the simple seasoning lets the tuber shine.
Crisp‑to‑Fluffy Contrast: The light flour coating creates a crackly crust, and the interior stays airy and buttery, delivering that addictive bite‑after‑bite sensation.
Customizable Shape: Whether you prefer classic bite‑size tots or larger potato pillows, the recipe scales easily to any size you crave.
Brunch‑Ready Speed: With just 20 minutes of prep and a quick bake, these tots fit perfectly into a busy morning or a lazy weekend brunch.
Tips & Tricks
Perfecting the Recipe
Dry the Potatoes Thoroughly. After rinsing, press the shreds with a clean towel for at least 2 minutes. Any residual water creates steam, which prevents the crust from forming.
Don’t Over‑Mix the Flour. Lightly toss the potatoes with flour; over‑mixting releases more starch and can make the coating gummy.
Use a Hot Oven. A fully preheated oven guarantees the instant sizzle that locks moisture inside while crisping the outside.
Space the Tots. Give each tot room to breathe; crowding leads to soggy bottoms.
Flavor Enhancements
Add a pinch of smoked paprika to the flour for a subtle smoky note, or mix in grated Parmesan for cheesy depth. A dash of truffle oil drizzled after baking turns ordinary tots into a gourmet side.
Common Mistakes to Avoid
Skipping the drying step leads to soggy tots. Also, avoid using low‑heat baking; the crust will stay pale and soft. Finally, don’t skip the final broil—without it the tots lose that signature crunch.
Pro Tips
Freeze Before Baking. Lay raw tots on a tray and freeze for 20 minutes; this firms them up, resulting in an even crispier exterior.
Use a Wire Rack. Placing the tots on a wire rack set over a baking sheet allows hot air to circulate all sides, promoting uniform browning.
Season Immediately. While the tots are still hot, toss them with a little extra salt and fresh herbs for an extra flavor burst.
Serve with Acid. A squeeze of lemon or a splash of hot sauce cuts through the richness and brightens each bite.
Variations
Ingredient Swaps
Swap Russet potatoes for Yukon Gold for a buttery flavor, or try sweet potatoes for a vibrant orange twist. Replace the all‑purpose flour with chickpea flour for a gluten‑free version, and add a teaspoon of cumin for a warm, earthy note.
Dietary Adjustments
For a vegan spin, use plant‑based butter or olive oil instead of dairy butter. Gluten‑free diners can substitute the flour with a certified gluten‑free blend. To keep it keto, skip the flour entirely and coat the potatoes lightly with almond flour mixed with Parmesan.
Serving Suggestions
Pair the tots with poached eggs and avocado for a brunch plate, or serve them alongside a hearty chili for a comforting dinner. They also shine as a snack with a trio of dips—spicy sriracha mayo, cool ranch, and tangy tzatziki.
Storage Info
Leftover Storage
Allow the tots to cool completely, then transfer them to an airtight container. In the refrigerator they stay fresh for 3‑4 days. For longer keep, portion into freezer‑safe bags, squeeze out excess air, and freeze up to 3 months.
Reheating Instructions
Reheat frozen or refrigerated tots in a preheated 400°F oven on a wire rack for 10‑12 minutes, turning once, until the exterior regains its crunch. For a quicker fix, pop them in an air‑fryer at 380°F for 5‑6 minutes. Avoid microwaving alone, as it makes them soggy.
Frequently Asked Questions
Can I make the tots ahead of time?
Should I bake or fry for the best texture?
What’s the best dip for these tots?
This guide walks you through every step of creating perfectly crispy, golden homemade tater tots—from selecting the right potatoes to mastering the bake‑and‑broil technique. With optional variations, storage tips, and troubleshooting advice, you’ll feel confident serving these tots for brunch, a snack, or a side dish. Feel free to experiment with seasonings or dips; the best part of cooking is making the recipe your own. Enjoy the blissful crunch of your very own tater tots!
Tater Tot Bliss: The Ultimate Guide to Crispy & Golden Homemade Tater Tots
Delicious Tater Tot Bliss: The Ultimate Guide to Crispy & Golden Homemade Tater Tots
Ingredients
Main Ingredients
- 3 large Russet potatoes (about 2 lb)
- 1 ½ cups all‑purpose flour
- 2 tablespoons melted unsalted butter
Seasonings
- 1 teaspoon kosher salt
- ½ teaspoon freshly ground black pepper
- ¼ teaspoon garlic powder
Optional Dipping Sauce
- ½ cup sour cream
- 2 tablespoons chives, finely chopped
- 1 teaspoon lemon juice
Instructions
Cooking (Bake for Golden Perfection)
- Preheat the Oven. Set your oven to 425°F (220°C) and let it fully heat for at least 10 minutes. A hot oven creates the initial burst of steam that lifts the crust, ensuring a uniform golden color.
- Lightly Oil the Sheet. Brush the parchment with a thin layer of oil or spray with cooking spray. This prevents sticking and contributes to an even browning on the bottom side of each tot.
- Initial Bake. Slide the sheet into the oven and bake for 12‑15 minutes, turning the tots halfway through. You’ll see the edges begin to crisp and turn a light amber hue.
- Finish with a Broil. Switch the oven to the broil setting for the last 2‑3 minutes. Keep a close eye—once the tops turn deep golden and you hear a faint crackle, they’re done. This final blast gives the signature crunch.
- Rest and Serve. Remove the tots and let them rest for 2 minutes. This short rest lets the interior settle, keeping the exterior crisp. Serve immediately with the optional sour‑cream dip or your favorite sauce.
Similar Recipes
 Appetizers
Colorful Turkey-Stuffed Mini Bell Peppers
Delicious Colorful Turkey-Stuffed Mini Bell Peppers
 Appetizers
Quick Crispy Rice Salad with Peanut Sesame Dressing
Learn how to make delicious Quick Crispy Rice Salad with Peanut Sesame Dressing. Easy recipe with…
 Appetizers
Spicy-Sweet Hot Honey Tortellini Pasta Salad
Delicious Spicy-Sweet Hot Honey Tortellini Pasta Salad
 Appetizers
Basil Bliss & Roasted Tomato Soup: A Comforting Culinary Delight
Delicious Basil Bliss & Roasted Tomato Soup: A Comforting Culinary Delight
 Appetizers
35-Minute Mini Quiches Met Prei – Irresistible Party Magic
Learn how to make delicious 35-Minute Mini Quiches Met Prei – Irresistible Party Magic. Easy recipe…
 Appetizers
Roasted Fig & Goat Cheese Crostini: A Sophisticated Appetizer
Delicious Roasted Fig & Goat Cheese Crostini: A Sophisticated Appetizer
 Appetizers
Irresistible Italian Crescent Roll Sandwich Bake for Dinner Bliss
Learn how to make delicious Irresistible Italian Crescent Roll Sandwich Bake for Dinner Bliss. Easy recipe…
 Appetizers
Island Breeze Bomb Recipe
Learn how to make delicious Island Breeze Bomb Recipe. Easy recipe with step-by-step instructions.

Caroline
I cook these recipes at home before they ever land here — simple ingredients, clear steps.