Crunchy Cottage Cheese Crisps: A Healthy Snack Revolution
 Save
Save
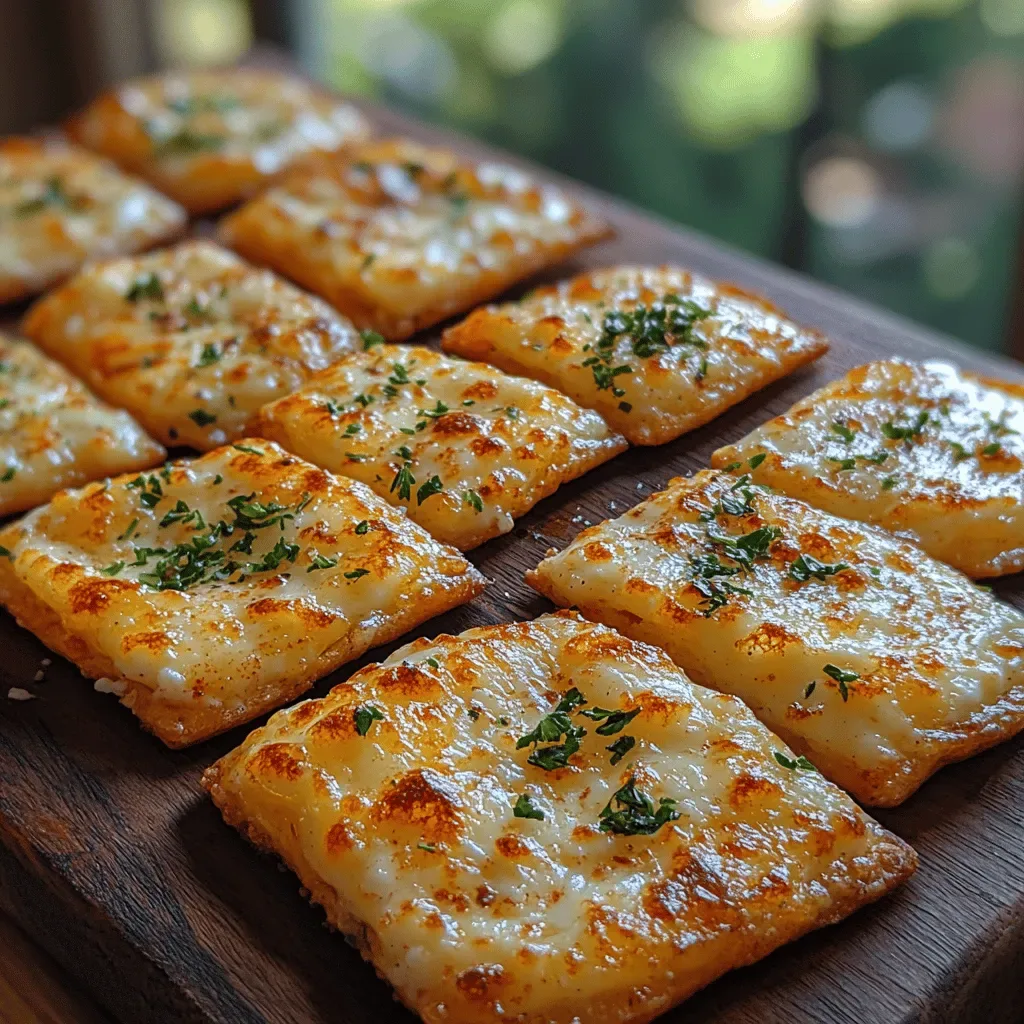
Imagine a snack that satisfies a craving for crunch, delivers a protein punch, and still feels light enough for a brunch table. Crunchy Cottage Cheese Crisps turn that vision into reality, offering a guilt‑free bite that’s both savory and delightfully crisp.
What makes these crisps stand out is the clever use of cottage cheese as a moisture‑rich base, combined with a thin coating of almond flour and Parmesan that browns to a golden snap. The result is a snack that feels indulgent without the excess calories of traditional chips.
Breakfast lovers, brunch hosts, and anyone hunting for a portable snack will adore these bites. They’re perfect for a mid‑morning pick‑me‑up, a light side for avocado toast, or a protein‑boosted addition to a yogurt parfait.
The process is straightforward: blend cottage cheese with egg whites, fold in seasonings, shape tiny rounds on a sheet pan, and bake at high heat until the edges turn crisp. A quick drizzle of olive oil ensures an even, buttery finish.
Why You'll Love This Recipe
Protein‑Packed Crunch: Cottage cheese and egg whites provide a solid protein foundation, making each bite a satisfying fuel source that keeps you full longer.
Low‑Carb, High‑Flavor: With just a touch of almond flour and Parmesan, the crisps stay low on carbs while delivering a rich, umami‑laden taste.
Speedy Preparation: From mixing to baking, the entire recipe takes under 30 minutes, perfect for busy mornings or a quick brunch fix.
Customizable & Fun: Swap herbs, add spices, or sprinkle seeds for endless flavor variations, letting you tailor each batch to your taste.
Tips & Tricks
Perfecting the Recipe
Pat the cottage cheese dry. After blending, spread the mixture on a clean towel for 2 minutes to remove excess moisture; this yields a crisper final texture.
Uniform size matters. Using a scoop ensures each crisp bakes evenly, preventing some from being under‑cooked while others burn.
Watch the color. When the edges turn a deep golden‑amber, they’re done; a lighter hue means they need a minute or two more.
Flavor Enhancements
Add a pinch of dried rosemary or thyme to the batter for an earthy note. A dash of nutritional yeast gives a cheesy depth without extra dairy. For a subtle heat, sprinkle a few red‑pepper flakes just before baking.
Common Mistakes to Avoid
Avoid overcrowding the pan; too many crisps steam instead of crisp, resulting in soggy patches. Also, don’t skip the olive‑oil brush—without it the tops can dry out and lose their glossy finish.
Pro Tips
Use a convection setting. If your oven has a fan, set it to convection for an even, faster crisping without extra oil.
Store in a single layer. After cooling, keep the crisps in a paper‑lined container in a single layer to preserve crunch.
Season while hot. Lightly salt the crisps immediately after they exit the oven; the heat helps the seasoning adhere better.
Variations
Ingredient Swaps
Replace almond flour with finely ground oat flour for a milder taste, or swap Parmesan for nutritional yeast to keep the dish vegan. For a Mediterranean twist, add sun‑dried tomato bits or olives to the batter before baking.
Dietary Adjustments
To make the crisps completely dairy‑free, use a plant‑based cottage cheese alternative and omit Parmesan, substituting a tablespoon of ground flaxseed mixed with water as a binder. For a keto version, keep the almond flour ratio low and add a dash of erythritol for a subtle sweetness.
Serving Suggestions
Pair the crisps with a dollop of avocado‑lime crema, a side of fresh berries, or a simple mixed‑green salad drizzled with lemon vinaigrette. They also make a crunchy topping for soup bowls or a protein boost in a brunch charcuterie board.
Storage Info
Leftover Storage
Allow the crisps to cool completely, then transfer them to an airtight container lined with a paper towel to absorb any residual moisture. Store in the refrigerator for up to 4 days. For longer keeping, freeze in a single‑layer tray, then move to a zip‑top bag; they retain texture for up to 2 months.
Reheating Instructions
Re‑crisp frozen or refrigerated leftovers by spreading them on a baking sheet and heating at 350°F (175°C) for 5–7 minutes, or until the edges regain their snap. A quick microwave burst will soften them, so the oven method is preferred for preserving crunch.
Frequently Asked Questions
Can I make these crisps ahead of time?
Will the crisps stay crunchy after a day?
Can I substitute the cottage cheese with a dairy‑free alternative?
What’s the best dipping sauce for these crisps?
Crunchy Cottage Cheese Crisps bring together protein, flavor, and texture in a snack that feels both indulgent and wholesome. By following the step‑by‑step guide, mastering a few key tips, and experimenting with the suggested variations, you’ll have a versatile brunch staple that can be customized to any palate. Let your creativity run wild—add herbs, spices, or sweet touches to make each batch uniquely yours. Enjoy the satisfying crunch and the boost of nutrition with every bite!
Crunchy Cottage Cheese Crisps: A Healthy Snack Revolution
Delicious Crunchy Cottage Cheese Crisps: A Healthy Snack Revolution
Ingredients
Main Ingredients
- 1 cup low‑fat cottage cheese
- 2 large egg whites
- ¼ cup finely ground almond flour
- ¼ cup grated Parmesan cheese
Seasonings & Herbs
- ½ teaspoon garlic powder
- ½ teaspoon onion powder
- ¼ teaspoon smoked paprika
- ¼ teaspoon sea salt
- ¼ teaspoon freshly ground black pepper
- 1 tablespoon chopped fresh chives (optional)
Instructions
Incorporating Dry Elements
- Combine flours and cheese. Sprinkle the ¼ cup finely ground almond flour and ¼ cup grated Parmesan over the wet mixture. Stir gently with a spatula until the dry ingredients are evenly distributed, forming a thick batter that clings to a spoon.
- Season the batter. Add the garlic powder, onion powder, smoked paprika, sea salt, and black pepper. Mix until the spices are uniformly blended; this step ensures every crisp carries the same depth of flavor.
- Optional herb boost. Fold in the chopped chives if you enjoy a bright, oniony pop. The herbs are optional but they lift the overall flavor profile.
Baking to Perfection
- Preheat the oven. Set your oven to 425°F (220°C) and allow it to fully heat for at least 10 minutes. A hot oven creates an immediate crust, preventing the crisps from spreading too much.
- Oil the tops. Lightly brush each mound with the 1 teaspoon extra‑virgin olive oil. This step promotes even browning and adds a subtle richness without making the snack greasy.
- Bake. Place the sheet in the center rack and bake for 12–15 minutes, or until the edges turn golden‑brown and the tops feel firm to the touch. Rotate the pan halfway through for uniform color.
- Cool briefly. Remove the crisps and let them rest on a wire rack for 5 minutes. They will continue to firm up as they cool, achieving that signature crunch.
Similar Recipes
 Appetizers
Irresistible Chocolate Fudge Mooncakes for Your Sweet Tooth
Learn how to make delicious Irresistible Chocolate Fudge Mooncakes for Your Sweet Tooth. Easy recipe with…
 Appetizers
Outback-Style Loaded Potato Soup: A Comforting Recipe to Warm Your Soul
Delicious Outback-Style Loaded Potato Soup: A Comforting Recipe to Warm Your Soul
 Appetizers
Tomato Basil Grilled Cheese Melts
Delicious Tomato Basil Grilled Cheese Melts
 Appetizers
Crispy BBQ Cauliflower Tacos: A Flavorful Plant-Based Delight
Delicious Crispy BBQ Cauliflower Tacos: A Flavorful Plant-Based Delight
 Appetizers
Crunchy Chicken Bliss
Delicious Crunchy Chicken Bliss
 Appetizers
Hatch Chili Cornbread Waffle Bites Recipe
Delicious Hatch Chili Cornbread Waffle Bites Recipe
 Appetizers
Crispy Baked Zucchini Fries with Marinara Sauce
Delicious Crispy Baked Zucchini Fries with Marinara Sauce
 Appetizers
Savory Chicken Parmesan Meatballs: A Delicious Italian Delight
Delicious Savory Chicken Parmesan Meatballs: A Delicious Italian Delight

Caroline
I cook these recipes at home before they ever land here — simple ingredients, clear steps.