Berry Bliss Lemonade Popsicles: A Refreshing Summer Treat
 Save
Save
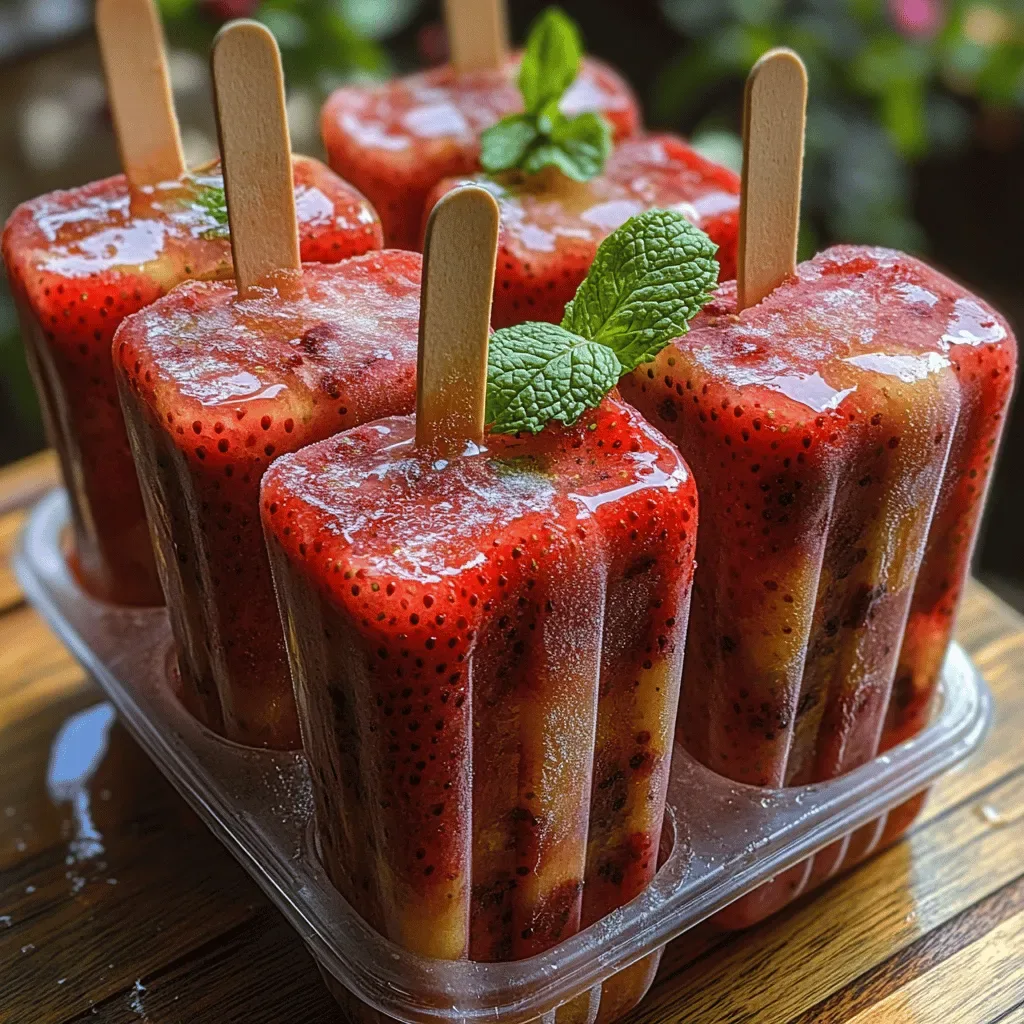
Imagine the first bite of summer: bright citrus, sweet berries, and a cool, icy texture that melts on your tongue. Berry Bliss Lemonade Popsicles capture that moment perfectly, turning a classic brunch beverage into a playful, handheld treat that feels both nostalgic and novel.
What sets this recipe apart is the harmonious marriage of tart lemonade with a medley of fresh berries, all sweetened just enough to let the fruit shine. A splash of vanilla and a hint of mint elevate the flavor profile, creating depth without overwhelming the palate.
This frozen delight is ideal for families with kids, brunch gatherings, or anyone craving a light, refreshing bite after a hearty morning meal. Serve it alongside avocado toast, fluffy pancakes, or a crisp garden salad for a balanced brunch spread.
The process is straightforward: blend, sweeten, pour into molds, and freeze. With only a few minutes of hands‑on work and a little patience, you’ll have a vibrant, palate‑pleasing pop that looks as good as it tastes.
Why You'll Love This Recipe
Bright & Refreshing: The citrus‑lemon base awakens the taste buds while the berries add natural sweetness, delivering a burst of summer flavor in every bite.
Kid‑Friendly Fun: Easy to hold and eat, these popsicles turn healthy fruit into a playful snack that children love without any added artificial colors.
Minimal Ingredients: With just a handful of pantry staples and fresh produce, you can whip up a gourmet‑looking treat without a long grocery list.
Customizable: Swap berries, add herbs, or adjust sweetness to fit any dietary preference, making each batch uniquely yours.
Tips & Tricks
Perfecting the Recipe
Use ripe berries. Over‑ripe fruit can become mushy, while under‑ripe berries stay too firm and may not release enough juice for a smooth base.
Don’t over‑blend. A few tiny fruit pieces add texture and visual interest; over‑blending creates a uniform puree that can look bland.
Chill the mixture. Refrigerate the blended liquid for 15 minutes before pouring into molds; this speeds up the freezing process and reduces ice crystal formation.
Level the molds. Use a spatula to smooth the tops of each cavity, ensuring even thickness and a professional look.
Flavor Enhancements
Add a teaspoon of finely grated lemon zest for extra citrus aroma, or swap half the berries for mango chunks for a tropical twist. A splash of sparkling water in the blend creates a lighter, almost fizzy mouthfeel that feels especially refreshing on hot mornings.
Common Mistakes to Avoid
Avoid using frozen berries straight from the bag; they release excess water, resulting in a watery pop. Also, don’t forget to leave headspace in the molds—without it, the mixture expands and may crack, ruining the smooth surface.
Pro Tips
Layer flavors. Pour half the base, add a swirl of pureed mint‑lemon syrup, then finish with the remaining base for a marbled visual effect.
Use silicone molds. They release pops effortlessly and come in fun shapes—perfect for brunch presentations.
Store in a single layer. When freezing multiple batches, keep pops on a tray before transferring to a bag; this prevents them from sticking together.
Serve with a garnish. A tiny fresh berry or a mint leaf on the stick adds a polished finishing touch.
Variations
Ingredient Swaps
Swap strawberries for sliced peaches for a softer flavor, or replace blueberries with blackberries for a deeper, slightly tart note. Coconut milk can replace yogurt to create a dairy‑free, tropical version, while a drizzle of maple syrup offers a richer, earthier sweetness than honey.
Dietary Adjustments
For a vegan pop, use agave nectar instead of honey and coconut or almond yogurt in place of Greek yogurt. Those following a low‑sugar diet can halve the honey and rely on the natural sweetness of the berries, or use a sugar‑free stevia blend. All ingredients are naturally gluten‑free.
Serving Suggestions
Pair the pops with a light ricotta toast topped with a drizzle of honey, or line a brunch buffet with fresh fruit salads and granola. A chilled glass of sparkling water with a lemon twist complements the citrus notes, while a side of mini croissants adds a buttery contrast.
Storage Info
Leftover Storage
Once you’ve enjoyed the first round, keep any remaining pops in a sealed plastic bag or airtight container placed directly in the freezer. They’ll stay at peak quality for up to 3 months. For easier removal, store them upright on a freezer-safe tray, which prevents them from sticking together.
Reheating Instructions
Popsicles are meant to be served frozen, but if you prefer a softer texture, let them sit at room temperature for 5‑7 minutes before eating. For a quick melt‑down, run the stick under warm water for a few seconds; this loosens the pop without melting the interior completely.
Frequently Asked Questions
Can I make these popsicles ahead of time for a weekend brunch?
What if I don’t have fresh mint? Can I use another herb?
Can I use a regular ice‑cream maker instead of molds?
How sweet should the mixture be for a balanced flavor?
Berry Bliss Lemonade Popsicles bring the bright, sunny spirit of summer straight to your brunch table with minimal effort. By following the detailed steps, using fresh berries, and applying a few pro tips, you’ll create a stunningly colorful, refreshingly tangy treat that everyone will love. Feel free to experiment with fruit combos, herbs, or dairy‑free options—making it your own is part of the fun. Grab a stick, take a bite, and enjoy the cool burst of flavor!
Berry Bliss Lemonade Popsicles: A Refreshing Summer Treat
Delicious Berry Bliss Lemonade Popsicles: A Refreshing Summer Treat
Ingredients
Fruit & Base
- 1 cup fresh strawberries, hulled
- 1 cup fresh blueberries
- ½ cup fresh raspberries
- ¾ cup freshly squeezed lemon juice (about 4 lemons)
Sweeteners & Creamy Elements
- 2 tablespoons honey (or agave for vegan)
- ½ cup plain Greek yogurt (optional for creaminess)
Flavor Boosters
- 1 teaspoon pure vanilla extract
- ¼ cup fresh mint leaves, loosely packed
- Pinch of sea salt
Instructions
Freezing the Popsicles
- Prep the molds. Arrange wooden or silicone popsicle sticks in your molds, ensuring they sit upright. Lightly spray the interior with non‑stick cooking spray to make removal effortless later.
- Fill the molds. Pour the fruit mixture into each cavity, leaving about ¼ inch of space at the top. This headroom allows the liquid to expand as it freezes, preventing cracks.
- Insert sticks. If using a silicone mold with built‑in sticks, simply place them now. For wooden molds, gently push the sticks through the mixture until they’re centered.
- Freeze. Transfer the molds to the freezer and let them set for a minimum of 4 hours, or overnight for a firmer texture. Avoid moving the molds while the mixture is still liquid to keep the swirls intact.
- Release and serve. Run the outside of each mold under warm water for 5‑10 seconds. This quick shock loosens the pops without melting the interior. Gently lift each pop out, pat dry, and arrange on a serving platter.
Similar Recipes
 Desserts
Discovering the Delight of Blueberry Cream Cheese Bites
Delicious Discovering the Delight of Blueberry Cream Cheese Bites
 Desserts
Oreo Delight No-Bake Cheesecake Bars Recipe
Delicious Oreo Delight No-Bake Cheesecake Bars Recipe
 Desserts
Sweet & Sunny Cornbread Muffins
Delicious Sweet & Sunny Cornbread Muffins
 Desserts
No Bake Christmas Cookie Lush: 7 Simple Layers for Holiday Ease
Learn how to make delicious No Bake Christmas Cookie Lush: 7 Simple Layers for Holiday Ease.…
 Desserts
The Ultimate Carrot Cake Recipe
Discover the ultimate carrot cake recipe with grated carrots, warm spices, and a creamy frosting. Perfect…
 Desserts
Peanut Butter Chocolate Rice Krispie Treat Cups
Learn how to make delicious Peanut Butter Chocolate Rice Krispie Treat Cups. Easy recipe with step-by-step…
 Desserts
Frozen Chocolate Peanut Butter Swirl Bars: Crafting the Final Layers of Delight
Delicious Frozen Chocolate Peanut Butter Swirl Bars: Crafting the Final Layers of Delight
 Desserts
Peanut Buster Parfait: Indulgent Layers of Sweet Joy
Learn how to make delicious Peanut Buster Parfait: Indulgent Layers of Sweet Joy. Easy recipe with…

Caroline
I cook these recipes at home before they ever land here — simple ingredients, clear steps.